
Most hunting and hiking boots are made with Gore-Tex protective and water-proof membrane, but with time they will break down little by little and thus won’t be as good at protecting your feet. This is when you have more often wet feet after several hours of trekking in wet areas or swamps, and as a result, your feet can get colder with time and you can even catch the flu.
To avoid all these unpleasant consequences and keep your feet comfortable, warm, and dry, you will have to protect your boots in a different way. In this article, you will learn how to waterproof your boots efficiently and thus prolong their life. Check out our piece on how to choose the best hiking boots to make sure you get the best shoes yet.
Another quick way to protect your boots from cracking the thin membrane is to simply avoid direct heat – from fireplaces and campfires to heating systems at your house or home.
Useful tips and ways to keep your boots waterproof
If you have all-leather boots, then you can successfully protect them with ordinary wax. It is often the case that many people try different oils and other sealants specific for boots, but ordinary wax is miraculous when it comes to keeping your boots waterproof. Here is how to apply the wax so you can be sure to have the desired result.

A great and very popular bee’s wax you can readily find on the market is the Kiwi Camp Dry beeswax. It’s also very useful not only for leather but also for fabric and even synthetic materials. It can virtually help repel water from any possible product – from boots to tents and outdoor gear.
Take both the wax and your pair of boots and place them in a nice warm place. Make sure your boots are clean from dirt or dried mud. As we said above, heat will damage the boots, but in order for the wax to work as intended you need to warm it and the boots slightly. Let them simply stay in soft warmth for some time.
The boots must be warm to the touch, but not hot of course. Then take the wax and apply it with a tissue or cloth on the leather area of your boots. Make sure to avoid contact with your fingers and hands (or you will make them waterproof also). In addition, don’t apply the wax on the rubber (or any plastic) part of your boot, but only on the leather area.
When you’re done with that, place the boots on the same warm spot as in the beginning. Let them stay from one hour up to one night, until the wax is well absorbed and wipe out any excess wax. You can do this procedure once every month or two. You will definitely be able to recognize when the wax is no longer protecting your boots the same way as in the beginning – your boots will look drier and slightly cracked and scuffed.
Optionally, you can remove the wax yourself using a damp cloth and special leather soap (not regular washing soap or detergent). Brush away the old wax and then reapply a new dose, just like we explained above. Beeswax can successfully protect your boots from several months to up to a year.

In addition to the above method, you can also mix beeswax and Vaseline together and when you melt them, apply them with a painting brush. Use a heat gun for several seconds to allow the wax and Vaseline to get absorbed in the leather itself. That’s a far more efficient way of making sure your boots will be waterproof for longer than with ordinary wax.
Here is an instructional YouTube video, which can be followed in either of the above two versions.
Another great way to protect your boots from getting soaked is to simply use a waterproof spray. These are very quick to use and if you don’t have the extra time to follow the above instruction, you can just get a waterproof spray and be done with it.
So, clean the boot, use a brush to remove any dirt or dried mud, and then wash it under running water. Dry the boot with a clean cloth but don’t let the boots get entirely dried (it’s best they are slightly damp), and then measure about 6 inches of distance from your spray and push the spray button.
Keep in mind that dampness helps the spray be better absorbed and will easily penetrate the leather’s fibers. Spray on little amounts all over the boot, thus the spray will be absorbed more evenly. When you’re done with that, you have to leave the boots to rest for a night or several hours at least.

As you apply any of the above products, don’t forget to pay special attention to the seam and joint areas – these make any boot susceptible to water leaking in. You need to be sure that seams and joints will be properly soaked with the waterproof spray, conditioner, or wax you use.
In addition to the above wax-based protective pastes, you can also use waterproof compound solutions. Their main purpose is to protect, as they don’t give special shine or polish to your boots. They also tend to wear off slower thus protecting for longer periods. So, if you want to have a shine to the leather, you can apply additionally some special wax or leather polish.
When you first apply the conditioner you can let it work for a while – several minutes should do. Don’t let the conditioner work for too long though, because it may soften the leather too much. This is also another reason why you need to wipe any excess wax or conditioner you apply.
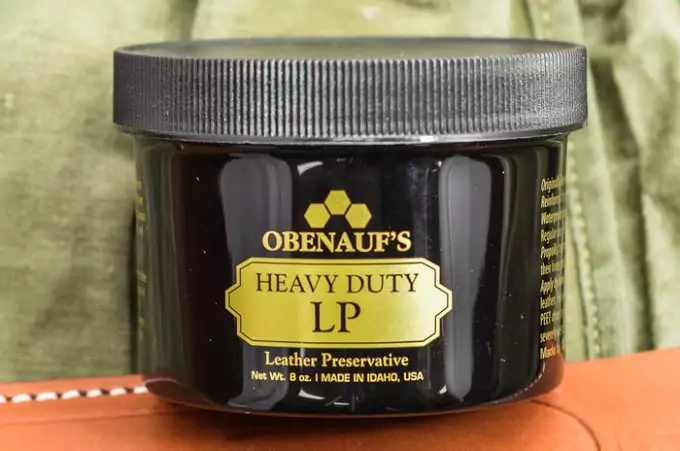
A good example of waterproof compounds is Obenhauf’s Heavy Duty compound crème. This type of conditioner also protects your boots from mildew and mold, which is definitely a plus, since leather can retain water and thus promote mold build-up. The conditioner also keeps the leather from cracking and keeps it fresh and durable for longer. Applying it is no different than the above methods – you can apply it with a cloth on your clean boots and then wipe the excess conditioner.
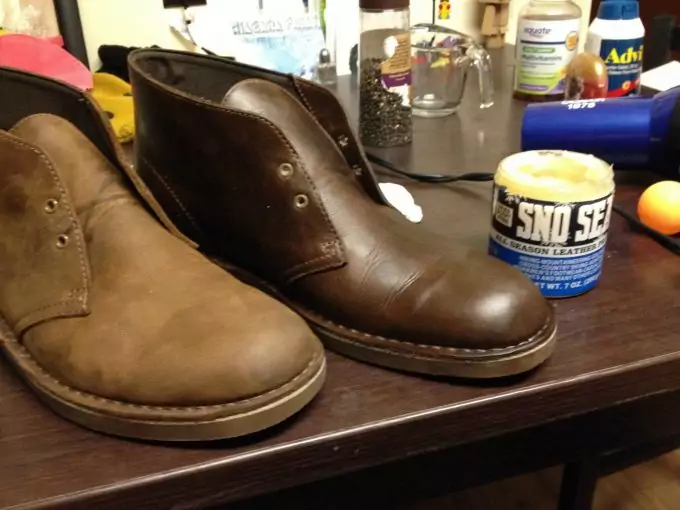
Another such compound conditioner is the Sno-Seal Weather Protectant. It’s made of beeswax. It is a great water-proof product without softening the leather too much and can retain its properties even in low to freezing temperatures. It lets the leather breathe, so there’s no risk of increased moisture build-up inside the boots, while you’re using them.
It is also important to note that, while you clean and wash your boots, before you apply any of the above solutions, conditioners and wax, if you discover mold somewhere on the outside of the leather you must remove it. You can mix water with vinegar (4:1) and then use this solution to wipe out the mold. Use any type of brush (old toothbrush or vegetable brush) to scrub away the mold.
Be careful with the brushing though, because this has an abrasive effect and may slightly damage the outer layer of your leather boot. As long as you move gently with the brush you may have to do this several times until the mold is gone.
Also, if you want to make sure that your boots are clean enough, you can also wash them in a small basin and use a water hose to remove any accumulated dirt and dried mud. Let the boots either dry at room temperature or use a fan to speed up the process.
Remember to keep both the insoles and shoelaces away (removed) from the boots so that your cleaning can be effective. If any water went into the boot, you can then put some paper inside the boot – it will absorb any remaining moisture. When the paper got soaked, remove it and place a new piece. You can be sure there’s no more moisture when the paper is dry when you remove it.
Special attention must be put to leather-like nubuck and suede. These need more attention when it comes to making them waterproof, without damaging the soft surface. So, first of all, you can begin by removing any dirty patches, brushing off dried mud, etc. You can then go to a well-ventilated area and use a waterproof spray, especially used for suede and nubuck leather, and spray up to 6 coatings.
Spray lightly and from a distance of several inches so that the spray solution can gently cover the boot’s surface, without accumulating too much on one spot only. When you did this first procedure, let the boots dry slightly for several minutes and repeat the same procedure. Before you apply the third and final coating, let the boots stay for 20 minutes to let the spray soak in well, then do the final coating.
You can do this procedure every several months depending on the climate you live in or the frequency of your hiking or hunting trips. To give your suede and nubuck boots special care, you can get a Meltonian Suede and Nubuck kit It has everything you need – from the brush to remove dirt and prepare the boot for the spray, and the spray and creme itself. The brush is found on the top of the can.

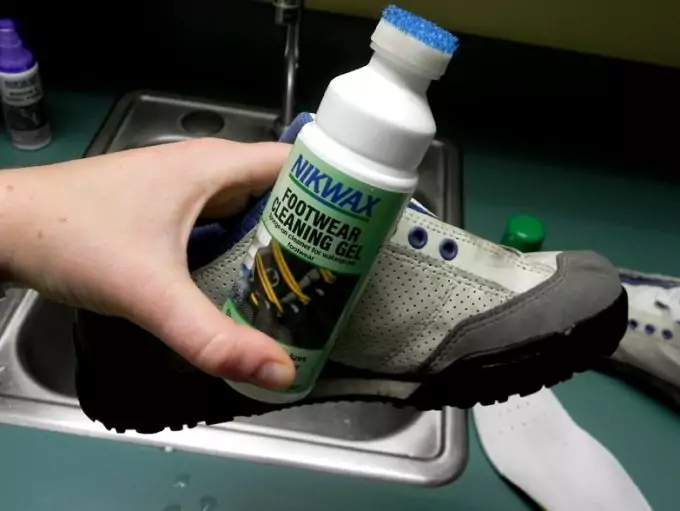
Optionally you can choose to use Nikwax Nubuck and Suede Proof spray. It is often considered one of the best products protecting your nubuck and suede leather boots. You only need to remove the dirt using either a very soft brush or a slightly damp cloth.
You can use a Nikwax Cleaning gel for this, otherwise, washing with water and leather soap is enough. Then take the Nikwax spray, shake it well, then you need to press the sponge so you can break the cap seal. Make sure your boots are slightly damp and then put a generous amount of the spray on the boot’s surface. Spray from an average distance of 5-6 inches. If there’s any excess spray solution on the boot after several minutes, wipe it out and let it dry completely before you go test your boots.
Keep in mind that suede and nubuck may change their colors and darken slightly. It usually happens with any product you decide to use.
Final tips and considerations to waterproof your boots
Overall, if you tend to spend a lot of time in muddy areas and have to go through swamps or a lot of water, then using grease-based products and sprays is the best option. Don’t use grease-based sprays on suede or nubuck. This may create unpleasant stickiness to your leather boots and it may take a lot more time to remove and reapply. Also, grease attracts dirt more easily and in combination with nubuck and suede, this means, more overall mud and dirt on your boots, which is exactly what you want.
You can also consider silicone sprays. They create slick surfaces, especially on ordinary leather boots. Silicone is used a lot on hiking gear and tents since it successfully repels water and moisture. If you want to use silicone on your suede or nubuck boots, pick a water-based silicone spray and don’t spray too much of it, since silicone tends to dry the leather too quickly and may promote cracks on the boot’s surface.

The latest invention on the market is the so-called acrylic copolymer. It creates an invisible and very fine web over the boot and prevents water from outside to penetrate the net and get into the boot. But it’s porous enough to let moisture out of the boot.
The good thing about this spray is that it doesn’t affect in any way the color or texture of the leather and it doesn’t make it slippery like silicone products. It is even often used to restore the color of some older leather shoes.
Finally, the best thing you can do is test these above methods and products on your shoes and see which works for you. And a word of caution – don’t use sprays or conditioners for suede/nubuck on traditional leather boots, and vice versa.
For more caring tips such as how to wash and clean your hiking boots, read our article on the topic.

Here is a tip how to not get wet feet when walking on a rainy day. This is great for sneakers because most are not waterproof. Just use hairspray, it will keep rain drops from soaking your shoes.
I strongly recommend Sno-seal to waterproof leather boots. I’ve been using it for a considerable length of time, and it works admirably. It doesn’t solidify like pure beeswax does.
I simply warm up the boots on the stove, on low heat, then rub it in with a cloth. The primary treatment regularly requires more than one application.
I’ve also used Sno-seal for my leather boots. I remove the laces, and apply the Sno-seal generously and dry it with a heating gun. I don’t use the oven because it might ruin the leather. The boots are hardened like a regular beeswax. The only downside of using Sno-seal is that it darkens light colored desert boots. If you don’t like it, use a non-coloring waterproofing measures, such as mink oil.
If I use Sno-seal for my boots, are they really waterproof? I know they will surely help with the rain and mist, but can I submerge my boot in a creek and still be dry?
It all depends on how well the boots are waterproofed.