
In any off-grid and SHTF scenario, it is less likely that you will be able to use your fridge for preserving your food, even though you might be well prepared and equipped with an alternative energy source. In a scenario where there is no chance of keeping your fridge working, the meat will be the first to spoil and become completely useless.
In case you can cope with that, you don’t need to think of a way to preserve meat and keep it fresh and usable, but if you can’t imagine your life without this fat and protein source that is a very important part of our everyday nutrition, then we will teach you a couple of old fashion ways to preserve your meat and keep it usable.
Table of contents
Canning
This is one of the simplest, most common, and easiest techniques that can be done by anyone and in any condition. If you know how to can fruits and veggies, you won’t have any troubles with canning meat in order to preserve it and use it later when you need it. The best way of preserving meat by canning is by first cooking the meat and exposing it to high temperatures so you could kill bacteria and keep it safe for usage.
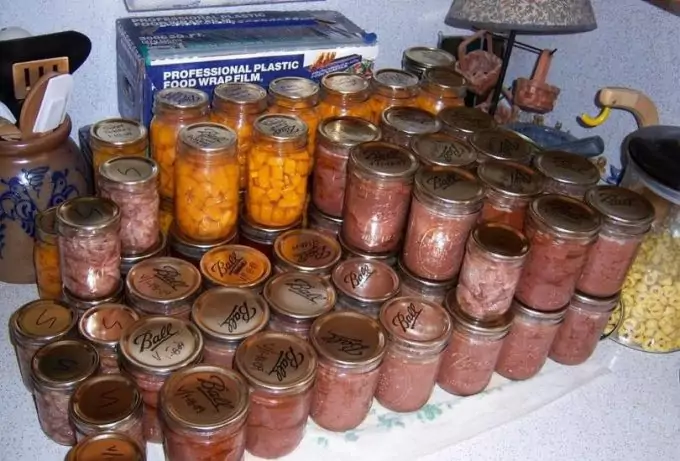
Instead of canning raw meat, a better option would be to cook it first. For example, you can make a tasty dish with spices and sauce containing meat chunks and then can it with a pressure canner. You can make beef or a chicken stew, or you can use pork to make a meal out of it and then cook it well before canning.
Raw Meat
Many people look upon this idea covered with a veil of skepticism as meat really decays fast and easily and unlike fruits that can still be used for something (at least for making jams), meat is useless and full of bacteria once it starts spoiling. The smell of rotting meat itself is a reason enough to make you throw it in a trash can. We rely on our fridge to keep the raw and cooked meat equally fresh whereas cooked meat will last a bit longer in a fridge, but even if you can’t use your fridge and you would like to preserve raw meat, you can do it.
The process requires a bit more time than originally needed for canning cooked meat, but it is worth your time if you want to have a stash of raw eatable meat on your off-grid shelf.
Before you start processing the meat for canning, you first need to know how the meat ages as its expiration date will greatly depend on the type of meat you are using as well as on other factors, such as bruising and fat chunks on meat pieces. All fat and bones should be removed before cooling and canning meat so that the quality of your meat won’t be affected by those factors.
Bruising can also affect the meat, so make sure you are using clean and quality meat pieces. This way you can preserve raw poultry, chicken, turkey, pork, beef, and even fish. Just as our ancestors used to “bathe” the meat in salt and spices to help the meat preserve its freshness and remain eatable after a longer period of time, you will also need to treat the meat with a salty solution. Avoid excessive salt solution usage on pork and poultry as those types of meat absorb salt more easily.

Before you start canning the goods, you will first need to keep the meat cold from a minimum of 6 hours to a maximum of 12 hours. The time needed for cooling the meat depends on the type of meat you are using. Chicken and turkey will naturally require less processing than pork and poultry or beef. Once the meat is cool and salted you can use your pressure canner, recommended is using a dial gauge canner or weighted gauge canner.
Once you are done with canning, don’t move the cans for a couple of hours more as sudden changes in temperature don’t suit the meat that well. Later on, you can stash your canned raw meat on your off-grid shelves and use them when needed. Make sure to check on your goods and renew any can coming near the expiration date.
Dehydrating
Just as you can use the dehydration process for preserving fruits and veggies, the same process can be applied to preserving meat likewise. All true hedonistic carnivores enjoy beef jerky. Jerky is of course made by dry processing and is dehydrated to be preserved for an extended time. If you like you can dry chicken, turkey, or fish along with beef – the process is the same. Here is what you need to do to make your batch of dried meat.

First, you will pick nice fillets or stakes and put them in your freezer. It won’t take long as you only want to make the meat firmer in order to be able to slice thin pieces of meat. Once the meat is out of the freezer, slice it into thin pieces. You can use the grain to do that. You will need a plastic bag with a seal to put the meat in. See our tips on how to dehydrate food to know more about the topic.
Besides from thin slices, you will also put Worcestershire and soy sauce (two-thirds of a cup each), tbsp of honey or maple, dried onion and garlic to taste, pepper, red pepper in flakes, and ½ tbsp of liquid smoke. In case you don’t have liquid smoke, you don’t have to use it, but the taste will surely be better with it.
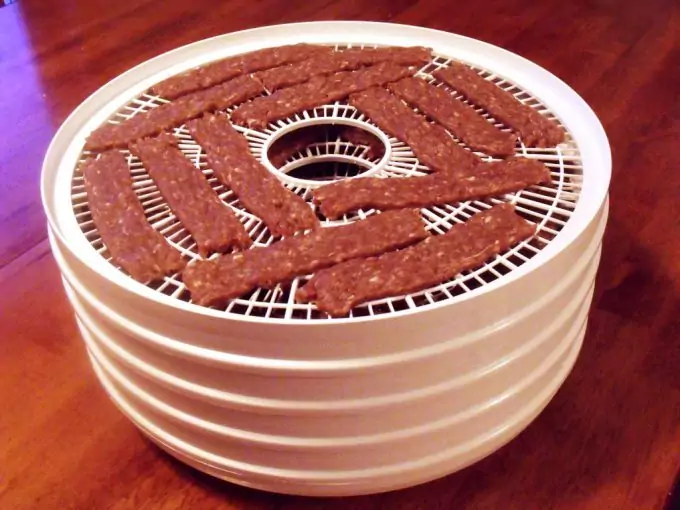
Once you are all done, seal the bag with meat and other ingredients in the freezer and cool it for about 3 hours. After 3 hours have expired, take the slices of meat and put them on a baking rack. Put it all in the oven and bake for 4 hours at 250 degrees. When the jerky is out of the oven, let it dry for one day and then store it in sealable airtight containers for preservation. You can dry and preserve any type of meat. You can also use a dehydrator, but the oven will do just fine.
Curing
Before the fridge was invented, people need a way to preserve meat so they used the curing process. This process is very simple and has been used for centuries before the freezing process, but we use it today as well – not for preserving though, chefs usually use curing for adding a distinct flavor to the meat. Curing is usually used on pork, beef, and fish and you can easily cure your meat in the following manner:
What you need to do first is to set the proportion between brown sugar and the amount of salt you will use. As meat is very quickly attacked by bacteria you definitely don’t want near your stomach, and this is all due to the watery base meat fibers have and bacteria love, salt is used to destroy those bacteria and to make meat safe to eat, making it well preserved. For 12 pounds of meat, you will need about one-half pound of salt and one-quarter cup of sugar. Sugar is there to set the balance and it will also give the meat a great taste.
Besides salt and sugar, you can add spices like basil, rosemary, mint, and parsley. What we also recommend is adding one special ingredient that will keep meat 100% eatable for a prolonged time: we are talking about sodium nitrite.
Sodium nitrite should be treated and used with caution as this solution can be dangerous just as it can be useful. To avoid accidents, you can alternatively use greens: spinach, celery, lettuce, and other leafy green vegetables for curing the mat as leafy greens contain nitrite. The amounts of nitrite present are healthy for us, so you won’t be risking your health and you will still get to cure the meat in order to preserve it.
Another way of adding nitrite without risking is by using the substance called pink salt. Pink salt has healthy amounts of nitrite and will not harm you when used for curing. Once you are certain you have everything you need to cure the meat, take the meat of your choice and cut it into larger pieces. Treat the meat with salt, brown sugar, and leafy greens.
You can as well add some maple as with making jerky or use honey instead. You don’t to, though. Once the meat is ready and cured, you can store it in a crock or a jar – whatever you have. Another thing to take care of is to place your meat somewhere where the temperature won’t go above 37 degrees Fahrenheit.
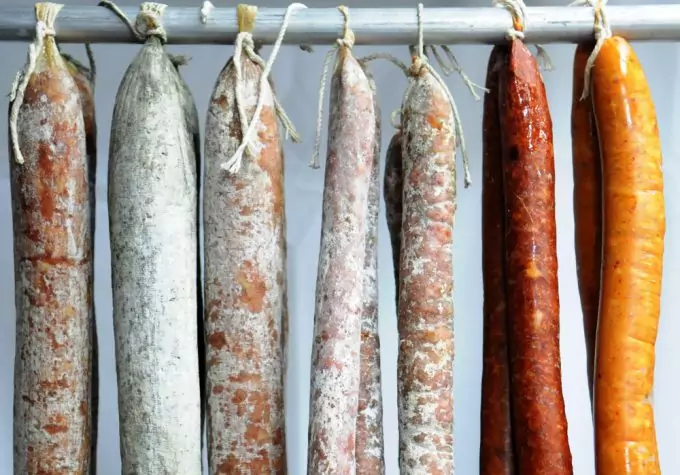
Cured meat placed and treated like so should stay stored for a month and then you will take it out. You will need to wrap the pieces with paper, plastic, or any other material you have that is also moisture-proof. You can further store the meat on shelves or use it when you need it.
Smoke
The smoke is still used for treating meat for the specific taste it gives to meat – it is very tasty and delicious, moreover considered a delicacy. The practical side of it is that smoke has the exact same effect you are drawing from using salt in curing – the smoke will keep the bacteria away from the meat and your stomach. You can be sure that your meat will be well preserved and tasty when treated with smoke. However, this process can be a bit more demanding than the last few techniques we have listed and explained. Let’s see what you need to do to get the meat smoking!

So, in case you have heard of a smokehouse near your place, you can take the meat you were planning to smoke for preserving and you will save yourself some time and effort. If you want to try this technique yourself or you don’t know where to find a smokehouse, here is what you will do.
First things first, what you need to know is that smoking the meat has to be done inside. You can probably do it in your basement, but in case you have a shack it would be great to make or purchase some racks and have them installed on the top of the shack – that is, on the ceiling (a bit below it).
You will also need to purchase a smoker. This machine is pretty easy to be purchased, store, and use as it is available in stores and online, in all sizes, and running on different types of fuel. So if the place for smoking the meat you have is small, that won’t be a major issue as you can buy a smoker to fit the room, i.e. your little smokehouse.
Alternatively, if you don’t feel like buying a smoker, you can try using your barbeque. You will simply place it in the room with the meat and keep it smoking. The process of smoking is actually similar to cooking, so you will be basically cooking the meat using smoke. What is great about that is that you will end up with tasty batches or batches of meat and have them edible for a long time to come.

Smoking takes a long time as this is a slow cooking process, using heat that is indirectly affecting the meat – positively, of course, getting rid of bacteria and preparing the meat to be usable and ready to eat. The temperature used should be somewhere between 150 and 220 degrees F.
There is also cold smoking but this process is only used to give the meat that is already cooked the smoky flavor everyone likes. This way, you will end up with a tasty final product that doesn’t require a fridge to be edible and free of bacteria. Preserving meat in the wild could also be made possible with this technique as you can hang the meat on the racks you have alternatively made out of branches to surround the fire pit. The meat should be hung above the fire, high up so it is cooked slowly by the smoke and not grilled on the fire.
Brining
Brining looks a lot like curing although there is some difference between those two techniques as bringing could be in fact described as wet curing. What brining will require you to do is to make the salty solution we have already mentioned describing it as a great solution for treating raw meat. You will need jars for your meat, so make sure you have enough seals and jars. Clean the jars thoroughly and fill them up with the salt solution.
The solution should also contain brown sugar and you can add some herbs of your choice to make the meat tastier. So, for three quarts of water, you will be adding one-half of cup sugar and one pound of salt. Adding herbs and the number of herbs used is optional. Once you have made the salty solution, you should take the meat of your choice and cut it into medium-sized pieces. You can use any meat you like but brining is usually used for fish, beef, and pork. It is maybe better to treat chicken and turkey with smoke or preserve it with drying than bringing it.

Fill up the jars with meat (more than half of the jar should be filled up) and then add the salty solution. All pieces must be completely soaked in order for bringing to work and all meat pieces should be placed tightly so there is barely someplace in between. That means you need to fill that jar up completely with meat and the salty solution. Seal the jars and put them in the storage room away from the sunlight of course.
You will need t0 to check the meat every week for four weeks like so: open the jars take out the meat, stir up the solution, and put the meat back in. In case the solution is thicker, you need to make a new batch of salty solution and put the meat back in with it, throwing the thick one out. After four weeks and 4 regular checkups, your meat is ready to be used and stored in sealable containers without the need for refrigeration.
You know have more than a couple of techniques to choose from and many different explanations for a problem of how to preserve meat in case there is no possibility to use freezer or fridge. Now, whether there is electricity or not, you can still use and preserve meat to be free of bacteria, tasty, and completely edible.
As a survivalist you need to be ready for any SHTF case scenario and cover all aspects of survival – now you can try all or some of the old fashion techniques used below to make sure your off-grid stash is filled with a tasty protein source.


I wish bacon making was included in the list but I guess the steps mentioned for smoking meat here applies as well.
Honestly I never did bacon by myself, I always bought it from store. It’s a good idea Jason and I will try it.
I’ve read that you’ve mentioned about adding honey to your meat. I’ve tried it once, but I failed. I thought that since honey never expires, I can use it for preserving meat. But just a day, the meat has spoiled. Is it maybe because I did not dehydrate the meat, or is it the quality of the honey I used? Anyway, I tried the smoking process and it turned out great!
Honey on its own won’t do the trick, you need
other ingredients as discussed in the article: salt, brown sugar, and leafy
greens for treating the meat.