
What’s silent, made of metal, and can be carried anywhere? A knife. Knives have been around the earth for years, but just recently have humans been able to customize knives for specific purposes. Kitchen knives, pocket knives, hunting knives, survival knives, steak knives, and butter knives are only a few of the types of knives that can be found on the market today. There is a knife for everyone out there.
[the_ad_placement id=”in-text-1-type-r”]
In fact, certain businesses allow their customers to customize knives to fit each client’s personality and needs. What if purchasing a knife from a retailer isn’t what you had in mind? Don’t fear, because there are a vast number of ways a knife can be made, including homemade. The only decision to make is what type of knife will work for you, and how you wish to make it.
Knowing how to make a knife is a productive way to kill time while creating a tool that will be used for years to come. Since there are many types of knives out there, you should at least be given the knowledge to make a few different types of knives. The most useful types of knives are hunting, survival, and pocketknives. Each one has its own unique design and build, and each knife also serves a specific purpose to the user.

Image credit: instructables.com
Perhaps the pocketknives’ greatest feature is its’ limitless workability or hardened durability. Since a storage section attached to the blade usually protects a pocketknife, the blade of the knife is unlikely to weather, rust, or break due to outside conditions. Overall, for normal mostly household uses, the pocketknife cannot be beaten, especially a homemade pocketknife. If you want to see some of the top products on the market, take a look on our reviews on the best pocketknives on the market.
The second type of knife that pertains to this article is the hunting knife. Suffice it to say that many people have heard the term hunting knife before. It is fairly self-explanatory. Hunting knives are used almost exclusively for hunting.
The knife won’t necessarily be used to kill the animal being hunted, but it might be used in the cleaning, cooking, and eating of an animal, without a doubt. There are instances in which hunters need to use their hunting knife to keep an animal from suffering. Other times, the knives can be used for modifications of the clothing or gear on the hunter. Hunting knives are a vital tool to have while hunting, and knowing how to make a homemade knife is a valuable skill to know. You can also learn a lot buy taking a look at the best hunting knives on the market and we have reviewed some for you, in this article here.

The survival knife is the other knife to talk about today, and it is just as important as the previous two. Known for being a last resort in an emergency situation, the survival knife serves many different purposes. It can be used to hunt, cut, carve, whittle, and even fish if it was necessary. Survival knives can be found as part of a larger survival kit or by themselves, but both options are popular among civilian and military alike. Some survival knives are made heavy, others light.
A few survival knives come with hidden compartments built in the handles. In the military world, survival knives are issued to troops around the world. The bottom line is they are a quiet, resourceful, diverse tool and it can be used by anyone. Any person who knows how to make a homemade knife knows how to make a tool they can trust to protect, help, or create something whenever needed. If you are interested in a high-quality survival knife, created by professionals, you should take a look at our reviews here.
Creating a pocketknife
The goal of this section is to explain how to build a homemade pocketknife without making the process too difficult or requiring too many materials. When thinking about what kind of pocketknife to create, feel free to design any shape. The only two requirements in the build of a pocketknife are a blade and a handle that supports the folding mechanism, storing the knife when the pocketknife is closed. As long as you stick to the basic processes laid out, the knife should last a long time and become a trustworthy tool to have around the house.
Tools & materials
Building the right pocketknife can be done with a limited amount of tools, and most of them can even be found in your household. Along with tools, you will need certain materials, most of which can be found hanging around most houses.

You will need a drill, heat source, wood saw and metal saw. If you were lucky enough to already have a machine to cut metal, now would be the time to dust it off and see if it still works. Materials needed for the project include a few small sized nuts & bolts, thin wood, a piece of metal, and about 6 inches of PVC pipe. Every single material needed for the pocketknife can be found at any hardware store, although some of you are bound to already have the necessary materials for the project.
In case some of you were wondering, the PVC pipe will be used in the making of the handle, along with the nuts, bolts, and wood, while the metal will be the blade, once it is properly formed. Be sure that you are careful and wear appropriate safety glasses, gloves, and shoes just in case something was to go wrong.
Building the pocketknife
The first step when taking on any homemade knife project, it is important to double and triple check that you have all the tool and materials needed to completely finish the process. There is nothing worse than having to quit on a job before it is completely done, due to lack of resources. Now, on to the actual build. A note to the reader, some of the parts will not be made when the process is laid out, but have patience, because the making of the parts will be shown as they need to be talked about.
PVC handle
First, take the PVC pipe on one side and cut it horizontally. Be sure not to cut all the way through to the other side. Next, use some type of heating element to mash the PVC pipe into a flat, square shape. The heating element could be a heat gun, or some sort of other heating source, but it will need to be hot enough to melt the PVC shape previously described.
Make sure to make the square as correct as possible, so that it can be molded into the handle later in the process. To make the handle of the knife, you must fold the malleable plastic over the metal piece that will be explained about later. Once the plastic thickness is alike to the metal thickness, fold the PVC over the metal and hard press the plastic so as to mold onto the metal blade.
Metal blade
For the blade of the pocketknife, use an extra metal piece sitting around, or even the blade of a saw would work. When it comes to the blade, it can be any shape as well, although with random jutted out shapes, the pocketknife is more likely to break. Keep that in mind when drawing up the actual blade.

Image credit: gambartop.com
Assembling the pocketknife
Now that the PVC handle and the blade are made, they are ready to be put together. Grab the blade, stuff it into the PVC handle, and then create the pivot point for your knife. Drill a hole inside the point where the knife will pivot and make sure the diameter of the hole equals the diameter of the bolt being used to connect the blade and handle.
Drill a second hole on the bottom part of the handle so that the blade will keep form moving in under the handle. Drill another hole near the first hole, close to the top of the blade, but make it a half hole. By half hole, I mean drill not entirely into the blade, but just enough so that the blade will secure into place.
[the_ad_placement id=”in-text-2-type-r”]
The final part of the process will use the thin wood. The thin wood needs to be made into two equal pieces that will fit over the handle previously made. This step in not necessary, but it will make the knife look more aesthetically pleasing. After the wood has been successful measured to the dimensions needed for the handle, use sandpaper to smooth out the wood, so no splinters will mess up your day. Next, thread the bolts through the holes drill, and fasten the nuts onto it.
Now that you have the knife assembled, sharpen the blade. In order to ease the sharpening, use a stone, but a file can be substituted in any situation. Now that you have been given the tools to make a homemade knife, you won’t ever go without a reliable tool again.
Making a hunting knife
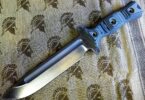
A hunting knife is primarily used in hunting situations, but can be used for anything needed to survive on any hunting trip.

Image credit: knivesandknifemaking.com
Tools & materials
Most of the tools and materials used in the creation of the hunting knife are also used in the process for creating a pocketknife. Again, we will need a drill, some sort of saw, heat source, and a metal saw. As far as materials go, 4 or 5 small nut and bolt pairs, a piece of metal, and thick wood or bone will suffice for the making of a homemade hunting knife. Instead of a thin wood piece as before, use a thicker piece of wood, or a material similar to bone so that the handle will have proper protection from the knife under it.
Building the blade
Prior to designing the handle, think about what size the blade should be. Unlike the pocketknife, the shape and size will directly affect the way you use the knife. In order to create an efficient knife, draw up a medium sized blade with a normal blade shape, but also create teeth on the backside, so that both sides of the blade are being used. When deciding on a length for the hunting knife blade, find the right averagely sized blade.
If the blade is too long, the owner could run into trouble, as there are laws against knives of certain lengths. Also, if the blade is too short, it won’t be able to serve any purpose for hunting. The blade must be durable and lightweight, in order to perform well as a hunting knife. Once the blade has been designed and drawn out, use a metal cutter to create the blade. If there are any imperfections in the blade, make sure to file them down, so the blade can be put into the handle later on. However, do not start to sharpen the knife until the handle is attached.
Constructing the handle
Knowing how to make a homemade knife is a special skill, but putting together the right handle is another skill in itself. The type of handle on the knife has a lot to do with the type of material being used. For our purposes, a wood handle would be the easier route for a beginner to make. Design a handle that will be lightweight, but also have some weight at the bottom. The shape of the handle can be a basic geometric shape or a curvier, customized design, but it has to fit your entire hand on it.
Take the wood and cut it horizontally into two equal pieces that can be bolted together around the blade, securing it well enough to hold. Drill two holes towards the top of the would-be handle. Make sure to drill the holes through the wood, with enough room for the nut and bolt pairs to be put on. Drill two more holes at the bottom of the handle and be sure to drill through the wood again. The final part of making the homemade knife is to assemble all the pieces.
Finishing the hunting knife
Once the blade and handle have been properly built, the knife can start to be put together fairly quickly. First, grab the blade and fit the two pieces of wood directly on top of each other, leaving a predetermined amount of space at the end for the actual blade. Once the pieces are aligned, thread the bolts through the knife handle holes and secure the nuts in place as well. This should make a snug fit between blade and handle.
Once the blade has been completely secured by the wooden handle, feel free to file the blade and sand down the handle to whatever preference you might have. Make sure to leave no jutted out edges in the wood or metal, in order to reduce the chance of cutting yourself later.

After the knife has been sanded down to a useable level, the owner can customize the wood by staining it, or even painting it. Last but not least, sharpen the blade with a stone sharpener. Once the blade is properly sharpened, you are ready to use this homemade hunting knife out in the woods.
How to make a homemade survival knife
The words how to make a homemade survival knife are very self-explanatory. A survival knife is usually used in survival situation, hence, the name. The survival knife means that the current situation you have found yourself in is most likely a hostile one. On top of serving as a knife that keeps you alive, it also has to be used as a hunting knife in certain instances. The key to a great survival knife is to make it larger than a pocketknife, but smaller than a hunting knife.
Some survival knives have hollow handles, so that the user can stockpile necessary items that aid in the survival of the user. Those items could range anything from a compass, to parachute cord, to string, in case of emergency. A survival knife with a hollow handle isn’t as durable as the normal handles, due to added stress the handle takes without any support under it.

Image credit: pinsdaddy.com
Tools & materials
As in the previous sections, the materials needed are a piece of metal, wood, 3 small nuts & bolts, and a little bit of cork to put at the end of the handle. The survival knife that is homemade will have a hollowed out handle, and the cork will fill up that hole, in order to hold any important items when needed. The tools that will be used to make the homemade survival knife are a drill, with flat wood drill head, file, sandpaper, and metal saw. The flat drill head will be used to hollow out the handle, creating a cylindrical shape that will still hold strong for survival purposes.
Cutting the blade
A survival knife blade should be designed smaller than a hunting knife, but it really depends on preference. Some survival knives are longer, like 7 inches, while the normal ones float around 3 or 4 inches. It is completely up to the designer. Design a blade that will look like a pocketknife blade, but on a larger scale. The blade must be strong, heavy, but not too big to fit into tiny places. Once the blade has been thought up, draw it onto the piece of metal that was mentioned in the material section.
Next, cut the metal shape out with a metal cutter and don’t leave any jagged edges when carving it out. Once the metal blade has been formed, check to see if any shards of metal are in the wrong place, or worse, a dangerous place. After a thorough inspection, set aside the blade and move on to the creation of the handle.
Molding the handle
The handle is just as critical as the blade on a survival knife. If the handle is made well, it will support the weight of the user and blade when using the knife much more aggressively, due to the survival conditions set in front of the user. The handle itself will be made of wood, but it will be hollow. The hollow handle allows various survival objects to be successfully stored in the butt of the handle. The first step to creating the handle is to cut out a piece of wood that will form the shape of the handle.

Staying cautious, the handle should not be an extravagant shape, but rather a cylindrical shape. The cylindrical shape will allow the handle to maintain strength with strenuous use in a dangerous situation.
[the_ad_placement id=”in-text-3-type-r”]
Once the wood is cut, mark 2 distinct holes in the wood of the handle, at the top, and drill a hole accordingly, through the wood. While drilling the hole, make sure to keep the holes going through wood and metal, so the blade won’t fall out. Once the holes are drilled, use the flatwood drill bit to drill a hole at the butt of the handle, creating a special compartment to hide whatever you need. Make sure to make the hole snug enough to the cork, so that it will protect everything in the extra compartment.
Finally, take the drill and drill out enough space in the top of handle for the blade to sit down into the handle. Once that slit is carved out, drill a hole through the wood and metal of the blade. This will set up a nut and bolt to secure the blade later on.
The final assembly
Now that all the parts have been made, it’s time to put them together for the last time. First, grab the blade and stuff it into the top of the handle, aligning the hole in the wood with the hole in the metal. Pull the bolt through, but don’t tighten the nut on until the last step of the process. Next, fit bolts through the two holes previously drilled out and secure nuts, tightening the handle to the blade, keeping it from budging. Once the top of the handle is secure, put whatever survival things you need in the special compartment and seal it up with the cork.
File down the blade and sand down the wood, to make the use easier on the human hands. Finally, decorate the survival knife however you deem worthy, and stain it if you feel the need.

There it is. Those are the ways to make a homemade knife. The pocket, hunting, and survival knives are all valuable products, and will save lives when needed. Keep these homemade knives close around; you never know when you might need one of them.
Each knife enthusiast will have their own preference, but any of the aforementioned knives can be made with most household items. If you don’t have these household objects, then you can find everything you need to make all these knives at your local hardware store. If these homemade knives are made carefully and correctly, then they will be useful additions to your survival arsenal.


I actually tried making a small knife out of a five-inch nail, It wasn’t fancy but I was able to flatten the nail and then sharpened it using a whetstone. I wrapped some rubber bands around the non-pointy end to act as a handle. It’s small and efficient and if you make it sharp enough, it can cut through raw meat too.
Hi Sarah,
It is easy to make a knife of your own, especially when you have reliable info, such as the one provided in our article. Keep on practicing, you will soon be an expert.
What type of a knife should beginners focus on making? Is it dangerous to start without much previous knowledge?
You can start with the simplest knife design.
That’s the amazing thing about knife making, it doesn’t necessarily require expensive tools, only a few simple ones. Sure, belt grinders and expensive forges always make things a little easier, but you can make a good quality knife with a couple of good inexpensive tools and a homemade forge. It takes a bit longer and can make a bit of a mess, but the end result will make you happy.
You are right, John. Knife making is one of the simplest survival skills when you have the correct tools and tips. But having an advanced tool, such as a belt grinder will make the whole process easier and faster.