Before making your own Kydex Holster, do some research. First, make sure you want a Kydex holster. This is a fun project, but it takes some work and time, so it is important to understand what you want.
Kydex has quickly become a prevalent choice among gun and knife enthusiasts. However, if you are going to make your own, you can even find different colors and thicknesses.
This article explains Kydex, its advantages and disadvantages, and how to make your custom holster.
Table of contents
What is the History of Kydex?
Kydex was initially produced in 1965. It was initially intended for use on the interiors of planes. Kydex is a composite material made from acrylic-polyvinyl chloride. The acrylic gives this material its rigid nature, while the PVC can make it challenging to work with.
The first Kydex holsters began to be widely used by the FBI in the early 1970s. Since then, they have rapidly become more popular.
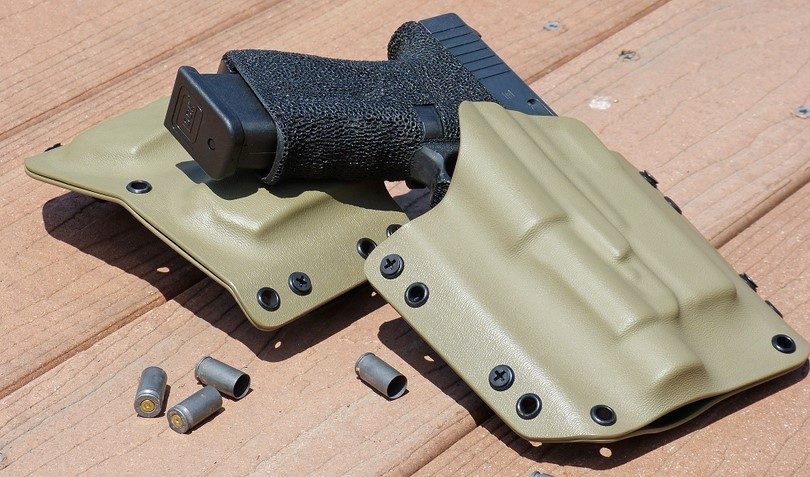
Today, you can find Kydex ranging in thickness from 0.028 to 0.500. Kydex has a range of uses – holsters, knife sheaths, air exhaust systems, kick plates, etc. The recommended thickness range for holsters is 0.060 to 0.125.
What are the Advantages of Kydex?
- The material is waterproof.
- Kydex doesn’t shrink or stretch; holding it’s shape well.
- There is minimal friction.
- Kydex is a thin material that retains its strength and function.
- The lightweight nature of this material makes it suitable for everyday use.
- Kydex does not require much special attention or maintenance.
- Custom-made holsters can be created with adjustable retention. This will reduce the wear.
- The material can be shaped and adjusted to make drawing/re-holstering your gun easier.
- Kydex is durable, it holds up against scratching, sweat, and other external factors.
- Kydex is easy to clean.
- One holster can have several configurations which makes it versatile.
- The holsters are budget-friendly.
How Kydex Compares to Leather
While Kydex is becoming increasingly popular, skeptics still argue that leather is the superior choice. Weigh the pros and cons of Kydex vs. leather before making a decision.

Pros & Cons
- Leather has a classier look when worn with formal attire like a suit.
- Many people claim leather is a more comfortable material.
- Leather is usually thicker and more expensive than Kydex.
- Leather doesn’t hold up as well against the elements, and may be harder on your firearm’s finish.
- Custom-made leather holsters take several months to make.
- Kydex is lighter and allows for a quicker draw.
- Kydex maintains its shape when the gun is drawn.
Kydex Holster Care Guidelines
Although customer Kydex holsters don’t require much maintenance, it is still important to know how to maintain your custom-made Kydex holster, regardless of how often you wear it.
Lint and debris from your clothes will find their way inside the holster, and there’s not much you can do to prevent it. Debris can take a toll on your gun’s finish, so make sure you don’t allow a build-up in the holster.
The good news is that Kydex is easy to clean. Using mild soap and warm water to wash the holster is generally all you need to keep it clean. Make sure you dry it well, though. Metal rivets and clips and can rust.

Dry the holster with a microfiber cloth or silicone towel. Materials, such as a paper towel, will leave debris, which defeats the point of cleaning it in the first place. Instead, while cleaning your holster, take the time to inspect it for excessive wear or damage.
To reduce friction, you can apply your favorite gun oil to the interior of your holster. The oil will help lessen friction and wear.
Power of Custom Design
Making your Kydex holster has a lot of benefits. First, by completing this process, you can create the exact product you need for your weapon without waiting months for someone else to design it.

It will save you a fair bit of money to create your Kydex holster. As soon as you notice wear and tear on your product, you can immediately make yourself a new holster.
This skill allows you to make an important item if it cannot be purchased. You will need to ensure you have the materials you need already on hand.
How to Make Your Own Kydex Holster
The holster in this overview is easy to make out of everyday items. Even if you don’t have all the tools listed below, you can probably borrow them from a friend or neighbor.

If you plan on making a few holsters, it would be worth investing in a heat gun, sander, and press.
Materials and Equipment Needed
- Kydex (choose the thickness and colors according to what you like)
- Oven
- Heat gun
- A Press (you can buy one or make your own press)
- Rivets
- Chicago screws
- Sander and sandpaper
- Drill
- Box cutter / razor blade
- A pencil
Prepare the First Sheet of Kydex
- The first step in making a Kydex holster is the most important: you’ll start by measuring the size of Kydex material that you’ll need.
- Place the fabric on a flat work surface with the gun on top of it.
- Use a pencil to trace the main shape of the weapon. It doesn’t need to be perfect, but you should leave extra space. You can always trim it off later.
- Cut the main square of material out with a razor blade or sharp box cutter.
- Place the material in the oven and slowly heat up to 325 degrees Fahrenheit. If the edges curl or if it starts to shrink, then you know you’re heating it too fast.
Preparing your Press and Gun

- Press the warm material and mold it as needed. Make your press using two wooden boards to secure the Sheath/Holster Making Foam (Thermoform Molding).
- Use at least four strong clamps to press the two boards together and keep everything in place until it takes shape.
- If you cannot find the right kind of foam, you can use a workout mat instead. Cut it to size and secure three layers to each board of wood.
- For best results, keep the magazine inside the gun. For safety, ensure that the magazine is empty and there’s no bullet in the chamber.
- Use tape to attach a wooden dowel to the top of the gun. This helps keep the sights on the gun safe. In addition, it prevents them from getting damaged when drawing and holstering your weapon.
- Tape up your gun to fill up spaces that could eventually catch and rub against the Kydex. Don’t worry about taping your trigger since you’ll need a snug fit to hold the gun in place.
Pressing the Kydex Holster

- Once the Kydex has warmed up enough and is suitably pliable, you can remove it from the oven. Again, it’s essential to protect your hands since it might be hot, and you will want to work as quickly as possible.
- Place the material on the bottom layer of your press and position your gun in place on top of the material. Fold it over and into place so the fabric wraps around the gun.
- Next, place the top part of the press on top of the weapon and Kydex before clamping it firmly into place. Let it sit for approximately 10 minutes.
- When you’re ready, open up the press and take a look at the result. If you are not completely satisfied with what you see, you can always reheat the Kydex and start again.
- Once you reach a result you’re happy with; you can remove your gun from the Kydex.
Finishing off Your Custom Kydex Holster
- Use a pencil to plan where you’ll trim the excess Kydex.
- Make marks where you will place your rivets to hold the material in place.
- Use a Dremmel with a sand or stone attachment to cut off the edges.
- Use a belt sander (if you have one) to round off the edges and create a less bulky result. Only leave excess where necessary. The more compact, the better. If you don’t have a belt sander, you can use a similar method.
- Manually trim and sand the edges by hand. This gives it that smooth appearance. Instead of sanding by hand, you could also use your Dremmel.
- Drill holes where you plan on inserting the rivets.
- Use a razor blade to clean out the holes before inserting your rivets.
Testing your Holster
- Remove the tape from your gun.
- Clean your holster and remove debris before testing. Debris may damage your gun, and you want to make sure that you don’t cause unnecessary wear.
- Slide your gun in and out of the holster to test the retention and make sure that you are completely happy.
- If need be, use your heat gun to warm up certain areas where there’s too much retention and loosen it up. You can simply use your finger to reshape the Kydex and press it out from the inside. Remember to keep your heat gun moving around and heat the Kydex slowly.
- Test your holster again once you have made the necessary adjustments.
Making Your own Belt Clip
When making a belt clip, use a thicker material to be as durable as possible. In addition, it’s advisable to make a few extra clips so that you’ll have spares on hand.

- Line up a strip of Kydex to ensure that it will fit.
- Mark where you want to make the holes on the belt clip – they need to line up with the rivets on the holster.
- Drill holes into the strip using your heat gun to heat the strip. When you notice that the Kydex becomes soft, place it on the holster and use your fingers to mold it into place. It needs to take the same form and fit snugly against the holster.
- Make a mark where you want the clip to bend. Make sure that the holes on the belt clip line up with the rivet holes on the holster before making your mark. Next, use the heat gun to warm up this area to bend it over. Then, allow the clip to cool.
- Mark the clip according to the size belt you usually wear. Heat the strip and bend it back again (double back) before allowing it to cool and then trim off the excess.
- Attach the belt clip to the holster using Chicago screws.
Other Important Notes
- Remember that this is just one easy way to make your holster from Kydex. Other methods allow the use of two different colors for that two-toned effect.
- Always ensure that the inner portion of the holster (the part against your body) is slightly higher than the exterior side. By doing so, you will make it possible to draw and holster your gun quickly and with the use of just one hand.
- If you’re not a fan of the Kydex belt clips, you can purchase metal clips and fit them instead.
- When making your first holster, you should take your time and set aside at least half a day to get it right.
Kydex Holster Durability
When making your Kydex holster, one significant concern is how well it will hold up. Therefore, choosing suitable holster material is essential for comfort, practicality, and safety.

Kydex has proven challenging in this regard, one complaint being that the belt loop can break if it is repeatedly flexed. As a result, gun owners should keep extra loops handy or opt for a fixed tunnel.
Of course, like anything else, this will also depend on how well you treat it. These holsters are not indestructible, but they are about as close as you’re going to get!
Custom, Small Business Holsters
If you are interested in a custom holster made here in the US by a small business, check these companies out. In some instances, you get more options (ammo also), in a custom product.
Kydex Holsters – Manufactured
You can also purchase a quality-made holster on Amazon. I’ve provided what I think are three of the best Kydex holster options.


I think this holster is well suited for professional personnel. As a gun owner, I solely carry it for self-defense, and I hope I don’t have to use it all. So a regular holster is more than enough for my needs.
Yes, that is correct. But a gun enthusiast would want only the best for his weapons and I believe that Kydex is one of them.
This is a pic posted in reddit about the dangers of worn out leather holsters and why Kydex holsters might be better for those who live in warm climates. Leather holsters can soften due to sweat and humidity which may contribute to accidental firings of guns. (Though some still strongly dislike the feel and look of kydex holsters and will stick with leather). An extra tip for those who want to try making their own kydex holster is not to overheat the kydex in the oven which is an easy mistake to make. This will shrink the holster and give it an ugly finish.
Holsters are the seat belts for pistols. They are safety devices. Therefore, there is every need for you to learn how to make a Kydex holster. It’s actually a simple project; all you need is the guidelines in this article.
Kydex is such an impressive material because it is waterproof and doesn’t shrink or stretch. I also love the fact that it is thin and sturdy at the same time. The ability to shape the kydex into a specific gun you have is a bonus.
I bought an Outlaw Kydex Holster from Amazon for my Sig SP-2022 and I can say that I was really impressed by the holster. It is not bulky and it easily conceals my gun under my shirt since it is not bulky in any way. I will now try and make a custom holster and see if it makes a difference.
I have made my own Kydex holster which I custom made for my Glock a few years back and this is such an amazing product. My custom holster shows minimal to no signs of wear even though I am bringing it everyday for the last two years.
If you are a Kydex newbie, you should know that kydex is acrylic/ PVC thermoplastic sheet that you can use to make a holster as an alternative to leather. This material ensures that your newly made holster is lightweight, thin and durable.
Kydex is a very durable acrylic/PVC thermoplastic material, and that is why it is preferred for a DIY holster project. The entire process is surely simple. You should try and make a new holster instead of sticking with the old one.
You right, kydex holsters, either commercially produced or custom-made, are the best. kydex is impervious to weather elements, easy to clean, rigid, easier to conceal, and offers a superior level of retention.
Can you also talk specifically about the fasteners involved – when and where to use what and what lengths are typical? I know there are the eyelets and Chicago screws, and also sometimes spacers and washers. I’m looking through some suppliers websites and for a newbie it’s easy to get lost in all the choices.
Thank you for your observations, Andy. We will certainly include your thoughts in our next posting.