
When you talk to any prepper or survivalist, they all have a list of absolute bare essentials that they would need in times of disaster or emergency. While the ins and outs of these lists are hotly debated and always vary wildly, three basic essentials usually come to mind with everyone: food, water, and shelter. Keeping yourself out of the elements, at least part of the time, is crucial to survival in any scenario, and can absolutely mean the difference between life and death.
There are many schools of thought on just what the best way to do this is, but the most recognizable survival structure has always been the quintessential tent. From the primitive and inexpensive forms to the highly specialized and outlandishly extravagant, the tent is one of the most transportable and simple ways to stay warm and dry in any scenario-a crucial factor of survival.
There are plenty of options out there for the person who just wants to bite the bullet and buy one, and endless tutorials how to guides for the DIYer in all of us. Here we’ll go through a little bit of both, and identify exactly how you go about selecting just the right one for your lifestyle.
Selecting the right tent for job
As with most things related to prepping, it’s all very relative to your location and lifestyle. For instance, if you live in a warm, humid climate, you hardly want a tent that’s insulated and wind resistant. Take into account your surroundings, particularly before spending a pretty penny on something.

My favorite way to prepare for camping or tent sleeping of any kind is to just practice. It’s as simple as picking one night a week to sleep outside, even just in your backyard, and evaluate the experience. Use whatever tent you have wadded up in the garage, or get crafty with some rope and a tarp even. And tempting though it may be to pick the mildest night of the week, be sure to get a few unpleasant days under your belt as well, so you can realistically evaluate your shelter needs in any weather.
As you slumber under the stars, take notes, either in your head or on a pad of paper. When you wake up in the morning, is there condensation inside the tent? Is there adequate airflow, or is it stuffy? Are you trapped in there with a ton of mosquitoes? Is there a pervasive bone-chilling breeze finding its way in? Also take into account simpler things to evaluate, like how easy the tent is to assemble and disassemble, its packing weight, and its durability.
After you take a step back and evaluate all of these things, put it all together in what you need from your survival tent. There are tons of amazing innovations out there that make it possible to survive in style, and plenty of ways to rig up your own in a pinch. Here are a few of the best ones on the market.
Now that you know what to look for in a tent, you should also think about your sleeping conditions. This requires you purchase a sleeping bag to keep you warm during the night (regardless of season). So, if you’re interested in knowing how to select one and which are the best products, check out our reviews for best sleeping bags.
North Face Mountain 25
This is definitely one of my favorite tents on the market right now. If you live in a cold, windy climate, this tent is about the only that’s really up to the task of keeping you warm and dry without breaking your back on the way up the mountain.
It’s super lightweight, coming in at 9 lbs. 15 ounces, so it’s easy to get up the mountain without making you break too much (more) of a sweat. It has a small bag footprint too-only 24”x7”, so there’s still plenty of room for the rest of your gear in your pack.
This is also one of the few tents that’s actually rated for four seasons too, with an insane cold temperature rating of all the way down to -60˚F for its portal window. It has a design that’s meant to withstand high winds too, allowing the sharp gusts to glide around its aerodynamic shape.
Of course, it’s also waterproof, rated at 10,000 mm for waterproofing. For those of you unfamiliar with waterproof ratings, what this means is that you could put water 10,000 mm deep on a square inch of the fabric before it would begin to leak through. Basically, the higher the number, the better the waterproofing. Plus, it has a bucket style floor that’s fully taped, so you never wake up to a flood.
Be prepared to fork out the cash though-amazing innovation will almost always come at a steep price. For this little two person tent, you’ll shell out around $500, so save your receipt folks. But with its amazing customer reviews, intense weather specs, and portability, the North Face Mountain 25 makes for one hell of a survival tent.
If you like this product you can find and purchase it on Amazon.
Rothco survival tent
At the other end of the spectrum, you have the incredibly simple-and wildly affordable by comparison-Survival Tent by Rothco. This is a classic design used by the US military in many situations, and is designed with simplicity in mind. With its no-frills design and very low price (around $10), even if it’s not your go-to survival tent, it still makes a great addition to any bug out bag.
It’s basically a reflective triangular prism made out of tarp material, that you put up by running the included nylon cord (paracord, anyone?) through the top of it, and tying it off on something sturdy nearby, like a tree trunk. The simplicity of the reflective material will actually keep the tent from overheating, but reflect internal sources of heat, like your body, back inwards, conserving the warmth inside the tent.

The material itself is pretty waterproof, though of course having two open ends will allow the elements in, so set it up with wind direction in mind. The dimensions of it make it incredibly lightweight, coming in at less than two pounds. Just fold or roll it up tight, and bind it to the outside of your bug out bag. Plus, it’s roomy enough for two, at about 8 ½ feet long and 5 feet tall.
If you’re a bare bones essentials kind of person, this is a much more affordable survival tent, and will get you through a night in a milder, more temperate climate.
If you like this product you can find and check its price here.
Backroadz truck tent
This is a rather unique option that I honestly didn’t even know existed until recently. If you’re a person that keeps emergency kits in their vehicle, and in a real-world bug out scenario would be hopping in your pick up, this one merits serious consideration. It’s designed to fit the beds of most pick-up trucks, and be put up and taken down quickly.
What I really love about this concept is that you’re not limited in an emergency by the need to pack up, or even conceal camp (hey, you never know). While you definitely don’t want to be cruising at 60 mph down the highway with a tent flapping around in your bed, you can easily navigate the woods and back country at will, without having to spend an our disassembling a tent (particularly handy for when a campground fills up with some rowdy neighbors).

The Backroadz Truck Tent comes in a few different sizes, so make sure to measure the bed of your truck before you make the purchase. It is very reasonable priced though. Depending on the size you need, you can expect to pay between $150-300, for sizes from 5 ½ feet to 8 feet long.
The unassembled tent is compact enough to fit under your seat, and the finished product assembles easily, with most customers saying that had it together in around 15 minutes. It comes with a polyurethane rainfly to keep you dry in the rain, and has a floor, so you’re not lying directly in the bed of your pick-up. It’s designed to hold two people, which all the reviews say it does quite comfortably.
This is a good mid-priced tent, and has a great combination of durability and portability. Just be sure to measure the bed of your truck before you pull the trigger on a purchase.
If you like this product you can find and buy it here.
Homemade survival tent options
If you’re more of a DIYer, or are just not keen on spending gobs of money on a tent, there are plenty of simple DIY shelters and tents that you can rig up. Most of them just require some kind of waterproof material, rope, poles, and some elbow grease. The substitutions you can make for the materials are endless, and only limited by what you may have on hand. Dig through your garage for an old tarp and some paracord, and you’ve got the basic necessities to put together your own survival tent.
Ridge tents
These are the typical “shed roof” style tents. Wildly simple in their design, and great for dealing with prevailing winds, they consist of a single support and a roof slanted at an angle, touching the ground on one side, creating a rectangular floor plan.
They are largely open, and can expose you to a nasty sideways rain, but are good in a pinch for keeping you warm and dry, particularly when you can use the landscape to your advantage. Try to position yours in such a way that trees or a hillside will block wind on the open side, allowing wind to shear over the roof on the enclosed side, keeping you warm and dry.

To assemble, simply run a piece of paracord through grommet holes in your tarp (or weave through the material itself if yours doesn’t have any) and tie to a tree on each side, or use poles. Simply make a rotisserie style support system by running two saplings into the ground and splitting the tops, and securing the tarp to a third pole that you wedge in the splits. Be sure to stake down the bottom of the tarp though, you’ll just have created a flag.
You should also know that these tents won’t shield you from the elements much so it is recommended to have extra-protection. We recommend a blanket and a tarp to insulate you from the ground. We also have some great reviews done on the best survival blankets so, if you want to know more, check them out.
Pup tents
This is an older style of tent, frequently used by the military for its simplicity, and is easy enough to make on your own. All you need is a large, rectangular tarp, and either some poles, or some paracord, depending on how you want to rig it.
If you’re using cord, situate your campsite between two strong trees, and simply run the cord under the middle of the tarp. If you want a floor, you can fold under the excess of the walls of the tent, and run small rocks along the crease between wall and floor to keep everything in place.

If you’d rather use poles, you’ll want to gather three strong saplings. Take the two thicker ones and point the ends with a knife, so they drive into the ground easily. Then use the knife to put a split in the tops of them, about 8 inches down the sapling. Drive the stakes into the ground, being careful not to exceed the length of your third pole. Run your last pole under the tarp, and tap it into the splits in the supporting poles to secure it.
You can also secure your tent a little more with little stakes placed at intervals along the walls, depending on how in depth you want to get. Bring some cheap metal tent stakes along, or use those survival skills to sharpen some small sticks to do the job. This particular tent design is not suitable for high winds, so make sure to choose a location that is well sheltered from the elements. Take note of wind direction and airflow before getting too committed to a campsite.
Just like with the tent above, this one is also pretty shallow when it comes to keeping you warm. It will protect you from wind and rain, but the cold is a whole other story. So, you will need something to wrap around your body and something to keep you away from the bare ground. That’s why we recommend you take a look at our best sleeping pads reviews – you’ll find out more about how to choose one and which products to choose.
Tipis
There’s a lot of tradition and skill that goes into the proper construction of a true tipi, but in a pinch, you can at least you use the conical tent model to provide you with shelter, particularly in sharp winds and cold climates, because of its ability to house a fire. Tarp material is susceptible to heat damage though, so take care to make sure that your walls are far enough away from your flames. All of that aside, with some paracord, waterproof material, and a knife or hatchet, you can rig up a quasi-tipi that will get you through a cold, blustery night.
Start with gathering your poles-around eight (depending on the size of your tarp or other material)-and sharpening the ends that will anchor into the ground. Try to get them around the same length, which will also be largely determined by the amount of material you have. Take into consideration that a few feet of pole will be sticking out of the tipi itself.

Start with making a tripod, laying three poles on the ground right next to each other. Use your paracord to tie a clove hitch around them, and run a series of half hitches to secure the poles together, until you feel they’re not going anywhere. When you’re ready, leave the excess cord and grab one of the poles, pulling it upright (use the cord if you need to).
Spread the other two poles, forming a slightly lopsided tripod. Let the excess cord hang in the middle, and begin putting the poles in the “crotches” formed by your tripod. Wind the cord in half hitches around these poles. Then either let the excess hang, or use it to anchor the poles further by staking it into the ground.
From this point, rig up your material in whichever way works with what you have-synthetic materials aren’t going to “grab” as well to your poles, so you may want to even weave your excess cord from your poles through the top of your tarp, and use it to pull the tarp around your poles. From there, there are a number of ways you can get more technical, but the most important thing is to anchor the base of the tarp so the wind doesn’t catch it-use stakes again here.
Tipis are definitely more work, but are a classic survival tent that has stood the test of time for its simplicity and ability to withstand the elements. You can make them as big or small as you like, and the material substitutions are limitless. They are also larger at the bottom allowing you more space and even more comfort. For instance, this is the type of tent where you could add a cot to improve your nights in the wild and keep you at a reasonable distance from the ground. We have some interesting reviews on the best camping cot if you’re interested.
Survival tents = prepper’s necessity
If there’s one thing that should be in your bug out bag, it’s some form of a shelter. Depending on your existing skill sets, this can be something very high end and specialized that you purchase, or something you rig together out of materials you either have on hand, or can be purchased for next to nothing.
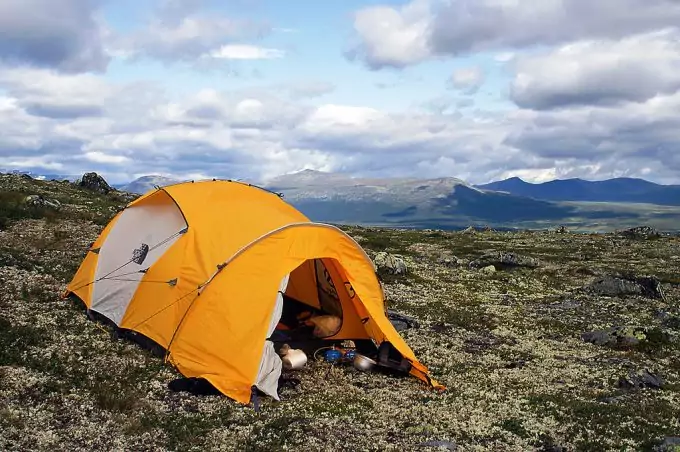
Evaluate your climate, emergency protocols, and abilities to determine if it would be more practical for you to purchase something or make something, and go from there in terms of customizing and optimizing your survival tent. Try to think of every possible contingency, particularly concerning weather, but also accounting for traits like camouflage, packing weight, ease of set up, and capacity. A canary yellow tent may be excellent for a backpacker who wants to be found if they get lost, but for a hunter you’ll want something that blends in better with the backdrop.
Don’t be intimidated by the range of options on the market-use articles like this and customer reviews to make an informed decision for a big purchase, and practice building your own survival tents in your yard with the kids.


Tents are one of the oldest known forms of shelter. Three years ago, I bought a Rothco. It is light weight, and I’m impressed with the quality. Now I’m a base camp hiker, and weight is no issue.
I am actually looking for a Marmot Limelight tent. I heard they are good for all seasons and can hold up extremely well to strong winds. However, is it true that Marmot can only dwell maximum of 2 persons inside? What do you think?
I have tried a canvas tent in our car camping. Although it contradicts the belief that is not breathable due to its wax content, it is heavier compared to other tents. It is waterproof and does not break down in sunlight. But if you are traveling foot by foot, it is not recommended because it is heavier especially when wet.
Hi Michael,
Thank you for sharing your experience. Canvas tents really are heavy and are more suitable for car camping than anything else.
Samuel
Most Marmot tents can only occupy 1-2 persons but they do have larger models. Do not expect to have something that will fit families though. They have a specific target audience, which are solo climbers.