Making your own knife sheath takes a bit of time, but is overall an easy task to do. There are a few different ways to approach this task, but they follow the same essence. And after all it’s always nice to have your own thing rather than commercially made one. You will know how much time and effort you spent on making the sheath, and as a result you will value it more and even boast about it among friends and family.
You will also learn useful techniques and approaches to making other similar items. In this article we will share with you tips and techniques on making your own knife sheath with just a few items, which can be found in any store selling screwdrivers, pliers, etc. But first, if you still haven’t choose a knife to use in any situation, take a look at our list of best combat knives.

There’s nothing really fancy you need to make a nice reliable sheath for your knife.
Instructions on making a knife sheath
So, first of all find a large enough leather piece. It should be twice the length of your knife and many more times wider (as you will be folding and fixing the sides). Also, make sure the leather is thick enough, so it’s really durable and solid to the touch. It should also be hard to fold (we’ll fix that).
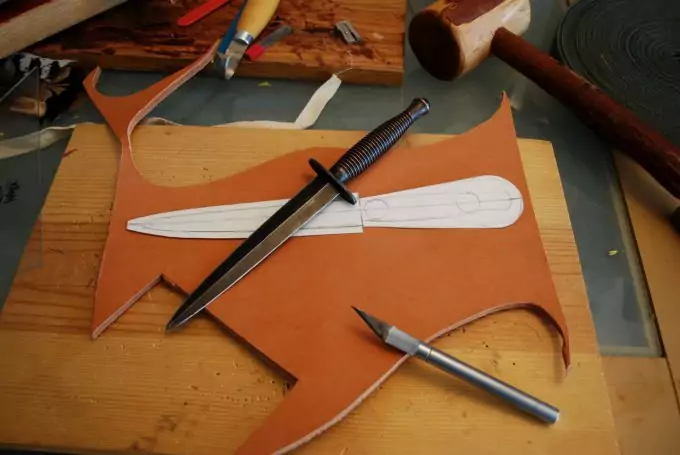
Prepare the leather skin and lay it down on a table. Place it with the outer side facing down and the inner (softer surface) facing up. Place the knife along the length of the leather. You need to be sure that you will lay the metal part of the knife in the wider part of the leather. The other part will be the lid on the sheath. Place the knife somewhat to the near corner of the leather and mark the curvature of the knife but slightly away from the actual edge.

Use a ruler to make a straight line all the way across the length of the leather, since you will be cutting the excess. Also prepare to have more space for the knife inside the sheath, otherwise it may be virtually impossible to put it in later, when it’s finished.
To better determine the patch of leather you will actually need (and what part must be removed and cut) you can then turn the knife over to the other side, rolling it in place (not just picking it up and changing the sides). This will give you the overall idea of the leather you will utilize. As you rolled the knife, make a mark somewhat an inch from the handle. Take the ruler again and draw a straight line, just like you did before – along the length of the leather piece.
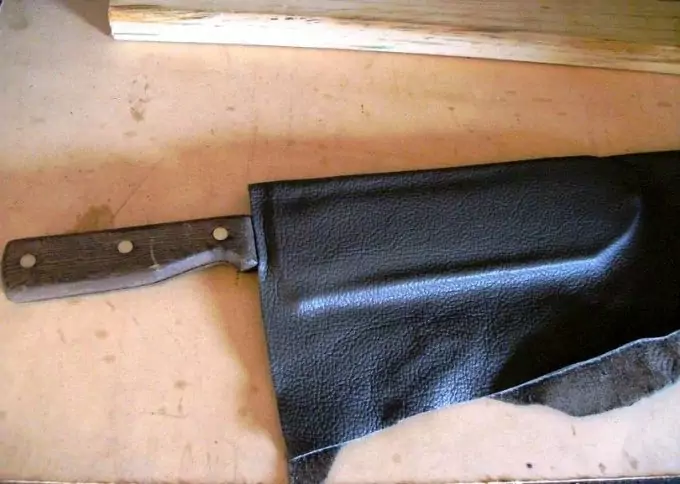
It’s time to cut the excess parts of the leather, which are outside the lines you made. You can then fold the leather to see if the knife fits well in. If you need to have the leather softer when folding you can wet it with a sponge or simply put water on the outside of the leather. It will be much easier to handle and manipulate. As it’s folded, check that your other line is perfectly straight and make sure not to cut too much, as you can undo that move.
Place the knife laying on the leather. Fold it and see if it looks and feels good. Then you can place a tiny mark, around the middle of the handle. That’s where you will have the belt part so you can attach the sheath on a belt. So make a straight line with a pen or pencil (as a mark) along the length of the leather.
You will have to cut half of the leather which will be right above the belt mark you made. The belt part should be half wide in comparison to the leather you have right now. Make sure the line is straight and then cut the unneeded part.
As you’re ready to begin sewing/attaching the sheath’s sides, you have to be prepared to make a welt. This basically means that you need an additional leather piece which will protect the threads from being cut by the knife. This is especially true when you draw in and out regularly your knife – the blade will point at where the sewing is, which make compromise the security of the sheath. So, the welt will secure that connection.

To make this, mark about 1/2 inch away from the edge of the leather, where the sewing will be done. Do a rough mark along the edge. Then take another scrap piece of leather and make the same – outline the shape of the sheath and draw the welt in it too. Cut the part outside the outlines. You need to cut only the welt part of the additional leather piece. Then lay the welt on top of the actual sheath, right where you drew the same welt mark. You will need contact cement to secure the welt in place.
As you apply the glue you need to wait the wetness to disappear and turn more matte – that’s when you should place it on the sheath. Be aware that contact cement is incredibly strong and if you want to pull that piece up, you will basically have to tear it apart, which means, destroying the sheath and starting over. So, be careful and precise when you place the matching piece.

Then prepare the belt part by cutting it somewhere in the middle. If you want it to look more aesthetically pleasing, cut in a slightly over line. Otherwise, straight cut is also fine. Then you are ready at this part of the instructions to die the leather if you want to. Be careful with dyeing the leather since it gets everywhere and it may stain clothes, working gloves, etc.
Since the belt flap you will have to stitch to the sheath may overlap with the welt, this will make the stitching very difficult to make (you’ll have to stitch 3 layers of thick leather). So, you can mark where the belt flap overlaps with the welt and remove that part of the belt flap so you don’t have to be stitching through the three layers, but only two.
When you’re ready with that part it’s time to glue the belt flap in place and then stitch it. Make a small square where the flap and sheath meet and run the stitches in the square – no more is needed.
Use a drill machine to do the holes and follow the marks of the square. Then take a thick thread and stitch the holes. Then prepare the glue again and wipe it over the inner parts of the sheath itself, as it’s time to finish it. Be precise about where you wipe the glue, since it may get to attach a larger portion of your intended leather edge. And as we mentioned, contact cement is extremely good at gluing. You need to be good the first time.

You can then use a sand paper to refine the edge of the leather. This makes it more aesthetically pleasing and there’s a nice finish to it.
Off to the stitches for the sheath. Your best choice is to use a professional tool for making stitching holes – this tool has a wheel with sharp ends drilling holes in the leather. Otherwise you can do it manually, but it may take some time to do it. This tool though only sets in place the holes as they will be equally spaced.
You will then need a hand drill to actually make the holes, going all the way through the three layers of leather. Be patient with this process and make sure you’re drilling straight from above, otherwise you may end up having two neighboring holes intersection within the leather layers. Be patient and slow so you have nice reliable holes.
Next, it’s time to do the stitching. Make sure you prepare enough thread length so you end up having more rather than less when it comes to sewing the holes. Also, prepare a slightly thicker needle. If it’s too thin you may break it. Double the thread and begin stitching.
To do the stitching properly, you can pull the thread through the 2nd or 3rd hole from the top, pull the thread half-way through its length and put a needle on the other end too. So you will have two needles on both ends of the thread. With the first needle, go back to the holes you missed (on purpose) and stitch them. Then work it backwards until you get to where you started initially.
Take the second needle and do the same thing. You may wonder what the purpose is. The reason for doing this is that this will give most of the support for your knife. It’s after all the opening of the sheath and it will take a lot of pressure and movement. If it’s not tight and strong enough to withhold stress, then the glue may begin to lose its grip with time.
To proceed on, keep stitching the same way all the way through the holes you drilled. Tug now and then to make the stitching as tight as possible. When you reached the end, you can safely cut the cords/threads on both ends and burn them slightly. Burning the ends will create small liquid balls right on top of the threads, thus making sure they won’t un-stitch. If you have an edger or sand paper you can refine the edges of the leather to make it even better and nice looking.

You can put some of the same die you used for dyeing the leather to hide the threads (otherwise they stand out too much). By this point you will be more or less ready and your sheath can be used for the knife you prepared.
If you need to see all this done in action, watch this above YouTube video on making Folded Knife Sheath.
Now that you know how to make your own sheath, you should also learn how to make your own knife. We have a detailed tutorial that will get you through step-by-step in this article here.
Second method for making a knife sheath
Here is another way of making a sheath. It is basically similar to the above method, but you can start by outlining your sheath’s form on a piece of paper or thick cardboard. You can then prepare the intended leather for the sheath and applying the outlines on the inside surface of the leather. Using a strong blade cut out the sheath part from the leather.
Once more you will need to prepare a belt strap and a welt for the sheath. There are some additional tools you can use to refine the look of your sheath, including a groover and edge cutter (edger). You can also make the sheath’s outside surface more unique, suitable for your taste, using a groover or stamp to make the surface rough along the blade. You can thus see right on the sheath, where the blade is positioned inside the sheath (when you’ve finished it). Do all of these cosmetic changes on the outside part of the leather.
You can die the leather at this moment, before you begin stitching and gluing the sides. As you do that, take your time to glue the welt in between the sheath’s sides. You can then also attach the clip on the sheath top part, using rivets.
It’s time to make the holes for stitching and sewing the threads. Any sharp tool will do, as long as the holes aren’t too big. Also, use button clips for the handle of the knife (if you had planned for this in the beginning). So after you had finally stitched the sheath you’re basically ready to use it.
Here is a short but instructional YouTube video on doing this second type of knife sheath.
When you have tried the above knife sheath versions you can begin experimenting and adding more features on your future sheaths. As long as you are not scared to try new ways of making improved sheaths, you won’t be wrong.


As an alternative to brand new leather, you can use old leather shoes, especially if the knife is just small. It’s actually one my best practices, I store leathers from old shoes and I re-use them in any way I can.
Hi Sarah, You can use old leather, but the most important thing is knowing the leather sheath making skills.
Can I recycle old leather to create knife sheaths? I had some success when creating bracelets out of old belts in the past, and would like to use that experience to make knife sheaths.
Yes, you can make resourceful custom-made shealths.
What is a good way to learn how to recognize a high-quality leather work? Because a knife is always trying to cut its way out of its sheath. An important consideration would be stitching, it’s obvious when a sheath is put together with cheap glue, even when it’s new it won’t last. Looking at the exposed places at the ends of the sheath you can clearly see where the knife is exposed.
When choosing a knife sheath, consider the size, type of blade, type of tang, and the type of knife tip. This way, you will be able to choose the perfect sheath.