
Cold weather camping tips come in handy when deciding to pack and head out for a snow camping trip. Why not? Winter is when the snow-draped mountain is glowing under the moonlight and when campers are in retreat giving you extra space for yourself and company. Backpacking in the snow also appeals because there is beauty, pristine and tranquility in the winter wonderland, without bugs, mosquitoes and crowds to deal with, at least minimum.
[the_ad_placement id=”in-text-1-type-r”]
Cold camping requires a little bit more planning than the usual camping you know because the extremeness of the weather may be uncomfortable and pose danger (think of avalanche, falling branches of trees, harsh winds…). With a little preparation though, you’ll be surprised on how you would feel comfortable and keep yourself safe.
Keep your body dry and warm
Going out in the cold and definitely staying for a night or two out there, you will feel extremely cold (and may even suffer from hypothermia if you won’t wear the right clothing). You should be able to put on layered clothing that can wick moisture, dry up fast, resist water, is able to breathe and insulate.

You can adjust layered clothing based on the level of warmth you require. In general, you will need…
- The base layer is your underwear, particularly synthetic or merino wool fabrics due to their ability of wicking perspiration away from the skin and getting it into to the outer layers. And because they dry quickly, you don’t stay wet for long. You should also wear lightweight and then a thicker and heavyweight base layer.
- Down jacket (middle layer) serves as the insulating layer to retain body temperature, and for snow camping, think of micro-fleece pants, shirts and jackets, one of the essential winter camping tips to remember.
- The outer layer/outer shell (commonly breathable and waterproof) works for your protection from the harsh weather elements, including snow and wind. You can consider laminates or cheaper alternatives, including polyurethane-coated fabrics (also waterproof but not as breathable as laminates). When buying, consider those with underarm and core vents for expelling excess moisture and heat.
You can also learn more about the necessary layers of clothes that will protect your skin and organs from cold, in this well-documented article.
While you can possibly get by with your old hiking boots, you have to remember snow trekking requires waterproofing and insulation and so you should wear appropriate winter boots for such purpose. But of course, you may also need snowboarding and/or skiing boots, as each of such activity requires boots compatible with bindings.
Consider essential winter accessories
After the basic clothing and boot tips, let’s proceed to the must-have winter accessories.
- Put on a hat because it does not only insulates and protects your head from the cold but also your body.
- Mittens and gloves should never be forgotten as well as bringing some extras for replacements when a pair gets wet.
- Goggles/glasses can protect your eyes, not only from the wind but from the sun, too. You can pick something suitable for specific weather conditions.
- Thin, snug-fitting socks are a must-have for the first layer before putting on another pair over it, but make sure both of which are made of synthetic fiber or merino wool. Consider the boots’ fit when selecting the second layer of socks because it would be too tight if you wore a very thick pair for the second layer. Again, bring in some extras for easy replacements. And if they get wet, put them near your sleeping bag for drying overnight.
- Gaiters are needed to keep the snow and water out your boots and add extra warmth. Make sure to use only breathable and waterproof ones designed for winter.
Choose the right backpack
While you are getting all excited of this extreme weather camping soon, you should know that winter camping requires an extra gear. And having that said, consider taking a high volume pack, although you have to pack lightly as much as possible.

The thing here is to ensure you are prepared for any winter conditions. Consider this guideline for a two-to-four day camping.
- At least 65-pack (Lightweight)
- At least 80-liter pack (Deluxe)
Remember to get a backpack with lash points, if you’re planning carrying snowshoes or skis.
We have reviewed some great survival backpacks so, if you want to learn more about this crucial item in your gear, you should read our best survival backpack article.
Pulling a sled
Part of this checklist for winter camping is pulling a sled if you’re taking longer trips because it can reduce the weight your back has to carry, letting you take more gear.

But take note, it may not be practical for all types of terrains, so plan and research the trail/route to decide whether taking one is appropriate or not.
Bringing utensils
Of course, you can’t eat without utensils and you only need two items—a plastic spoon and a plastic cup. Did we say plastic? Yes, you don’t bring metal utensils for snow camping and you obviously know why. And cleaning plastic utensils is a breeze that all you need is to scrape every meal’s remainder on them using snow.
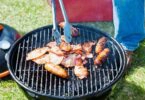
Planning for proper nourishment in winter camping
Caloric requirement
In order to keep the body warm in winter camping, you need to increase your caloric requirement. Specific variances apply per individual (age, health, body metabolism…), but here is a basic guideline.
- 2,500-3,000 calories for sedentary occupation
- 3,500-4,000 calories for three-season backpacking
- At least 4,500 calories for winter backpacking
Meal plan
Experts suggest avoiding fresh food, including vegetables, eggs and fresh fruits because they’re loaded with water, meaning they weigh so much. But just like any rule, an exemption applies! You have to bring high fat food sources, including butter, cheese and meat, as well as dry food, including rice, cereal, oatmeal and wheat.

You may also consider bringing some extra, including freeze-dried food, which cooks easily saving fuel and baked goodies, including cookies, which give extra energy boost almost instantly.
First is breakfast, which should not be complicated but a simple yet complete one, because it starts your day and gets you moving and working as soon as possible. Remember, staying out in the cold and standing out your tent for long can just make your body and feet cold, so think of a good simple breakfast.
A tip: Consider food to cook in water, in each person’s cup (e.g. oatmeal, granola, hot chocolate…). And for extra boost, add in a bit of margarine and milk. Easy yet complete with a combination of sugars, fats and proteins, these breakfast foods can keep you going through really quick!
[the_ad_placement id=”in-text-2-type-r”]
For lunch, let’s have another simple approach to cold camping You can break out the stove and cook if you like; otherwise, you can just carry a personal lunch to eat throughout the day, when you’re at water stops, scenic areas and clothing breaks. Obviously, the second approach is better than the first because it reduces the time to stand around and spend a major stop. But either way, consider the three major food groups (fats, proteins, sugars) we’ve discussed about earlier.
And for the last meal of the day—dinner—here is a simple approach, too. Start it with a hot drink or an instant soup (Again, each could be made into individual cups). Taking some hot soup provides some warmth while main course, which can be some stew, is cooking. A stew or a glop can save both fuel and time. For instance, a glop starts with a gravy base and has noodles/rice, some frozen vegetables and protein (cheese, lunch meat, tuna…).
You can also make meals out of freeze-dried food, which can be just added to boiling water, requiring less fuel. Different vendors offer these types of food, although they cost more than traditional noodles and rice. Consider hot drinks, including hot chocolates, tang or tea, and then dessert. Before going to bed, you should have heated water in personal bottles.
One great approach to food during winter is learning how to prepare your own MREs (Meals ready to eat). We have a very well-written article on homemade MRE so don’t hesitate to take a look.
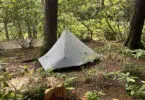
Choosing a winter camping shelter—tent
But before you could have a tent, you have to choose one based on several features. To withstand both snow and wind, find a strong 4-season tent, which usually have stronger poles for holding loads of snow. After that, look into its ability of shedding snow, so it should have a roof line for letting the snow fall off. For a winter trip, you need much internal room because of all the gears you’re taking and because you need to stay inside the tent for a longer period of time.

Aside from these factors to look into when finding a winter camping tent, consider one with a rainfly to reduce condensation while providing better insulation (Inside, temperature is at least 10 degrees warmer than the outside).
[the_ad_placement id=”in-text-3-type-r”]
You can opt for free standing tents, which are designed and made for winter use, but avoid three-season dome tents, which do not have strong stitching and poles to hold snow. We have some great reviews on tents that can withstand the wrath of winter in our article about cold weather tents so go check it out!
When done looking for a suitable winter tent, consider adding flooring using a space blanket and covering its edges to seal it off well.
Additional checklist for winter camping tent
- Additional poles and splints
- Stakes (for staking your tent into the ground when going to windy areas)
- Ground sheet (tarp or space blanket)
- Wisk broom (for brushing the snow off your boots and clothes before going inside the tent)
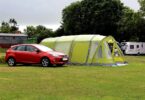
Picking a campsite
- Read and understand campsite rules and regulations.
- Don’t select a low-lying area that accumulates the coldest air.
- Avoid open areas and ridge tops, where winds could be harsh and strong to blow down your shelter.
- Avoid avalanche-prone areas.
- Watch out on dead branches hanging in trees.
- Check on water availability on lakes and streams.
Building and setting up the camp
- Tramp down areas, where to build your kitchen and tent.
- When setting up the tent, make sure its door is at 90 degrees to prevailing winds.
- Stake your tent out.
- Build snow walls on the tent’s windward side by mounding its sides with snow. Make sure you do it with someone to push out the tent while you’re making snow walls to avoid the tent from collapsing.
- Start digging out a porch in front of your tent so that you can take off your boots easier and then make a kitchen pit, which should be at a minimum of six feet in diameter, enough for four to six people. Be sure to mark out this circle with a rope. And then begin digging at least two feet down and pile the snow around the pit’s perimeter. After, pack the snow at the perimeter of the hole, giving you at least four feet deep of protection from the wind.
Other general winter camping survival ideas
- Take food for sleeping to thaw fresh items, including meat, for next day’s lunch. And if you wake up cold in the middle of the night, some protein (e.g. cheese) could help. [Protein is digested slowly while you’re asleep, so it can provide just enough of body heat for a longer period of time, something you don’t get from sugar that gives you high body heat fast, but then also quickly causes drops in temperature.]
- Minimize trash to bring with you by repacking food into separate bags or sacks (dessert, dinner, lunch…). And for your convenience, label each bag or color code it.
- Dig a hole in streams or frozen lakes for water source, but be careful not to fall in. You can also melt snow to make water by heating it up and adding snow to it, so it can turn into water, something more efficient than dumping snow straight in which can burn the bottom of your container (*Approximately 10 quarts of snow for a quart of water).
Sleeping tips
- Get warm before getting into your sleeping bag by performing a few of jumping jacks to build heat up.
- Before sleeping, get all the gears, water bottle and tomorrow’s lunch out your pack.
- Don’t forget brushing off snow from your boots and clothes before going inside the tent using the Wisk broom.
- Strip off layers of clothing and just keep to what is enough to fit into your sleeping bag. [Too much of clothing can compress the dead air space in the bag].
- Take off damp clothing layers and put on dry ones, especially socks.
- Dry up wet items by placing them in the sleeping bag with you.
- Put the food and water bottle in the sleeping bag, t00.
- Additionally, you can keep yourself warm wearing a hat as well as polar guard booties.
- Sleep with your face out the bag to reduce any moisture accumulation inside it.
- Changing sleeping positions may help if you keep waking up in the middle of the night several times but may be insufficient for some people. Stoke up your furnace by eating some proteins when you wake up feeling cold at night (Something normal in the cold weather).
- If you need to urinate, go for it! Otherwise, you will be losing energy because your body has to keep all extra fluid throughout the night.
- Don’t forget to bring a thermos with hot water inside your tent.
General checklist for winter camping
The following is optimized for winter trips in mountainous areas, where temperature ranges between 20 to 30 degrees Fahrenheit. Make adjustments based on specific conditions.
| Outer Layer | Base Layer | Accessories | Footwear |
| Breathable/waterproof jacket | Expedition-weight long john tops and bottoms | Fleece/wool hat | Camp booties |
| Breathable/waterproof pants | Middleweight long john tops and bottoms | Balaclava | Waterproof snowshoes |
| Soft shell hiking pants | Long sleeve shirts | Synthetic liner gloves | Synthetic or wool socks |
| Insulated down jacket | Synthetic bras | Middleweight insulated ski gloves | An extra pair of socks for sleeping |
| Waterproof gaiters | Synthetic briefs/panties | Down mittens | |
| Insulated pants | Bandanna | ||
| Sun hat or visor | |||
| Waterproof over-mittens |
Gear list:
- Internal/external frame backpack
- Four-season tent
- Sleeping bag
- Inflatable sleeping pad
- Collapsible snow shovel
- Foam sleeping pad
- Trekking poles
- Fuel bottles
- White gas stove
- Waterproof matches and lighters
- Cook set
- Plastic spoon and cup
- Headlamp with extra bulb and batteries
- Parkas
- Water bottles
- Compass/GPS
- Vacuum-insulated bottle for hot drinks
- Multi-tool, Swiss knife or pocket knife
- Goggles, sunglasses
- Chemical heat packs
- Assorted zip-lock bags
- SPF+45 sunscreen
- Stuffsacks
- Lip balm
- Toilet paper
- First aid kit with personal medications
Other gears:
- Toboggan
- Personal locator beacon
- Pee bottle
- Towing sled
- Metal tray
- Crampons
- Avalanche probe and beacon
- Ice axe
*This winter camping checklist isn’t comprehensive but is only an overview of what to bring, which may vary from situation to situation.

Nevertheless, a little bit of planning before cold camping can keep you safe and prevent you from meeting any mishaps along the way (or least be prepared to whatever you may encounter out there).
Give at least a month, if possible, when preparing for winter camping so that you can gear yourself up with appropriate clothing, accessories and tools needed for comfort and safety, not only of yourself but of fellow campers as well. Finally, feel free going over this guide or sharing the tips with your close circles that are planning for winter camping, too.

I didn’t start camping during winters before building first-hand experience. I knew it was challenging, but now with enough experience and preparedness, I quite enjoy the camping experience in winter.
I agree with you in saying that wool is the way to go, cotton when wet takes in moisture and it also drains body heat at the same time. Wool when wet still preserves body heat 40% better than any other material.
Hi Judith,
Thank you for sharing your experience with us. Winter camping is specially hard for beginners and they must have sufficient knowledge in battling the cold weather before taking that first step.
Samuel
Hi Ahmad,
Thank you for your comment.
Wool is the more preferred option but newer materials have now come out that offer the same heat saving benefits at a much lighter weight, which is wool’s disadvantage. It really can get heavy, especially when wet.
Samuel