
Starting with the very basics of the problem, let’s see what exactly a greenhouse is. The Wikipedia definition states that a greenhouse (also called a glasshouse in some areas) is a building covered with a transparent layer of glass of plastic sheets that allows the sun to enter freely and doesn’t allow the heat to escape. These buildings can vary in size from small to industrial sizes and are used to grow various species of plants that either can’t grow in the outside climate or you want them to develop faster.
[the_ad_placement id=”in-text-1-type-a”]Now that we’ve cleared the basics about greenhouses, you should also know that they are not difficult to build. With just the right items and some skills you could build one in your back yard and this is the main purpose of this article.
We are going to walk you through, step by step, and help you build your own greenhouse. This skill is extremely helpful in case of a global disaster because it will help you grow plants and make your own garden.
Food you have in storage won’t last forever and it’s extremely recommended to have the necessary skills to become a farmer for a while. Also, you should make sure to add some seeds in your survival pantry, so you’ll have what to grow in your garden.
The first thing you need to know, before considering the materials and making the blueprints, is the fact that there are two types of greenhouses: glass and plastic. Just as the name states, the glass structures are covered with a special type of glass called horticultural glass. This type of glass is not as clear and perfect as the glass used to make your windows but it’s perfect for raising plants. The plastic structure is usually covered with polyethylene or polycarbonate sheets.

Of course that, if you’re not on a budget and you want a completely high-tech greenhouse, you can purchase a special type of glass that comes integrated with all sorts of sensors, heating and cooling installations and monitoring installations that can be automatically controlled by a computer. These are used on professional greenhouses and, in case of a SHTF situation, they won’t do you any good. The classic old ways are going to prove useful then!
So, now that we know what a greenhouse is and how they are classified, let’s start the discussion on how to actually build one in your back yard with traditional methods and materials.
Choosing the location
The main request any type of greenhouse has is lots of sunlight so make sure the structure is located in the south area and that there is nothing blocking the sunlight. The building can be either a lean-to structure or a completely independent one. The lean-to structure is a bit easier to build and if you choose this type, make sure to place it on the south wall of the building it is going to be leaning against.
If you don’t have a location with all-day sun (highly recommended) make sure to choose one that has morning light. This will help the plants grow faster and healthier. Pay close attention to any bushes or trees that may cast their shadow and block the morning light. Nothing should interfere with the sunlight until late in the afternoon.
Given the fact that you can grow plants in the greenhouse all year long, you must be careful with how the sunlight is going to be in the summer and in the winter. For example, the winter sunlight reaches the Earth at a lower angle so any tree or bush that doesn’t cause problems during summer may be a big problem during winter.
Also, don’t place the greenhouse near evergreen plants as they don’t shed their leaves and the shadow they cast is going to be thick all year long. If this is not a problem during summer, in the winter your plants are going to need all the sunlight they can possibly get.

The next two things to look up for when choosing the location are: easy access to electricity and the flatness and elevation of the area the greenhouse is going to be situated on. Access to electricity is very important as you’ll need to power a few appliances for heat and ventilation to keep the inside temperature at an optimum level. If you decide to build an independent structure, you may need to call an electrician to make the connection with the main grid.
Regarding the area the structure is going to be situated on, you need a flat area that is slightly elevated from the rest of the terrain. This insures a good drainage and water flow during rainy seasons. Excess water must be drained away from your plants, otherwise they will drawn and die.
It is also recommended to build cisterns around the greenhouse to collect the rainwater that drains from the eaves. This will help saving money with water and your glasshouse will be a little bit more ecological.
Choosing the structure
After you’ve chosen the location and you are sure that sunlight will be able to reach it all year long it’s time to start thinking about the actual structure. Well, now it’s the time to actually make a short classification of the various types of greenhouses so you’ll know what to choose and why.
There are mainly 3 types of glasshouses and you can choose either one according to your budget, the space you have available and the climate you live in. Thus, there are:
- Lean-to structures that usually lean on the south wall of your house or a barn. These are usually small and cover the need of a small household but if you don’t need more, this type is perfect.
- Independent structures – these can be as big as your land allows you and require a separate electric panel and water drainage systems. They will also need a bit more work during the building phase but they are worth it.
- A walipini structure (the “walipini” is an Aymara Indian word and it means place of warmth) – this is actually one of the most affordable structures of this sort but it’s mostly used in cold climates. A walipini is actually an underground greenhouse, where you use the warmth and natural properties of the earth as side walls and the sunlight only comes through the roof. We will discuss this structure further in the article.
Now, according to your needs, budget and area of the world you live in, you’ve probably took a decision on the type that will work for you. If so, the next thing you’ll need are plans or blueprints. We recommend going online and downloading the ones that fit your needs. Here are two good examples of greenhouse plans:
but you can find more at a simple search so don’t limit to these.
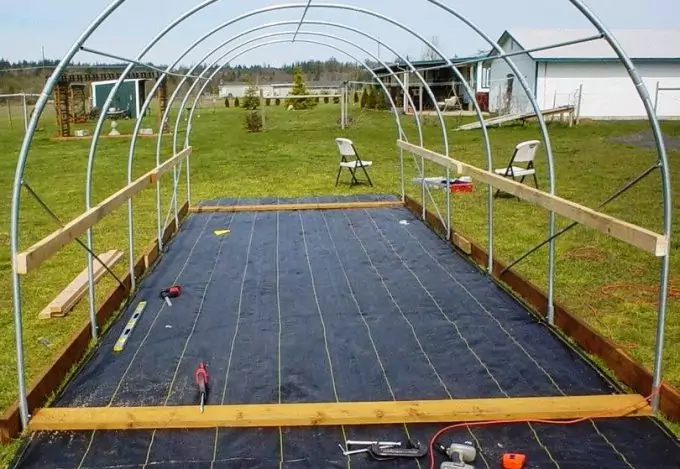
Building an independent / lean-to structure
Because these two structures require approximately the same amount of effort and materials, we are going to discuss them together. The first thing next is to decide whether you want to do this from scratch and learn the very basics of building a resistant structure, or you simply want to buy a kit and follow the instructions in putting the thing together.
If you’re a kit kind of guy, we have a few recommendations that you should consider before buying. For example, the Palram Nature Series Mythos Hobby Greenhouse is a good and reliable kit that is delivered with polycarbonate panels to use on the roof and for the walls, an aluminum frame that is rust resistant, an adjustable vent to install on the roof, a lockable door handle, rain gutters, and a galvanized steel base. With all these, you receive 5 years warranty and you’ll be able to build a glasshouse of 49 sq feet of space for your plants.

Another fantastic example of a kit is the OGrow Deluxe Walk-In Portable Greenhouse. Actually this is the mini version of a regular greenhouse that you can move around to let your plants catch some sun even thought the location is not that great. It doesn’t take up too much of your yard space and it doesn’t require that much effort to maintain it so, if you simply want to grow a few flowers or vegetables, this is a fantastic choice. This kit offers the possibility of growing plants on shelves, creating a type of a vertical garden.
The kit comes with heavy duty metal bars to support the entire structure, clear cover sheets made from heavy duty material, the shelves are reinforced to be able to keep heavy plants, and a steel frame that is rust resistant.

These kits offer you the necessary materials and plans for building the greenhouse but they also cost around $600. Of course that, being a DIY project, you may realize that you need some extra materials which means the costs will not always respect the graphics.
[the_ad_placement id=”in-text-2-type-a”]If you want to do this entire thing by yourself, well, congratulations, you finally understood what it means to be prepared for a global disaster! According to the space you need for your plants, your structure may vary in size and this involves costs with materials and time with actually building it. Make sure to calculate your budget and always leave something extra, just in case something doesn’t fit the initial plan – with this type of projects the unexpected is not such a surprise element anymore.
The most popular size for these structures is 8 by 6 feet but this doesn’t have to be your standard too. Just make sure you plan enough space for your plants and that you have all the necessary materials.

The following thing that you need to choose is the type of structure you are going to use. There are various materials you can use but the most popular ones are wood, pvc pipes or steel bars. The type of materials you are going to use for the frame and the shape of the structure are decisive for your budget, resistance in time and usable space.
For example, if you use pvc pipes you will get a much cheaper greenhouse but the resistance won’t be as good. On the other hand if you use wood or steel bars, the greenhouse will be there for years to come and you will manage to recover your initial investment in a few years.
Important tip: if you are tall and you plan on working in your greenhouse for extended periods of time, build a rectangular shape. The dome shape doesn’t allow for much head space and you’ll have to be bent over all the time you’re inside – this will feel really bad when you have to spend a few hours in the greenhouse.
If you decided to go with the rigid frame (wood or steel), you will also need a foundation or some way to make sure the structure won’t collapse at the firs wind. If local building regulations are too strict regarding foundations, you can dig a deep hole for each pole and fix it by pouring concrete in the hole. This will create a sturdy structure and no one can accuse you of building a foundation.
You will feel the main difference between a lean-to and an independent building when you’re making the structure. As we discussed earlier, an independent structure requires a separate foundation when a lean-to get its strength from the wall it leans against.

Important tip: If you decide to go with wood, make sure to treat it and paint it first. Otherwise it will decay fast and your structure won’t last more than a few years.
Building the structure can be a tedious job so make sure to bring a few friends over to help you with it. Here you can see how to build a pvc greenhouse using all sorts of recyclable materials.
So the costs won’t get so high. And the other video is about building a greenhouse using a wood structure.
As you can see the building times are different and the tools used are also more complex for the wood structure. This is why you need to do your research before actually starting to build one of these.
Cover the greenhouse
As soon as the structure is finished, you must start thinking about the type of coverage you want. In order to have sunlight all day long, all year long, you must consider a transparent material that allows sun to come in. The most popular materials for covering this type of structure are glass, polycarbonate or plastic sheets.
| Advantages | Disadvantages | |
| Glass | Filters the harmful UV lightYou can replace it with fiberglassYou can use old windowsIt will give your greenhouse a traditional, nice lookIt offers more clarity and light | It breaks easily and can cause accidentsIt’s heavy and can burden the structureIt’s expensiveRequires a foundationIt may lead to some plants’ destruction because it lets in too much light
Poor thermal efficiency |
| Polycarbonate | It’s light and doesn’t burden the structureIt is flexible and you can use it on a curved structureI has a better thermal efficiency, keeping the warmth inIt is cheaper to replaceIt’s also easier to install
You can buy it in pre-cut panels that will fit right on your structure Tough and durable with good longevity | It’s not as durable as glass isIt is prone to scratchesMust be UV treated on both sidesIf not insolated properly it can attract humidity and moldsYou must be choose the thickness according to your climate conditions |
| Plastic film | It is definitely the cheapest solutionProduces a diffuse light that doesn’t scorch the plantsResists well to mild shocks | It will rip and tear easilyIt doesn’t have a long lifetime and it must be replaced every few yearsDoesn’t withstand harsh weather conditionsIt has a poor thermal efficiency and if you want to keep some warmth in, you must add more layersIt gets milky white after a few years of usage |
As you can see there are pros and cons for every choice you make. It all depends on how well you want your greenhouse to resist in time and how much you are prepared to invest in it for the years to come. A bigger investment now may save you the money, time and effort you need to add to the structure in the future.
Of course, if you are a bit flexible, and you don’t really want that traditional, clean look greenhouses have in magazines, you can find easy solutions to cut the costs. For example, you can use old windows instead of glass specially designed. The best way to do this is to go around your neighborhood and see if there are any buildings being demolished. When you find one, ask the owner if you could have his old windows (if there any left whole). This way, you’ll save money and you’ll help the neighborhood recycle some very sensitive materials.
Here you can see how a greenhouse made with old windows looks like and you can follow the entire series to get more tips and tricks on how to make it from the very beginning.
Still, you will not always be able to get windows of the same size and this is OK. You just have to adjust the frame so they will fit it perfectly.
Being wooden frame windows, it’s best if you treat and paint them before installing them on the frame. This will assure they will not shrink (anymore) and that they will resist for a long period of time.
If you’re living in a colder climate or if you have winters, the best choices are going to be glass and polycarbonate. They are resistant to heavy loads (snow can be pretty heavy) and they won’t rip as easily as the plastic film does.
Important tip: To make sure your structure is not burdened with too much weight, you can make a compromise and use two types of covering materials. Thus, you can use glass for the walls and door, and use polycarbonate or plastic film for the roof.
Regardless of what you decide to use for coverage, make sure the building is completely isolated. Any holes or cracks will let the heat out and the rain and dust in, and your glasshouse environment won’t function properly.
Floor, drainage and ventilation
Now that the most difficult part is over, you need to cover the inside environment. The first thing you should consider working on is the ventilation.
Ventilation
Given the fact that this is a closed environment, you will need to be able to get the heated air out and bring in new air during summer. Also, you will have to be able to heat the air during winter, when the greenhouse doesn’t have enough light.
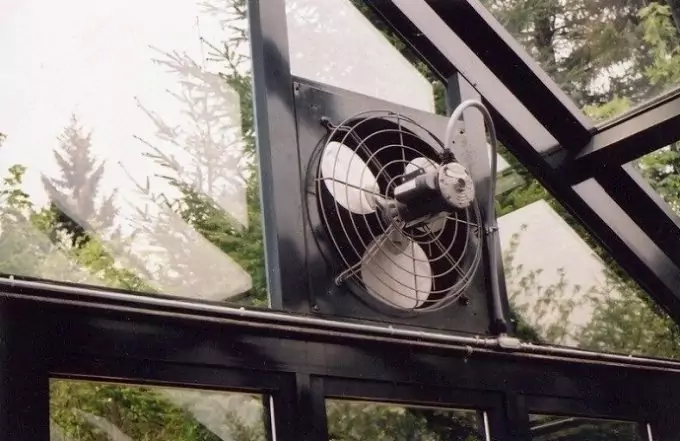
Your inside temperature must be around 80 to 85 degrees Fahrenheit so the plants won’t scorch or freeze. During a hot sunny day, the inside of your greenhouse can get to 100 degrees Fahrenheit very quickly which is why it’s extremely important to maintain a constant monitoring of the temperature.
You can do this by installing a few thermometers like with Temperature Humidity Meter. To make sure your building is ventilated properly, you will need to install a fan (or more if the greenhouse is big) on one of the side walls. Also, you have to create air vents in the roof by opening (manually or automatically) some of the panels. This will create a flow of air that will bring the temperature back to normal.
During winter, you may have to install a heater that works either on electricity or gas to keep the temperature up.
Floor & drainage
The floor is where your plants are going to grow and you can make a few great choices that will cut your job in half for the future.
One of these great choices is a weed barrier that stops the weed from invading your precious vegetables.
[the_ad_placement id=”in-text-3-type-a”]The floor must have excellent drainage so when wetting the plants, water doesn’t transform your glasshouse into a small pool. The best choice for this is gravel, as it has amazing drainage and maintains the heat, but you can also use concrete, bricks, sand, or even dirt. Just make sure to make it comfortable for all the activities you are going to perform in there.
Building a walipini structure
The walipini is an underground greenhouse that uses earth’s natural heating and ventilating system to preserve plants. These structures are amazing for growing plants in colder climates and they are more affordable and easier to maintain than the traditional glasshouse.
The basic idea behind a walipini is a rectangular hole in the ground (about 6 to 8 feet deep) covered with some sort of transparent material that allows the sun rays to come in. For coverage you can use the same materials used for a regular greenhouse but the most popular one is plastic film. You will need to settle the roof into an angle so the sun can cover the entire area so the walipini walls are going to be uneven.

To eliminate any confusion, the side, back and front walls are usually made out of dirt (it’s a hole so there’s no need for other material for the walls) reinforced with stones or other building materials.
The back wall is usually the tallest one and the front wall is lower but this is not a general rule anymore. You can actually build a normal, triangular shape, using a wooden or pvc structure that comes on top of the hole. The roof is actually the main element of insulation and light so you must make sure it is done right.
This sort of structure will save you tons of money on energy as the walipini doesn’t need any extra heat (regardless of the season). The hole will protect the plants inside from any temperature changes. Still, you will need a ventilation and drainage system to protect the plants from any water infiltrations and scorching from extra heat. Even during the winter, the temperature inside can rise quickly so you’ll need to be able to create a constant air flow using fans and air vents.
In conclusion
As you can see, a greenhouse can be a bit of a difficult and expensive job but, with the right information and proper help you will manage to build it and enjoy it for many years to come. The glasshouse is a fantastic addition to your garden and everyone who owns one state that their garden has become more productive due to the fact that they were able to start the plants early.
If you have a garden and some extra terrain, you should start this fantastic DIY project! It will teach you many new skills and it can be a fantastic project for the entire family. It is also a learning experience for any dark survival scenario you might imagine. However, if you learned how to build a glasshouse, you should also learn about the type of seeds you should be planting in your garden. You can do this by reading our article on choosing survival seeds.


Is there a greenhouse that can be built using materials found in a forest? I’m asking in case of SHTF event and one feels the need to build one.
Well, this would be something extremely creative, but I don’t thing it’s impossible. I’ll look into it and let you know.
Using forest floor materials can be very interesting indeed. Most start-up greenhouses that I have seen start with plastic sheets over arcs made of thin bamboo.
Yes, forest floor materials can be interesting, but the best choice for this is gravel, as it has amazing drainage and
maintains the heat.
Great article!!
Thanks Djani for showing interest in our community.