
Like it or not, almost our entire transportation system is based on tires. We need them for public transportation, we need them under our own cars and we can’t go out for a bike ride without having two tires. The sad part is that, until one of them gives up, we never consider tires as being an important part of our lives. The saddest part is that tires know how to teach us a lesson and show us how important they actually are, by giving up in the most unpleasant moments. When you’re in a hurry and you absolutely need to get somewhere, you will get a flat tire.
Leaving the irony of the situation aside, a flat tire and having the skills to change or fix it, may be the difference between life and death. There are tons of scenarios where you absolutely need your car or bike to work at its optimum parameters and a flat can be the worst thing happening. For example, when you run away from a hurricane or a tornado, you don’t need to call AAA to come and help you fix your tires.
Also, let’s image you are on a camping trip with the entire family and, on the way there, one of your tires simply doesn’t want to hold on anymore. Usually, these situations can be solved by simply changing the problematic wheel with the spare one and keep the flat for later inspection and repair. This also means that you must have the right tools and skills to actually make the switch between the wheel in the car and the one on the car.

A skilled driver will know how to solve the problem without spoiling the fun for the rest of the participants at the trip. It usually takes about 15 minutes to change the flat tire and move on towards your target location so it shouldn’t be a big deal. So, if you don’t know how to change a flat tire yet, it’s time to learn!
Getting prepared for the event
No one wants for something bad to happen, especially when you’re headed to a relaxing location where you want to catch a few days of silence and fun.
Still, you must prepare yourself for such events so, when they happen, you’ll be ready to face and solve them quickly and efficiently.
A quick check up
The first thing any responsible driver should do before starting a long trip is getting the car in the service for a quick check up. Here, your car will be inspected for possible problems on the road and this includes the tires as well. If you don’t have the time or the intention to service the car, you can do it by yourself, in the garage or in the back yard. Look for signs or spots of worn threads, cracks, possible foreign elements, or anything else that indicates your tires are close to their expiration date. If your tires don’t look sturdy enough maybe it’s time to buy new ones.
Here are a few tips on when it’s time to change a tire:
- check the tread; if it’s down to 1/16th of an inch the water is no longer diverted by the tire;
- check if the thread wear is even by feeling the wheel with your hand. If the wear is uneven this may be the effect of a misalignment so you should take the car to a service before changing the problematic tire;
- check for sideways bulges or bubbles – this means that the tire’s structural integrity has been damaged and it can explode at high speeds causing an accident. If you see something like this in your tires, don’t wait to see if the threads are worn, that tire needs changing as soon as possible!
The right tools
The second step in getting prepared is to make sure you have the right tools and that you know how to use them. Most cars are already equipped (by the producer) with some necessary tools like:
- a simple jack;
- a lug wrench;
- the spare tire;
As you can see it’s not much but if you know how to use them you can get yourself out of a bad situation. To learn how to use them, check the car’s manual and read the instructions in there.

To make life easier, you should also add the following items in your trunk:
- a tarp or a thicker mat so you can kneel and have access to the tire easily without getting dirt all over your clothes;
- rubber or working gloves would be perfect so you won’t get your hands dirty;
- a flashlight with some extra batteries just in case the problem happens during night time;
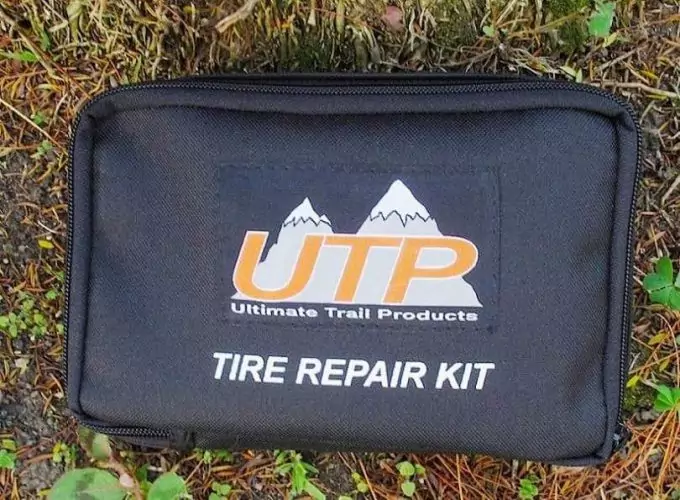
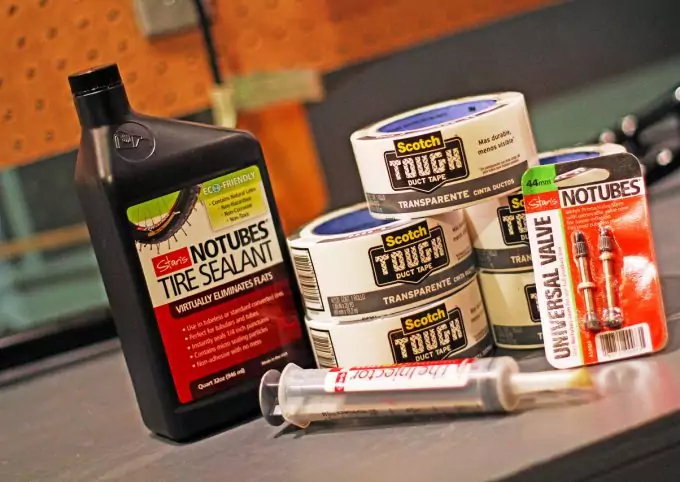
- some type of sealant that is used for fixing small punctures (we’ll discuss these later);
- a tire gauge and tire blocks;
- a raincoat to protect you when it’s raining (yes, tires get flat during rainy days too);
- extra clothes for the cold season to keep you warm while working in the snow.
Of course that you can add to this small kit for tires but these are the main items you should have in case something goes wrong.
See: Prepping on The Go: Assembling a Car Survival Kit
How to change a flat tire on your car
Let’s discuss how to actually change the flat with the spare wheel. It is not difficult and virtually anyone can do it so don’t expect to be a tedious activity that requires a lot of effort. After you did it once, you’ll be able to do it anytime you want.
The first thing to look out for when changing a tire is the location. Try to get the car as far away from traffic as possible and make sure you are visible to the other drivers by activating your hazard lights. Also, try to get a flat, solid surface that will support the car from all points. Avoid as much as possible uneven or soft ground as there is the danger of the car rolling away from you into a ravine or on a steep.
To make sure the car stays put and doesn’t move while you operate around it, apply the parking brake and put it in Park or first if you have a standard transmission. Since some extra precaution never hurt anyone, put some heavy objects in front of the tires (you can use rocks or, if you have them, the tire blocks).

Next, make sure you have all the necessary items at an arms’ length so they will be easy to grab when you need them. Start by removing the hubcap so you can see the lug nuts. With the wrench, try loosening the nuts – you don’t want to remove them completely, you just want to give them a start while the car is still on all fours.
For this, turn the wrench to the left. Sometimes, the lug nuts are extremely tight and your arm force is not enough. From other drivers experience and ingenuity, here are two tips that may be of real help when the nuts won’t budge:
- Try standing on the wrench while it is placed on the nut. Using your full weight may be just the right thing that stubborn nut needs;
- Take a rock or a hammer (one of the items that are not on the list but it’s good to have around in need) and hit the wrench arm with it. Usually this does the trick with the worst nuts.
As soon as the nuts are a bit loose and you feel that you can unscrew them easily, take the jack and place it under the frame, near the problematic tire. Make sure that the jack is placed on the frame and not on your car’s floor. Usually, the producers create a special place in the frame for the jack so you won’t place it wrong and crack some of the more sensitive parts.
[the_ad_placement id=”in-text-2-type-a”]With the jack in place, start raising it until you feel it supports the car for the problematic wheel. Check if the jack is firmly in place and if it is perpendicular to the ground. If it tends to lean on one side you must lower it and place it again until it will be positioned correctly. If everything is in order, continue raising the jack until the tire is not on the ground anymore.
Now, unscrew the lug nuts that you loosened earlier and make sure to not lose them – you won’t be able to drive anywhere without them. Once the lug nuts are down, pull the tire towards yourself and place it on the ground. It is actually recommended to place it under the car, near the wheel with problems so, in case something goes wrong and the car falls from the jack, it has something to stop the fall.

Take the spare wheel and place it on the hub, making sure to align the lug nut posts with the holes in the wheel and push it until you’re sure it’s fixed. Next start putting on the nuts and screw them just to keep the wheel in place. At this point there’s no need to tighten them. Just make sure the wheel is perfectly balanced and screw the nuts going in a star pattern from one nut to another.
If you apply too much force at this point, the jack may be upset out of its balance and accidents can happen so, don’t do anything more than screwing in the nuts using just your hands. With the wheel in place and the nuts screwed in, start lowering the jack until the car is back on its own four wheels.
Remove the jack and take the wrench to tighten the nuts. You can use the same “techniques” you used when unscrewing the nuts. After this task is done, it’s time for cleanup. Gather all your tools and put them in the trunk, together with the punctured wheel. Take a quick look around to make sure you didn’t leave anything behind and you can continue your trip.
How to fix the flat tire
Now that you’ve learned how to change the tire in case you get a flat on the road, it’s time to see how to fix the problem. Most drivers would simply take the tire to a service and let professionals deal with it but, if you’re curious and want to learn new things you can make this a DIY project.

The most popular cause of flats is the puncture. Small, sharp objects like nails, screws, staples, items that you couldn’t think about being on the road and under your tires can darken your day. Now, you have two main possibilities to repair a puncture (besides going to the service):
- Using sealants;
- Using a tire plug kit.
Both methods are safe and simple but they both require a small budget to acquire all the necessary tools and items.
For more reviews on the best car safety kits, check out our earlier article on this topic.
Fix the tire using sealants
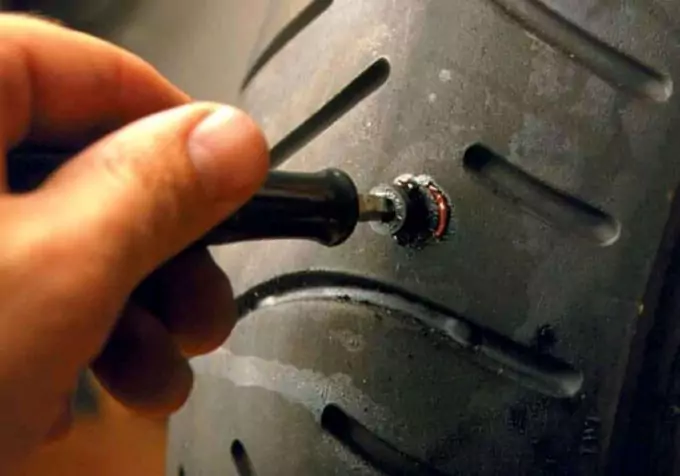
For this operation you are going to need the tire sealant, a pair of rubber or working gloves, a pair of goggles, and some pliers. First, make sure to read the instructions on the sealant as different manufacturers have different rules when it comes to applying the solution on the tire. If you can, remove the object from the tire using a pair of pliers or something that has a sharp end.
To apply the sealant, simply remove the valve cap and attach the sealant’s nozzle to the valve stem. Press the button on the recipient to release the content in the tire. Next follow the instructions on the recipient and when the waiting time is over, you can re-inflate the tire.
To help you speed the process, we put together a list of the best three sealants you can find online. We used their popularity among users as a classification factor. The products we mentioned on our list are available for all types of tires so don’t expect to read only about car tires. Tires like bike tires, wheelbarrow tires, lawn mower tires, and other sorts are definitely on our list.
NoTubes Tire Sealant
This is a fantastic sealant for bikers as it helps maintain the tire for longer periods of time. Bikers that like to take mountain routes usually have to carry a tire repair kit in their backpacks but with this sealant, the problem is solved. It remains liquid inside the tire for about 6 months and when a new puncture appears, it covers it immediately allowing you to move on without even knowing. It also works on bigger punctures.
With one quart you can fix up to 8 tires and it can repair a 0.25 inches hole instantly. The price ranges around $20 so it’s pretty affordable considering that a good bike tire can cost sometimes around $50.
The con users mentioned with this product is the fact that the dried sealant may cause oxidation spots on the wheel. Also, you shouldn’t use it with wheels that you don’t wear as the liquid inside evaporates and the latex will slowly solidify.
If you like this product you can find and buy it on Amazon.
Slime 10009 Tubeless Tire Sealant
This product is amazing to fix punctures of maximum ¼ inches in your tubeless tires. It is also amazing to use as a preventive measure and acts almost immediately when something sharp decides to live in your tire. It is advertised to last up to 2 years and it is extremely easy to clean with just water.
It is not recommended to be used for high speeds (over 65 mph) excepting emergency cases. This warning is issued by the manufacturer as the product may cause excessive vibrations. Also, it will not seal sidewall punctures and it’s not recommended to be used with faulty valves.
It goes great for both bikes and cars and even some other types of tires. Users are completely satisfied with the product with one exception, cars with tire pressure sensors. This product is not made for this sort of tires.
If you like this product you can find and check its price on Amazon.
Fix-A-Flat S430 Aerosol Tire Inflator with Hose for large tires
This is the product you want to have around for your car! You can seal a 3/16 inches puncture and you will have a brand new and inflated tire in a matter of seconds. It works with tire pressure sensors and it is easy to cleanup with water. Still, this is not a product that will make your flat hold for as long as it would have before the puncture. It’s actually more of a quick patch before you apply some real treatment on the tire.

You can apply it on various types of tires and it produces a slight imbalance in the wheel due to the liquid you just introduced. This feels a bit uncomfortable at driving but you’ll get used to it.
If you like this product you can find and buy it here.
Using a tire plug kit
First of all let’s see what a tire plug kit is and what it contains. Almost all kits contain the same tools with minor additions to certain manufacturers. The only difference between the kits is actually the design and maybe the materials the tools are made of. Also, the price may vary but a standard tire repair kit shouldn’t cost more than $20. It’s a very small price to pay for your tires’ health.
A tire repair kit usually contains the following items (not necessarily all of the items mentioned bellow):
- 1 T-handle insert tool
- 1 T-Handle Spiral Probe
- repair plugs to insert in the puncture
- hex keys
- sealing lubricant
Now, let’s see how to actually use one of these kits to repair the punctured tire.
Fist you need to pull the wheel of the hub using a wrench and a jack (see above at the instructions on how to change a flat tire). As soon as you have the wheel in your hands, rotate it and find the puncture. If you can’t see any foreign object, try to “see” with your hands. It will be easier to feel a small object in your tire that seeing it with your eyes. As soon as you find the little bugger, use a pair of pliers to get it out.
There are times when you can’t see or feel a foreign object in the tire and these make your life a bit more difficult, as it will take some more work to find the leak. For these situations, use soapy water (shake until it becomes lather). Pour the soapy water all over your tire and watch it carefully. Where there’s a leak the soapy water will make bubbles.
Now that you’ve the leak, mark it using either a marker, chalk or something else easily visible. Get the T-Handle Spiral Probe from the kit and insert it in the puncture moving it up and down. This action will clean and even the area and remove any dirt so the glue will stick correctly. Next, add the glue or the cement from the kit and use the T-Handle insert tool to insert the plug in the hole. It should remain about 1 inch of the plug out. Wait for about 1 minute and then cut the rest of the plug.
The next step is checking out if you really did a good job. For this, inflate the tire at the right pressure and check if the pressure is maintained for a few minutes. After this, go to the puncture and add some soapy water around it. If there are no bubbles, then you did a fantastic job! Place the tire back on the hub and enjoy your ride!
Again, to make things a bit easier, we put together a top 3 of the best products on the market, so check the list bellow.
Victor 22-5-00106-8 Heavy Duty tubeless tire repair kit
This is a standard repair kit that costs around $10 and comes with the two T-Handle tools and 5 pieces of 4 inch heavy duty repair plugs.

This kit can be used for tubeless radial and bias ply tires.
If you like this product you can find and check its price here.
Slime 1034-A T-Handle tire plug kit
This kit also has the standard items but the T-Handle tools look sturdier and they will allow you to apply more force. Also, the kit contains 1 tube of glue for tire repairs so you can fix the puncture without having to remove the wheel from the hub.
If you like this product you can find and purchase it on Amazon.
Tooluxe 50002L Professional tire repair kit set
This is a fancier set that comes in a heavy duty hard plastic toolbox, allowing you to keep the entire kit together. Besides the traditional T-Handle tools, the set also contains 2 hex keys, sealing lubricant, and 30 pieces of string plugs.
[the_ad_placement id=”in-text-3-type-a”]The price is a bit higher (around $20) but if you want some extra quality, this kit will definitely be with you for a while!

The final conclusion after seeing how to change and fix a flat is that there’s nothing to worry about. Sure, it’s an unpleasant event but with the right knowledge and skills you’ll manage to fix it in a few minutes.
If you like this product you can find and buy it on Amazon.
Learn early how to survive in any emergencies. Check out our popular piece on basic essentials for bugging out on the run – it’s an amazing read!


I’m a Stans devotee; it does all it claims. I’ve utilized Stans tubeless for a considerable length of time. One stipulation: it’s best to use this framework on haggles you put a significant measure of miles on in a brief span; conceivably tires you destroy and supplant each season. On the off chance that left on edges too long, you have to include sealant intermittently as the fluid dissipates. At that point, the firm latex develops within the tire, in the long run including a considerable measure of material and weight to your wheels/tires. It’s a wreck to attempt to get out. On the off chance that the tires are on your second arrangement of edges and are hanging in your carport, the latex cement in the base of the tire in a major stringy mass. For my special arrangement of wheels with mud tires (that I may not use in a single framework) I will quit utilizing tubeless with sealant and do a reversal to tubes.
That;s great, Jonas.
Tubeless is an advantage if you are a hard-core rider who wants
maximal responsiveness and control, while avoiding pinch-flats in
difficult terrain. “Going tubeless” is not worthwhile if you’re basically a
gutter-bunny who occasionally ventures onto smooth dirt trails.
I have no issues when it comes to fixing a flat tire, but I once had a tire rip from the inside and was left stranded without a replacement. Is there a suitable tool on the market for such a scenario?
There are various tools you can use, but you can try tubeless tire sealant.