If you’re a survivalist who tends to spend a lot of time in the nature your chances of ending up in a critical situation are pretty high. Or maybe you’re a casual hiker who always carries matches and has never considered the necessity of learning how to build a fire. In either case, you definitely should learn how to start your own fire, both with and without matches. It’s much more challenging to do that without matches, and it requires both knowledge and personal experience.
[the_ad_placement id=”in-text-1-type-r”]In this article we will give you the knowledge. Without it you can’t go on and hope to rub some sticks together and hope that they catch on fire. You have to be prepared, both mentally (for the critical situation) and with practical skills.
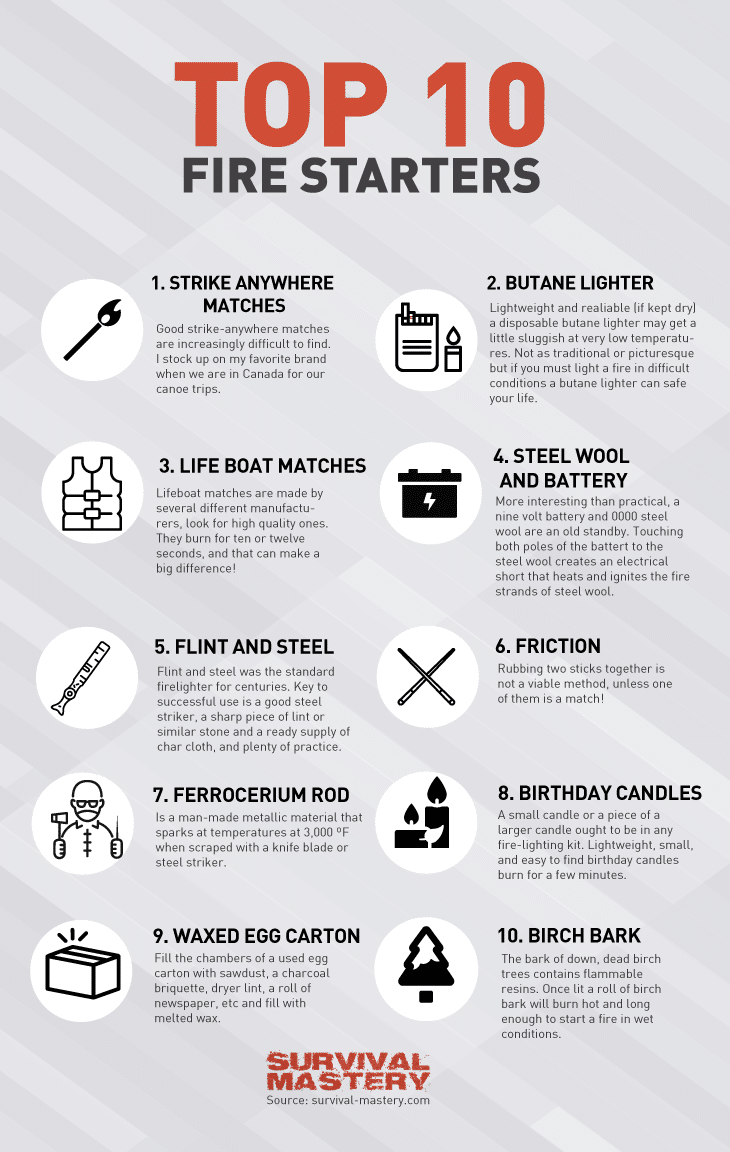
So, before you go hiking or camping next time, practice the below listed methods until you succeed. Still, you should consider having backup, especially in the practice rounds. That’s why we recommend taking a look at our reviews on the best fire starters on the market.
Several basic and conventional fire starting techniques
Friction-based technique
This is the most often explained technique for starting a fire. It requires that you prepare a peg base and a spindle stick. You have to prepare the base by cutting the peg in half (it doesn’t have to be thick, but at least several inches in width). Then you may a tiny hole in the base, but not too tiny – you need to place the spindle in it, so you can start rotating the spindle in the hole in a vertical manner. Thus, embers are produced and then they are used for starting the actual fire.
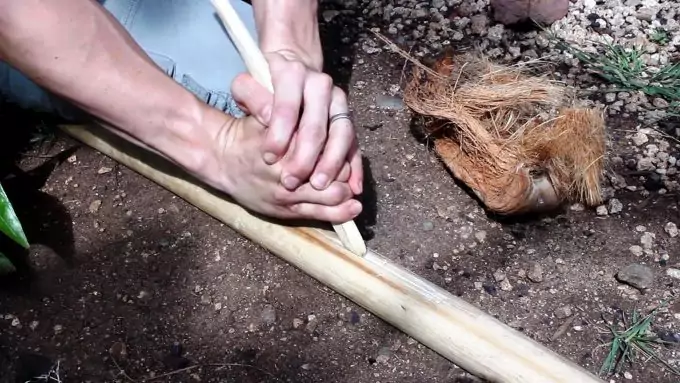
Image credit: pinsdaddy.com
You can ‘feed’ the fire by placing some dry grass or other tender dried vegetation. They catch on fire very quickly and will get the fire going.
In order to first create the embers, the base needs to be absolutely dry. Even the tiniest moisture left in the peg will slow down the process (or obstruct it completely). So, either find a perfectly dry peg, or dry it beforehand by laying it in a hot sunny place.
The Hand drill
This is a similar process to the above described, but the hand drill method is far more often used than the friction-based. In fact, they both employ friction, but this one simply more popular.
Again, you need a wooden bed/base and a spindle. First, you need to cut a V-shaped notch in the bed, and make a smaller depression next to it. Place tinder material and other tender dried vegetation (dry bark will also do) and place them in and around the notch, like a nest. Now take the spindle and starting rotating it in the hole, again vertically, until you see some sparks and embers being produces. Hopefully they will fall on the surrounding dry tinder and it will quickly start to burn (you’ll first see the smoke coming).
You need to gently blow at the heated nest until you actually see some actual fire starting. Feed it slowly and gradually. If you feed it too quickly with large logs and dry wood, it will be suffocated. Give the fire some time to catch up and grow slowly.
Here is a YouTube instructional and detailed video on the same hand-drill technique.
Fire plough technique
This one may be slightly easier although the principle is very similar.
Again, prepare some fireboard like you did in the above techniques. This time cut a groove (along the board’s length). Again you need a spindle to trigger the production of embers.
Start rubbing fast the spindle in along the groove (up and down). Place again some tinder and make a nest of it so that any embers can get caught in it. When you see smoke coming up, you’re ready to actually start the fire by blowing at it first, and little by little you feed it more dry wood.
Bow drilling
This method is considered the most efficient and helps you maintain a steady speed while trying to start the fire. You will need a few more items to complete the setting. Again, you need a spindle and a wooden board, and in addition you have to make a small bow and find a socket.
The socket would best work if it’s some kind of stone or rock. It needs to be somewhat flat and ideally have some indentation in its center. The idea with the socket is that you will use it to put pressure on the spindle, so that the spindle is positioned firmly against the wooden board. If you have some oil, sprinkle some of it on the socket, where you’ll position the spindle later.
The bow can be made very simple (you won’t shoot prey with it after all). Just find a branch or another piece of wood no longer than your arm. Dryness and such don’t matter – you only need the piece to be flexible and to have a bit of a curve to it. For the string – if you have some rope, thread, shoelace, almost anything will do. Attach the string to the branch’s ends and you’re finished setting up the bow.
To prepare the fireboard – you need a V-shaped notch (as explained in the previous methods), but this time not along the entire fireboard’s length – just a small indentation. Make another small hole next this V-shaped notch.
Next, take the bow and spindle and make a loop with the string around the spindle (so when you move the bow, the spindle will move with it, since the loop holds it). Then attach one end of the spindle in the notch and cup the other end with the socket. Now the bow is ‘locked’ and to remove it you need to un-cup the socket.
[the_ad_placement id=”in-text-2-type-r”]As you prepared all that you’re ready to ‘saw’ the spindle with the bow’s string. You’re creating a primitive drilling technique since the spindle should rotate quickly thanks to the sawing movement. If you applied oil on the socket then the spindle can rotate even faster.
After some time and vigorous rotating, some embers will be produced from the notch. Keep a piece of bark next to the notch so when an ember flies out the bark will catch it. Also, if you place some dried grass, tinder, and such, they will easily catch fire when an ember hits them. Keep them on the bark you placed next to the notch.
If you need to put this into practice and see it in real life, watch this YouTube video from Discovery.
How to build a fire using a few unusual techniques
Flint and steel
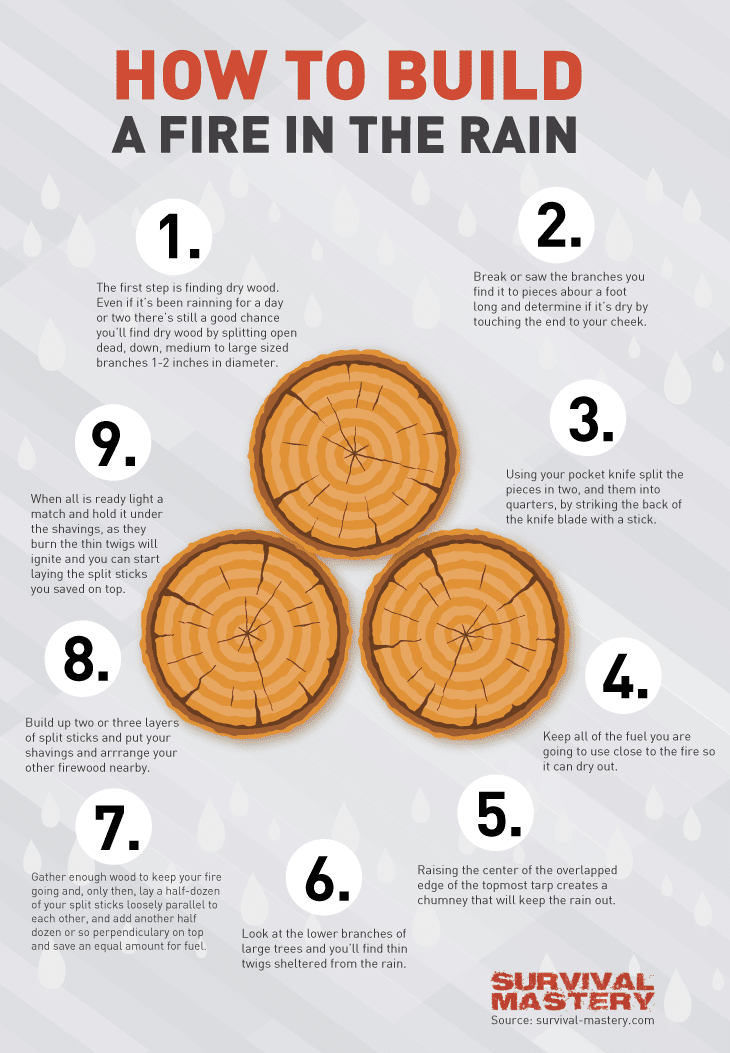
This is also a classical way of starting a fire. It’s also a great idea to carry some flint in your backpack, in case your matches are too wet and useless. Matches come handy when it’s dry, but if it’s rainy and humid, then rubbing a flint into a steel piece (you’re pocket knife would do best) would be your best option. Still, if you really want reliable matches, you should take a look at our reviews on waterproof matches.
Another great thing to carry is the char. This is a piece of cloth or fabric turned into charcoal. This is a very useful piece to have, since it catches embers very neatly and keeps them alive, without actually beginning the fire itself. Since having a char is highly improbable (not many people use it as a good way of starting fire), so fungus and birch bark can virtually do the same – keep the ember alive until you’re ready to prepare for a stronger fire).
Now it’s time to take the char (or fungus) and the flint in your hand. Place them both tight between your thumb and index finger. Leave 2-3 inches of the stone revealed and the char/fungus should be below in the order, but it should catch any embers you produce.
Now if you take your steel knife and strike with its back on the flint, sparks will fly off the edge of the flint and hopefully land on the char which is right below (and your index finger supports it). When the char or fungus holds some embers, place it on a tinder bed/nest and again, blow gently until you see some small flames. Your fire is ready.
Lens-based method
This method takes very little time and skills. Almost any boy has tried melting some plastic toys and such. The only drawback to this method is that you need two things – magnifying glass and sun. If you have one, but not the other (or have neither) you really have to think of another method.
This doesn’t mean you shouldn’t know how to use the lens-based method. In fact it’s highly recommended, since, if you have sun and lens, then starting a fire would feel like children’s game. Literally.

Image credit: offgridweb.com
So, here’s how to do it. Take any type of lens you have at hand – eyeglasses, magnifier, binocular, etc. Then place some tinder and such dried foliage on the ground. Rotate the lens in such a way that you adjust the sunlight to focus on a very small point on the tinder. The closer to the nest you bring the lens, the larger the focus point, thus smaller chances for starting the fire. So, play with that, and keep the lens at a distance so the sunbeam is no more than half and inch in diameter.
Now you need to just be patient and wait for the tinder to start smoking until you see some fire. It won’t take much time. Besides you don’t have to do any fast-paced friction, rubbing or drilling. As long as the sun beam is well focused and the tinder dry enough, it won’t take more than several minutes to see the result.
There is another method with which you can use the sun’s light. As much as it may sound weird you can use balloons and even condoms filled with water. Here is how it works. Whatever you use, balloon or condom, fill it with water so that it has an almost perfect spherical shape. If you fill it with too much water, the spherical shape will be too distorted and the method won’t work. Make sure, if you use a balloon, that it’s transparent enough when you will it with water, so light can penetrate it and for the desired sunbeam at the end.
Use your hands to manipulate the shape by observing the shape of the sunbeam at the end. Due to the shorter focal point of the balloon in this case, you’ll have to keep it closer to the tinder (1 or 2 inches). Play and experiment with it, but keep the sunbeam sharp and concentrated, and not blurry and misshapen.
Surprising or not, you can start fire by using a piece of ice. The ice should again act like a lens. This is a very handy method for winter camping.
Here is what you need to do. You must use only pure clear water for the method to produce any results. Any impurities in the water will prevent the method from delivering any result at all. Also, if it’s cloudy this may also render the method useless. Anyway, prepare clear lake or river water and place it in a block-shape can or foil. The end result should give you a block of ice of 2 inches thickness (no more than that).
Let the water freeze and then take out the frozen block. Now you need to give the block some shape. As you probably already know a lens shape is thicker around the middle areas and thinner in the outer edges, so with that in mind, start shaping the ice block into a lens.
Now that the ice block has a lens shape, you have to polish it so that the surfaces are as smooth as possible. Without having smooth surfaces, the light from the sun will be partially reflected from the uneven surface. So, you have to polish it with your bare hands since the heat from your skin will melt the ice surface and all uneven parts will melt as well. You can then use gloves to further polish what’s already melted partially.
You’re finally ready to use the shaped lens ice block to start the fire. The first method in this section can be repeated with this one – just point the sunlight through the ice block into a sunbeam on a bed of dry tinder. Adjust the focal point so it’s nice and sharp, and just wait a bit for the tinder to catch on fire.
Coke can and chocolate
This method may be pretty weird at first, but you’ll see later why it works. You need a coke or soda can and a chocolate bar. And let’s not forget that you need plenty of sun for this to work.
So, unpack the chocolate and chop a block from it. Now start rubbing the soda can’s bottom on all places with the block. As we know, soda cans have rounded inward bottoms, but they are not smooth. What you’ll be doing with the chocolate is to smooth the bottom so it’s polished like a smooth metal. It may even look like a mirror later on. If you have an abrasive toothpaste, that would work too.
In the end, you should have a parabolic mirror and since it’s elliptical it will again act like a lens, by focusing the sunlight into a tiny focal point. Then, position the can’s bottom towards the sun so it catches the sun’s light and then point the sun beam towards the tinder you’ve prepared. This sun beam is extremely powerful and like a laser so it will take no more than a few seconds to see the tinder smoke. You know the rest and how to keep the fire alive and growing.
Of course for this method to make any sense to you, you should have brought along soda and chocolate (which are pretty luxurious items in your backpack), but it never hurts to know several more methods of lighting a fire.
Steel wool and batteries
Another weird and unthinkable method (how come you don’t have matches, but you have batteries and steel wool?), but as we already mentioned, it’s always better knowing some extra methods, rather than just a few. And after all, knowing more methods gives you the experience of knowing what works and why it works, thus you can use you common sense to readjust some of the methods to fit your current situation and tools you have at hand.
To start off, you need to spread the steel wool a bit – about 6 inches by 1/2 inch. Surround it with tinder and some dry stuff. Then take the battery and you only need to touch the battery to the steel wool (with one of the battery ends) and the steel wool will create embers almost immediately. Touch the wool in several places, then cover it with a few more tinder and even birth bark pieces, and you’ll have some nice flames.
[the_ad_placement id=”in-text-3-type-r”]The great thing about this method is that it will work in any conditions – dry or wet, cold or warm. If you like this method you can decide that this will be the only method you prefer and so always keep in your backpack some steel wool and batteries (e.g. 9V).
For more details you can see this YouTube video on starting a fire using this method.
To stay safe, always try these methods above in your backyard or in a safe area where you live. Don’t leave it to chance; because you read about it, it doesn’t necessarily mean you know it. Unless you experience it first hand you can’t rely purely on knowledge. Survivalists and outdoors enthusiasts always try new techniques and add more to their practical skills. At least if you practice ‘at home’ and it works you’ll know that you can reproduce this again.




Fire is the most important element in the wild after water. It is always nice to learn new fire-making methods, thank you. Sometimes, unattended fire can cause trouble, so it is important to be aware and sleep with one eye open, especially, out in the wild. Do not start a fire you can not put off.
That’s true, Raul. You should not start a fire you can’t put out. The best way to do so is by learning the various fire starting techniques.
While I was in college, I went to the woods a lot, to enjoy the peace and serenity in the bosom of nature. I learned many ways to start a fire; some may look, and sounds crazy, but they’re necessary to learn and understand if you’re serious about your survival.
Nowadays when I go out I bring some waterproof matches and a lighter in addition to my EDC because I might have to improvise. My #1 rule has always been, “Keep It Simple.”
Hi Daniel,
Keeping some waterproof matches handy is always a good decision as you never know when you’re going to need them.
Samuel