Have you ever tried to read a map that wasn’t on a GPS or on Google Maps? Sadly, our generation is losing its natural sense of orientation because there are so many gadgets to tell us where to go. Can you tell where North or West is without getting your phone out and using the compass app?
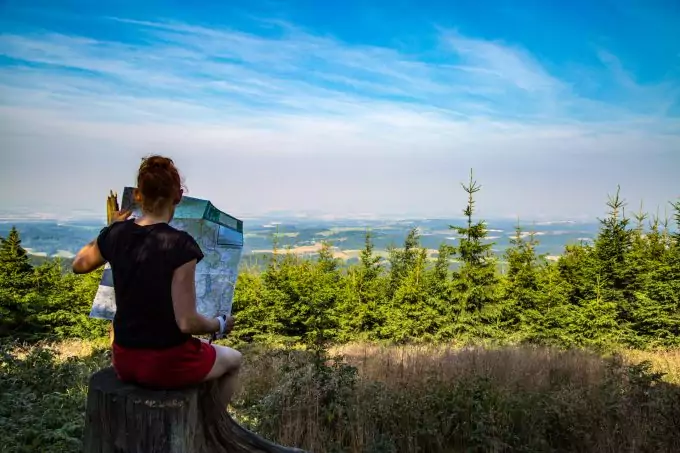
As a survivalist you should know by now that map reading is an essential skill that can save your life in the wilderness. As a beginner it may seem redundant to learn about how to interpret a piece of paper with colors and lines on it when there are so many gadgets that can do it for you but make no mistake, that piece of paper is going to be your best pal in many outdoor adventures. A GPS can stop working out of the sudden or it can get without batteries or signal when a map doesn’t need any of those.
Imagine you are on a hiking trail and you use your phone to follow the path. All of the sudden you realize your battery is about to die and you forgot to bring a spare one with you (it doesn’t seem plausible but sometimes it actually happens). What are you going to do in order to get to the cabin or camping place? Well, hopefully you got a map with you and you’ve read our indication on how to properly read and understand a map! Even though at start it may seem complicated, maps are amazingly easy to interpret once you manage to understand what everything is.
Map reading for beginners
Don’t worry if the multitude of lines and colors in front of you make you feel nauseated. With a little study and practice you’ll be able to understand all the signs and symbols used on the map and interpret them accurately.
Warning: if you are at the beginning of your relationship with a map, practice at home before you decide to go on an outdoor adventure without a GPS or a smartphone! Just reading about how to read a map is not enough to make it in the wilderness.
If something bad happens and you get lost it will be very difficult to remember what you’ve read and the map won’t do you any good. Practice at home first and only when you feel confident enough, you can practice while hiking. It’s also recommended to take a more experienced partner with you during your first adventures in the outdoor with a map.

Let’s start slow and begin with the basics of map reading.
Choosing the right map
The first step is to make sure you have the right map. There is a wide variety of maps in this world like: road maps used by drivers to get to their destination, touristic maps where you can see the best places to visit and how to get there, topographic maps for hikers that show routes and camping places, or general maps of the area.
After you find out which map you’ll need for your exploration, check to see if it’s up to date. We live in a constantly changing world so if you have a road map, make sure the latest changes have been registered. The same applies for a hiking or topographic map. If your map is old go online and verify if there have been any changes since the date the map was created. You can definitely use Google Maps for this.
Understanding map’s basic elements
Now that you have the map in front of your eyes, you have to look for a few elements that can be found on a map:
Map’s orientation – in order to orientate in space using a map, you first have to find out how the map is oriented. Most maps have a compass rose that shows the main cardinal points and how the map is oriented according to them. This rose can be found in one of the map’s corners but if you don’t see it, you can safely assume that North is pointing towards the top of the map.
The scale – each map is drawn using a scale that shows the correlation between the map and the distance in reality. It would have been very difficult to draw a life size map and it would also been impossible to carry around in your backpack. This is why each map uses a certain scale and in order to correctly calculate distances you need to know which scale was used for your map.
You can usually find the scale either at the side or at the bottom of the map, and it looks something like this: 1:100,000. This means that one unit on the map corresponds to 100,000 units in real life. According to the map, you should choose according to the best scale:
- Hiking and walking maps are best at a scale of 1:25,000 because they can show more details;
- Road maps for driving are best at a scale of 1:190,000 – they don’t need to show that much details just the ones that are relevant for the road;
- A general map of the world looks best at a scale of 1:24,000,000 – less details and a better general view.
If you would want to find out how much there is from point A to point B on a map you will need a ruler and the scale. Measure the distance between the two points on the map and multiply the result with the scale (250,000 if the map’s scale is 1:250,000 or 190,000 if the scale is 1:190,000). You will get a result in inches that you can transform in miles or kilometers.
Map’s title – all maps have a title that summarizes their main goal. For example if a map is called “Geographical World Map” you expect to see a general map of the world with continents and landforms but if a map is called “Demographical Map of United States of America” that map will represent population density and tendencies all over USA.
Longitude and Latitude – I’m sure you’ve heard about these two terms but have you ever seen them on a map? Usually when you travel short distances and you know the route you don’t need them but when you try to pin point an exact location on the map or you’re navigating or flying, the longitude and latitude are extremely important.
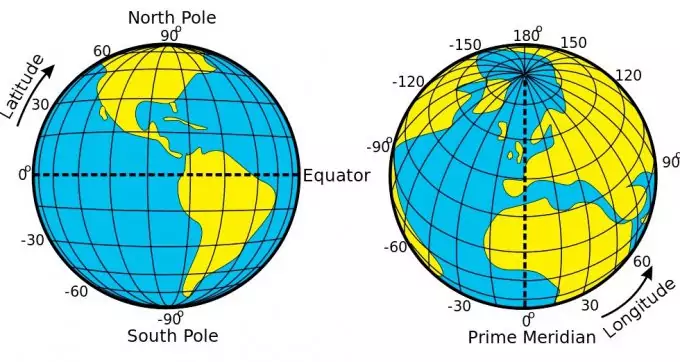
First of all let’s see what longitude and latitude are. When you take a look at a map you can see that there are horizontal and vertical lines drawn at equal distances. These are called Parallels and Meridians. Parallels start at the Equator and move on to the North and South Pole horizontally and Meridians unite the two poles vertically. These are imaginary lines drawn on the map to help us better orientate in space and each one is noted in degrees.

Now that we’ve learned what these lines are, let’s finally discuss the subject at matter: longitude and latitude.
- Latitude expresses the distance in degrees North or South from the Equator. So when we say 45 degrees North, we start from the Equator and go towards the North pole until we find the 45 degrees Parallel.
- Longitude expresses the distance in degrees East or West from the Meridian Zero or the Greenwich Meridian Line. This is the standard starting point for all Meridians wherever you are in the world.
Now, in order to get a specific point on the map you need both Longitude and Latitude (just like when you play chess and you want to specify a certain cell). Where the two imaginary lines cross, there is your location.
To complicate things even more, you should know that each degree is divided in 60 minutes so you shouldn’t be surprised if you stumble across a location that looks like this: 45 degrees and 50 minutes North (or 45°50’N). Also, each minute represents a nautical mile.
The simple part these days is that, if you have a GPS, you can simply insert the longitude and latitude and it will show you the location. Otherwise you would have to calculate and use geometrical tools in order to find the location on the map. Who would ever though that Geography and Math go hand in hand?
Contour lines – these are another type of line with a totally different meaning. Contour lines are used to show the general height above sea level in an area. Each line represents a standard of height. In order to understand what they mean you should know that the further apart they are, the flatter the terrain is in reality and the closer they are the steeper the terrain showed on the map.
Contour lines are extremely important for hikers and outdoor adventurers as they need to know what lies a mile ahead. This way, if an area is too steep they can go around it. Maps that show contour lines are called topographic maps as they show a place’s topography.
Legend – each map has one because it’s difficult to represent objects and landmarks in writing. Symbols are the best way to make sure the map doesn’t get too crowded and you still know what to look for in reality. There are some general symbols that are universally used but there are symbols that differ from one map to another. This is why you need to check the legend and make sure you understand its symbols.
Universal symbols are as follows:
- Lines are the universal symbol for roads, lanes, freeways, and everything that can be used as such. Thick lines are used to depict modern roads like freeways and as the line gets thinner the road is less modernized;
- Colors are used on maps to highlight areas like mountains (brown), bodies of water like lakes, rivers, seas, oceans (blue), forests, parks, woods (green), black and grey for buildings;
- Touristic maps use various symbols to depict churches, museums, castles and other places worth seeing.
How to read a map: getting from point A to point B
Now that we discussed the basic elements you can find on a map it’s time to actually discuss how to use them in order to get from point A to point B and then to point C and so on.
The first and most important thing when trying to use a map is to find your current location on it. If you know where you are on the map (point A) then you can look for the best way to get to point B.
Finding your current location on the map
There are three ways you can find out your location on the map:
- Identify landmarks (usually two are enough) like a mountain you are close to or a river. When you have only one landmark is a bit more difficult to orientate the map accordingly but when you have two you can see where you are in relation to each of them. Align the map so the landmark you see in front of you is on top of the map and draw a straight line down using a pencil and a ruler.
Keeping the map’s position, find the second landmark on the map and draw a line from that point towards the first line. The second line you draw should be angled like the second landmark is in relation with your current position. For example if the second landmark is at 90 degrees on you right, your line should be perpendicular on the first but if it’s at 45 degrees the line should be in diagonal. The point where the two lines intersect is roughly your position. It’s not an exact science but it’s a way to find the area you are currently in on the map; - Using a compass – all you have to do is orientate the map in the direction shown by the compass. If you don’t have a reliable compass, take a look at our list of reviewed best products on the market.
- Using a GPS (though it is not recommended to base your map reading skills on a gadget) you can get the longitude and latitude of your location. Apply the data on the map and you’ve got your precise location. Here you can read features and prices for best GPS devices you can easily carry in your backpack.
Mark your location on the map to make sure you don’t forget it and start working on the second part of this problem: finding the destination.
Getting to point B, C, D, E
Getting from point A to point B is rather easy. All you need is to identify point B on the map and using a ruler, to calculate the distance between the two points (we discussed this earlier, on maps’ scale). Now that you know the distance you should look for the shortest or easiest route to get there. You can use a road map to check out the main access routes or a touristic map with trails.
If before getting to point B, you want to also visit point C and D you should plan ahead. Mark the roads you want to follow on the map and make sure you take into consideration all the necessary factors:
- Calculate the time you’ll spend on every road and how much you want to spend visiting each point of interest;
- Take into consideration accommodation possibilities in case you need to stay overnight (touristic maps also show camping places and hotels);
- Try to find the shortest route to unite all the places you want to visit but also look for alternative routes in case your plans change or you encounter a traffic jam;
- Establish check points to follow the route when on the road. It happens sometimes to miss a turn and, before you even realize it, get lost.
Now that everything is planned step by step it’s time to start packing! Don’t forget to put the map in your backpack, otherwise all the planning will be for nothing.

Map reading generalities
In the end we should discuss a few extra things that may prove useful when trying to read a map:
- Most maps used for orientation use 5 standard colors to show landmarks and other important objects: blue for water, brown for land features like contours and earth banks, black for man-made objects or cliffs and boulders, yellow for fields and power lines, green for thick vegetation that you might want to avoid and white for open woods that are easy to go through;
- Colors are also used to signify height. This way the color is darker at the bottom, where height is lower and gets lighter as the height increases. Top of high mountains are usually white;
- For easy storage and use maps fold so after you’ve planned the entire route you can follow it piece by piece;
- When you go hiking or in an outdoor adventure it’s always recommended to take a water proof map. This way you can make sure you’ll have the map for the entire trip and not just until the first rain or river you have to cross;
As you can see, even though we live in the era of touch screen and portable devices, paper maps are still a reliable item that needs to be in every survivalist’s backpack.


Truly at the present time people have used to gadgets and apps very much and it’s even dangerous because they are losing a lot of their skills in such a way. And the worst thing is the fact that people don’t want to think themselves. They pass this function to machines insensibly and trust to gadgets more and more. There are people who can’t read an original (paper) map at all. I am really grateful to the author of this article for his detailed and intelligible recommendations; they are worthwhile and helpful indeed.
Thank you Helen. We are too dependent on new technologies these days, that’ s true, but maybe with a few warnings here and there, we will change :)
I enjoy viewing scans of old maps online.
Modern technology does bring a lot of improvements but nothing can replace a physical map in a man’s backpack.
Do you think maps will slowly start to fade out from daily use because of modern systems like GPS?
No, maps have been in use for years. In fact, they may be your only hope when your electronic devices get damaged or run out of power.