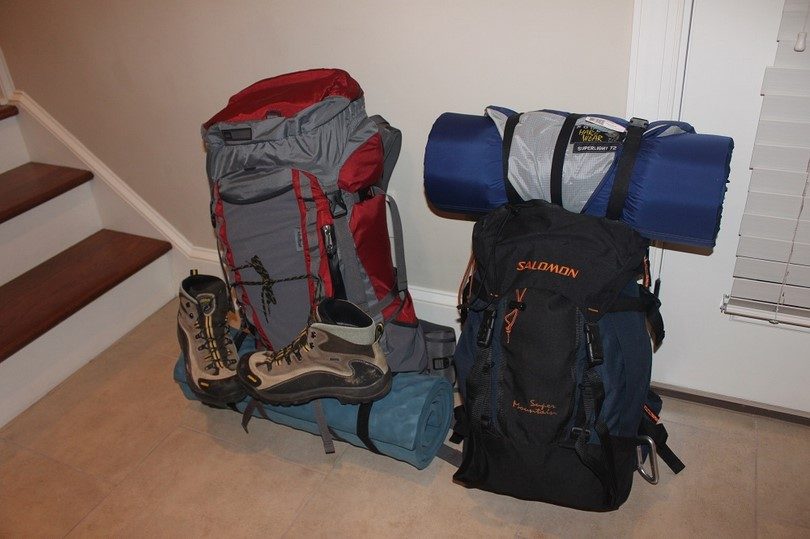
Survival bug out bag is one of the most discussed and disputed topics regarding personal training for difficult emergency situations. The bag aims to provide minimal comfort and possibilities to the one in need at a time. There are literally many ways of preparing your bug out bag, but all the bags must contain some essential components.
[the_ad_placement id=”in-text-1-type-r”]
It should be noted that a survival kit can be of many kinds, depending on the user’s point of view. Kits can be highly specialized (for certain areas/climates – see military survival kits for US Army) or general purpose kits designed to cover as many of the potential situations where a man might find himself sometimes.

Regardless of their destination, most kits contain a number of elements essential for the survival of anyone in a difficult situation. We will refer here to the items needed for survival in nature, not necessarily discuss specific situations and capabilities of surviving in extreme conditions with minimum of equipment. We will talk about the bags that will ease the life of someone who has to survive in the wild or to a disaster like a flood or an earthquake. Usually, it provides all the items that can help you survive for at least 72 hours.
Building the bug out bag
Choose your bag – the first thing you have to take into consideration is choosing the actual bag. Now, there are two ways to do this.
- First, choose the bag and then see how you can fill it.
- Second, gather all the items and then choose the bag so you have enough space for all the materials.
Fill in the bag – this is the main part of the whole process. First of all, let us think about all the stuff you need when you go out on a trip or in an emergency situation: clothes, water and food, shelter and also bedding, a source of heat, lighting, tools, hygiene items, first aid kit, something to communicate with (if you’ll be able to), travel aids and other stuff that you think might be useful.

Clothes – keep in mind that you always have to be warm and dry, so you will need at least two changes of clothing. Wet clothes and dressing light in cold weather may lead to hypothermia which can be deadly.
You should prepare this part of your bag considering your level of comfort at different temperatures. It is also advisable to update your bag when the season changes.
At a first glance, pack the following items:
- Convertible pants
- Underwear
- Short or long sleeve shirts
- Fleece
- Wool socks (it is very important that your feet are warm all the time)
- Gloves
- Hat
- Rain suit/poncho
Food – the food is not so important because the body can withstand a considerable time without it (and that means days). Most experts in survival state a period of about 3 weeks. A person with a normal, regular diet will experience a weakening of the body and a decrease in physical abilities after 7-8 days of starvation. In a survival situation it may mean a worsening of an already potentially dangerous situation.

The lack of food, in particular in the conditions required for a survival situation, may have further exacerbated effects (amid fatigue, stress, etc. ) which is why it is normally recommended to pay an increased attention on maintaining the body in condition.
Nutrients can be provided by sweet snacks, candy and protein/energy bars, salt, sugar, spices or by cans and other dehydrated meals. Here’s an article review of the best energy bars, check it out.
You might want to have something for food preparation. So, you will need:
- Protein/energy bars (at least 6)
- Dehydrated meals (at least 3)
- Cooking pot
- Portable stove and fuel
- Metal cup
- Can opener
- Pot scrubber
Use only metal utensils for cooking as they resist at high temperatures.
Water – It is particularly important because its absence can take you down in a much shorter period (about 3 days, depending on conditions). Be sure that you have minimum 1 liter of water/day.
In case you run out of water, try to find another source. Water quality must be ensured by purification. This is achieved by boiling it at least 5 minutes. You can also use water purification tablets, obviously respecting the dosage written on their packaging, or water filters. Check out our piece on the best purification tablets for more information.

You may improvise a container for carrying the water by placing a plastic bag inside a sock. The items you need:
- Minimum 3 liters of water
- Water bottle (maybe a metal one)
- Water purification tablets
- Water filters
Shelter and bedding – exposure to the elements of nature – rain / wind / snow / excessive heat can kill you, so this requires adequate protection. You should include some items, but be careful to choose the extra-light and compact ones so you don’t have a heavy bag:
- Tent
- Sleeping bag
- Sleeping pad
- Tarp
Articles that may be included in a kit of survival are however limited. You need to have basic knowledge of building a shelter from natural materials as this can help you survive.

A very tight survival blanket, folded and placed in the bag can be a very valuable element. Of course, you can use thick plastic or polythene bags. They can be placed over the framework of the shelter and help effectively against wind, rain or snow by retaining warmth.
You may use the survival blanket when you need extra heat. It is advisable to wrap the sleeping bag with it and not to wear it directly on your body. This is because of the sweat that will keep you cold after you unwrap it. See our piece on the best survival blanket to keep you warm in any emergencies.
As a general indication for the shelter location you should look for a good place, away from dangers and easily adaptable. You have to exploit the potential of the terrain (you can use a large boulder, a tree broke or uprooted, a natural indentation, etc.). The shelter must be built in an area protected from strong winds (when possible) and at a larger distance from a water source because of the animals that may come there to drink.
[the_ad_placement id=”in-text-2-type-r”]
There are two important aspects that you should consider, although the practice has shown that they are frequently overlooked: insulation from the ground and the size of the shelter. Insulation from the ground is very important and it is good to be done with as many materials as possible (natural materials, extra clothes, sheets, newspapers, tree bark) to create a barrier between the body and the cold ground. The size of the shelter is important because this way you will see how quickly it will become warm and keep the heat from the body or other sources.
Heat source – heat is essential in temperate or cold climates and the kit should contain at least 2 methods to make fire so to be safe. If one of it breaks out, you will have some back-up.
You can use a lighter (some of them are very resistant, they can produce sparks even after they are out of gas), a flint and waterproof matches (preferably with wax) packed in a zip bag. To waterproof the matches you may cover the knobs with nail polish, but this method is not at all friendly because they will damage quickly. When you use wax waterproofed matches remove the wax with your nail or a knife so that they can light up.

Primer (the material which transfers the spark to ignite the fire) is very important and it is good to have it in sufficient quantities. A good primer can consist of cotton balls soaked with petroleum jelly and kept in a sealed container. Packaging may be a plastic bag, a box of film camera or even a marker tube – you must use your imagination.
Amongst many other materials, a primer good to have in your survival bag consists of hygienic pads soaked in melted wax. You may also use: natural fiber rope passed through wax, wax paper strips, small paper cones filled with confetti covered with wax, vegetable fiber, lint, textile debris, etc.
The modified matches are a combination of both spark and primer which leads to the prolongation of their burning time. They can be created by wrapping a small piece of wool or cotton string right next to the knob and dipping it in wax. The burning time will increase in direct proportion to the amount of cotton and wax used.
To resume, you will need:
- Tinder
- Ignition source
Lighting – it would be good to have more illumination sources. Just like the fire sources, if one breaks up you will be able to use the others. Illumination can help you find your way or ease your work when doing something.
You may include the following items in your bag:
- Headlamp
- Glowstick
- Mini LED Keychain
- Batteries (the more the better)
- Candles
Tools – it is imperative to have a cutting tool in the bag. This may be a small fixed blade knife (which is preferred in all cases when possible), a small, solid pocket knife with a folding blade or a multitool. The necessary features of the tools should be solidity, reliability and convenience.

A small neck knife of good quality could be sufficient, along with several other razor blades kept in paper packaging, used for delicate things (animals skinning, smaller incisions, etc.)
So, those should be enough:
- Multitool
- Knife
- Machete
Hygiene items – you may say these are not as important, but remember that they may prevent infections which can lead to a bad shape and poor health for you.
Make sure to pack:
- Soap
Hand sanitizer - Small towel
- Wet napkins
- Toilet paper
First aid kit – the items from the first aid kit should be placed separately, like a medical kit. They should cover three stages of a wound treatment: cleaning / sterilizing the wound ( infections can occur in up to 8 hours for an unprotected wound), bandaging (made with sterile bandages that protect the wound ) and subsequent treatment (and therefore more bandages to be changed and possibly additional substances)

All of the following items may be useful at some point:
- Antibiotic gel
- Waterproof plasters (different sizes)
Sterile swabs
Roller bandage
Good tweezers and a magnifying glass - A sterile syringe (10 ml)
- Short scissors
- Safety pins
- Painkillers
- Anti inflammatory medicines
- Anti diarrhea medicines
- Salt
Communications – it is possible that you don’t get the chance to use them, but if you do it would be better to have those in your bag:
- Cell phone fully charged
- Emergency radio
- Crank power charger
Travel aids – you might find yourself in a situation that requires some of these items:
- Money (minimum 500$ – small bills)
- Coins
- Compass
- Map
- Whistle
- Note pad and pencils
Signalizing – a loud whistle would be the easiest option. Also, depending on the situation, you may use a signaling mirror (keep it wrapped in paper to avoid scratching), a piece of burnt rubber or a flashlight.
These are the most important elements that should be included in the kit. They should be able to help you for a period between 24 and 72 hours.

Obviously, this kit can be adapted and modified according to requirements, situations and especially the area where the traveling is to be made. It is preferable that the kit elements have multiple valences (can fulfill multiple requirements).
Self defense – bugging out is a dangerous situation and you should be prepared to face it. This is why having some stuff for self-defense is a must. You may choose between:
- Takedown rifle
- Handgun
- Ammunition
- Pepper Spray
Miscellaneous – in this category you will find items that don’t fit anywhere else. Include them in you bug out bag so that you don’t regret it later.
Parachute cord may be used in so many ways that it would be impossible to list all of them in this article. You may use it for fishing (make a rod out of it), for creating an animal trap, for building a shelter, creating a tourniquet, securing your backpack, etc
Duct tape is useful to repair equipment and to create various joints. It can be wrapped on the short end of a pencil.
Wire (brass or copper) is very good, it has endurance and is the best material for building traps.

An awl and several needles of various sizes, attached to a small sewing kit can be very valuable in repairing the equipment. Some safety pins and some buttons can complement very well this segment. All these can be fixed on a piece of material (possibly waxed). It is not a bad idea to keep a needle and a piece of string next to you, ready to be used.
To summarize, here are the things from this category that should be found in your bug out bag:
- Paracord (survival strap)
- Duct tape
- Sewing kit
- Cotton bandana
- Garbage bags
- Re-sealable bags
- Condoms
- Sunglasses
- Face paint
During a trip some of the items described here can be carried separately from the kit in convenient areas. For example, you may put objects whose use requires immediate access (little lighter, whistle, LED flashlight) on a piece of lace at the neck that can be worn every day. You may fix some bandages or patches on a strap of your backpack. You must be creative when carrying all this stuff.
This is one possible version of a bug out bag. You may adapt it to your own needs, the country you live in or the place you want to travel. There are certain areas where it is very hot (therefore you should bring more water, for example) or very cold (bring warm clothes). There are areas where you may find an increased risk of earthquakes or floods. Upgrade your backpack accordingly.
[the_ad_placement id=”in-text-3-type-r”]
Although it would be nice to never have to use the items in this bag, it is better to be prepared. In an emergency situation, like a natural disaster, the one who has the survival kit will have more chances to live than the one who doesn’t. Think about the fact that you won’t have shops to buy food and water, hotels to rest in or doctors to treat your wounds.
You will be all on your own and maybe you will have to take care of some members of your family, too. You won’t be able to ensure their safety without the help of these small objects. Set the bag ready and, in an emergency case, just grab it.

The possession of the bug out bag will not automatically ensure your survival. The most important part of the kit is your mind, along with the skills and knowledge acquired and applied in time.
Adaptability, optimal decision making, correct assessment of a situation can often help you avoid the crossing of a potentially dangerous situations, a situation that puts your life in danger. This is the time when you will need to survive. Be prepared so that you can sleep well at night.
We have prepared an article review of the best bug out bag backpacks, see it now to give you more options.


Where did you get the small zippered canvas bag with compartments?
Top load bags, for me, are the best bug-out bag as it can pack more items and the sole entry point means you can squeeze things in from the top. Of course, it’s still up to your preference and the amount of stuff you would be carrying.
Yes, it does depend on everyone’s preferences and carrying capability.
Great article for putting together a survival bug out bag!
For those that find themselves with a bag that is becoming too heavy, one tip is to ditch all of the cooking ware and dried meals and replace it with some ready to eat emergency rations.
You can get a pack of it for cheap that gives you about 3600 calories. So that works out to 1200 calories per day (for a 72 hour bag), which isn’t enough to maintain your weight, but will keep something in your belly and give you a little bit of energy.
Have you ever tried any of those emergency/ dextrose bars? Much less try to live off of them exclusively for a few days? Most taste like crap. Oh sure if you’re starving you can probably force down some down but the challenge is in keeping them down. Those things half taste like PlayDough sprayed down with Pledge.
I remember seeing a vid a few years ago where a guy took a self challenge to live off of them and water alone for like 3 or 4 days. He wasn’t feeling hot by middle of first day and after like a day and a half he was getting so sick from them he’d throw up. So he called it quits and pulled them from his gear. I’d rater stuff some Cliff bars or similar in than those things.
Trek Warrior,
Great input but we also need to think ahead and consider surviving beyond the 72 hours. If you don’t want to be burdened by cookware, you can always store food in a safe location. This way you can go there and stock up when needed.
David
Great advice. Thanks, David.
No problem my friend.
One item I notice missing from every survival list, that I have found indispensable in mine, is a pair or 3, of XL pantyhose. They are light weight, take up minimal space, and provide a plethora of uses.
Besides great light weight insulation property for warmth under clothing, you can cut off part of a leg for a bug mask, hold a bandage in place, use as a stretchable bandage to wrap a strain, tourniquet, expandable stuff bag to carry wet clothing outside your pack, fresh killed food, or fire starting fuel. A fish or crawdad seine, emergency stretcher material, even a weapon . . . rock in the toe makes an emergency mace.
You are only bound by your imagination. I have several pair in each of my packs, and vehicles. YMMV
I’m “Wheelchair Handicapped” so I have to Wear Mine. I Wear a “ScottVest” with approximately 42 Pockets. If you are too? Consider the Weight Restrictions of your Wheelchair, and Carry the Lightest Most Necessary Life Sustaining Load Possible…
Thank you for your views. You are definitely right, the weight of the BOB should be within the required wheelchair weight.