
Where wilderness survival is concerned, there are a few key concerns that most people agree are critical to survival: food, water, and shelter. Regardless of the type of climate or geography you’re in, it’s of critical importance to protect yourself from the elements. Knowing how to build basic structures out of locally foraged materials can be a life-saving skill if you don’t have access to a tent or cabin.
[the_ad_placement id=”in-text-1-type-a”]However, there are also a number of lightweight survival shelters that be stowed in “bug out bags” or vehicles in case of emergency that serve the purpose of being relatively weather proof, and typically very fast and easy to assemble. I’ll go into a few ways you can prepare for the eventuality of needing to provide yourself with a shelter, and some of the options that are available in today’s market.
Surviving the elements: factors to consider
Before you decide what your survival shelter contingency plan is going to be, you first want to evaluate your local geography and climate and determine what kind of odds your structure will have to overcome. Things like seasonal weather patterns, local terrain, and even wildlife should be a factor when making this decision.
For example, if you live in rugged, mountainous terrain that sees a lot of unpredictable temperature swings, and is home to large predators like mountain lions and bears, there are a few special requirements you’ll have of your shelter.
For one thing, if the terrain is rocky, steep, and generally energy-consuming to traverse, you want to make sure that if you pack your shelter in with you that it is very lightweight, and that you can secure it without staking it into the ground. Given the temperature fluctuations you see in mountainous areas, you want to make sure whatever you use is not only waterproof, but rated for very low temperatures.
Then, considering the local wildlife, you’ll want something that won’t absorb food odors readily. While you won’t likely find a portable survival shelter that can withstand a bear attack, even something that can be sealed very tight to keep alluring odors in or out will be an advantage.

If you plan to use locally foraged materials to build a rugged survival shelter, familiarize yourself with the process before you need to use it, so you’re not doing it for the first time when you absolutely need a roof over your head. Ask yourself what kind of materials you can find in the woods, and what kinds of natural features you can use to your advantage.
Options for prefab survival shelters
There are plenty of different routes you can go if you choose to just buy something and put it in your emergency kit. Depending on how specific or complete of a shelter you buy, prices can vary wildly.
Just be aware that if you buy a special lightweight tent specifically designed for hiking and low temperatures, you’re likely to spend several hundred dollars. The more specific your criteria and the more specialized the equipment, the steeper the price. If you’re looking, we have a few great reviews that may be of interest in our winter camping tents article
However, if you’d rather have something that’s just packaged up and ready to go, and aren’t too concerned with the price tag, there are some really great options out there. I’m particularly fond of the tents used for mountaineering. These are typically very small, maybe one or two person, and are designed just for sleeping in. However, their compact design means that they take up very little space in your pack, and are incredibly lightweight, between 3 and 7 pounds for most. Their pitches are often designed with fierce winds in mind too, so they can take a beating without bending poles or blowing away.
In addition, because they are designed with mountain climbers in mind, there are quite a few available that are rated for very low temperatures, even -60˚ F. But seriously- be prepared for a hefty price tag with these bad boys-most run between $500 and $800. But if you can afford it, more power to you, these things are the tanks of the tent world (check out North Face or Mountain Hardware for some of the best). You can see more similar products in our survival tents article.

If you’d rather assemble something of a survival shelter kit, rather than go out and purchase a tent, there are a few things you can throw in a bag to rig up a variety of shelters. This kind of pseudo-hybrid shelter is a nice plan because it makes use of local materials, but provides you with some tools to expedite the process.
If you go with this method, plan on packing some things that may be time-consuming or difficult to fashion in the wilderness on your own (remember, you really only have one day to rig up a shelter, there’s no working after nightfall). A few good staples to bring are:
- A tarp, or polyethylene plastic sheeting-Water proofing your structure can be done, at least partially, without the use of these materials in a pinch. But in miserable, rainy conditions, these materials will speed things up a bit for you. Tarps are great, but kind of bulky. I really prefer a good all-purpose plastic sheeting, even just a thick plastic drop cloth. Not only are they effective and versatile, but they’re super economical.
- Rope/paracord-The importance of rope cannot be overstated. There are plenty of ways to rig up a shelter by weaving branches, and you can certainly fashion rope out of pliable plant fibers, but it’s very time-consuming, tedious work that usually takes some practice to get the hang of. Invest in as much as you have money and room for in your kit-you’ll be glad you did.
- Knife and hatchet-Both of these are pretty critical with any good survival kit, but will save you considerable frustration and labor when trying to put up a shelter. Get a knife with a very thick blade, and preferably a toothed edge and a smooth one (or just pack two). Where your hatchet is concerned, make sure again, that the blade is thick (this will help it last through plenty of sharpening), and also that it has a bit of weight to it-the back side of a hatchet makes a great hammer. We have a nice collection of hatchets (and their reviews) in our piece on best tactical hatchet so don’t forget to check it out!
- Bastard file-This isn’t completely critical, but it takes up so little room in your kit and can save you so much frustration, I make it mandatory in mine. There is nothing more infuriating than a dull knife or hatchet, especially when the only building material you can find is green wood (which, in case you didn’t already know, is much harder to cut than seasoned dry). Familiarize yourself with basic sharpening skills, and keep this file in your kit at all times.
There are plenty of other things you could pack for your survival shelter kit, but these are what I deem the main essentials, and really all you need to get started. With a little ingenuity and elbow grease, these basic staples will help you put up a shelter in just about any environment.
Natural wilderness shelters
Of course, there are plenty of ways to keep yourself covered without any of the aforementioned materials. Though having a plush, weather-proof tent is certainly easier, and very convenient, there is really something to be said for building your own structure out of only what you find in the wilderness.

The feeling of wandering the forest, scavenging for building materials, invokes a kind of primordial instinct that a lot of us have forgotten. We still may not know what the heck we’re doing, but just the act of having to find what we need and work with the forces of nature, instead of against it, is tremendously satisfying.
[the_ad_placement id=”in-text-2-type-a”]What I mean by working with nature isn’t some tree-hugging proverb, but rather a very practical, very scientific mindset that you want to familiarize yourself with, regardless of your survival methodology. When all you have to work with is the dirt at your feet and the branches brushing up against your legs, you have to think very practically. Whereas in a typical house building scenario, you build the home to suit your needs, and largely alter the land you build on to suit those needs, in this scenario, you’re working around what nature requires.
For example, to alleviate a drainage problem on your piece of property, you may dig ditches and run offs, but when you’re putting up a shelter in nature, you select a well-drained area, and alter the structure to fit the area. So if you’re trying to survive in a frozen tundra, though you may be more familiar with cabins and teepees, a lack of lumber and the hardness of the ground will make it way more work to build one of these structures, rather than just building an igloo or something similar.
The point is, work with what you have-don’t push the limits of the environment, because the environment will absolutely win. That being said, it’s a good idea to familiarize yourself with some basic natural survival structures, and even take an afternoon or two to build a couple of prototypes (it’s a great project to do with the kids!).
Tipis and similar structures
Familiarizing yourself with the basic principles of tipi building is an invaluable skill. Though admittedly, it may not serve you well in an area devoid of timber, in any other environment it’s a simple, effective, and highly adaptable design. There are many complexities and refinements to tipi building that the Plains Indians have come to perfect over the years, but even just understanding its basic construction can be incredibly useful.

Namely, you’ll want to get familiar with the pole assembly. It’s a simple enough task to harvest a few small trees for the job; just allow yourself time to peel them before you assemble your tripod. Once you have your poles erected and secured with rope (here’s where that paracord comes in handy), you can use a variety of materials to seal in your walls, depending on what you have on hand.
Of course, traditionally animal skins were used, but since you’re not likely to have many of those tanned and ready to go, make use of what you do have. You can use your plastic to form a waterproof barrier, just bear in mind the mechanics of evacuating smoke from the room, as well as condensation build up inside the walls.
If you don’t have plastic or anything similar, you can even begin securing a web of thin branches over your poles to create a sort of mesh wall, to which you can apply a combination of mud and leaves (depending on how thick your branches are) to seal yourself in.
Snow as a building material
If you’re stranded in a snow-packed area, it will be incredibly difficult to retrieve lumber and make any use of it. Your best bet in this scenario is definitely to make use of the snow to build an igloo or a Quinzhee (a structure made out of snow, easier for beginners than igloos). There are many methods to constructing these types of shelters, some more complex than others. However, if time is a factor, and you’re new to building with snow, I definitely recommend going with a Quinzhee.

There are plenty of technicalities to their construction, but essentially the process is this. You find yourself a good location, with plenty of loose snow nearby, and ideally sheltered from the wind. Find something to act as a placeholder under the snow mound as you pack a large mound around some objects-preferably some things that are easily moved, like packs, or even wads of branches. Pack snow all around the objects, making the mound a couple of feet thick.
Add some marker sticks, about a foot long, piercing the dome all over. Tunnel into the mound and remove the items, and then begin burrowing outward until you reach the ends of your sticks. Make sure to also dig out a vent hole, so the structure gets adequate oxygen.
Earthen dwellings
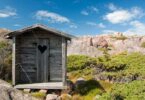
Making use of the natural features of an area is a quick and fool-proof way to get a roof over your head. Even just building your shelter against a rocky wall, or digging it into the side of a hill can greatly reduce your exposure to the elements. Plus, you get the added benefit of the thermal mass of the earth, which helps to regulate the temperature and hold onto heat.

Caves, though damp and dangerous at times, can be an excellent escape from the elements. So long as you have a means of lighting your way, and preferably a guide rope out should your light source fail, they’re a great option. But follow some basic precautions if you decide to go this route:
- Always make sure you’re alone. Throw rocks into the depths, make plenty of noise, and give any other inhabitants ample opportunity to come out or make themselves known. You don’t want to get in close quarters with a sleeping bear.
- Don’t go in too deep. Caves can be very misleading with their size. What appears to be a single tiny room can have a crack or hole that can lead hundreds of feet further. Don’t complicate your situation by exploring and getting lost. Stay close to the entrance.
- Be aware of your surroundings. Caves by their very nature are formed by quick-moving water and earth. Particularly if it’s stormy, or local streams and rivers are high, be on the alert for the possibility of rockslides, cave-ins, and flash floods.
All in all, caves are a simple and effective shelter, but they’re not without their share of risks. Be sure to exercise common sense and tread carefully if you spend the night in one.
Knowledge really is power
There’s just no over-stating the importance of shelter. Without it, you open yourself up to some harsh conditions. Even just a couple of hours of exposure to wind and rain can give you a case of life-threatening pneumonia or hypothermia.
[the_ad_placement id=”in-text-3-type-a”]Intense sun exposure can cause dehydration and sun sickness, which can make you incredibly sick to your stomach, as well as greatly impair your cognitive abilities. And a cold wind coupled with humidity or snow can cause severe cases of hypothermia, which if left unchecked will slowly begin shutting your organs down, or frostbite, which will permanently destroy extremities.

The best preparation you can exercise for building survival shelters is arming yourself with information. Though high tech gear and tools certainly make life a little easier, knowing how to do without is far more valuable.
Take the time to research various shelters, and practice what you learn. Take the information you glean from the internet and turn it into a workout-build prototype shelters in your yard on the weekends, or go camping with your basic tools and see what you can build in a pinch.
In the end, actually learning the ins and outs of these structures, and then applying that knowledge through hands on practice is the best preparation you can give yourself, and in my opinion, will go a lot further than an $800 tent.


If I would go to the forest for a camp, I’d like to build a shelter with my own hands and tools. It gives you a unique feeling about the nature and let you to deep into atmosphere of camping.
Probably, the best option would be to build shelter above the ground, so that different animals won’t get into you “house”.
Yes, building a shelter in the woods can be really satisfying. Even better, it prepares you for the situation when you are stranded and fighting for your life
Always remember to dismantle your shelter carefully before leaving any campsite. This would help preserve the top soil and be in line with the Leave No Trace principles.
Ahmad,
Following the Leave No Trace is a good principle to follow as it helps save nature and allows future generations to enjoy what we enjoy.
David
The two key factors that determine the structure of your wilderness survival shelter are local geography and climate. You can choose to construct your shelter with foraged materials like leaves, sticks, branches, twigs, snow, mud or earth. However, you need to exercise caution when you are building in order to ensure the tent is strong, save, and can stand the test of time. How are you planning to build a do-it-yourself survival structure?
The ideal survival shelter is one that protects you from the weather as well as wild animals. The most popular designs are round lodge, ramada, quinzhee, snow cave, wedge tarp, tarp wing, tarp burrito, and a tarp hammock to mention a few. This article offers you the crucial info you need to build the most reliable survival shelter.