Survival gear is something hikers and enthusiasts alike need and trust with their lives. You can’t go out in the wild without your pocket knife. You can’t go hunting without a bow or fishing without a fishing rod. All these items are part of your survival gear inventory.
These can be useful not only in the wilderness of course. They can be handy in natural disaster emergencies as well. Your survival gear list consists also of simpler items like a shelter, compass and map, wire, fabric and sewing kit, resin and petroleum jelly, etc. The list is long, but we will talk about the details in this article.
You can compile a sensible list of homemade survival gear and we hope that in our article you will find the information you need. Making survival items at home, and making sure they will work really takes time and lots of trial and error. We will provide you with the information so that the error part is brought to a minimum.
Instructions on how to make various survival gear
Making shelter
It’s important to know how to make your own shelter in unfavorable conditions and use items you only have in your backpack.

Here are our suggestions on handy items that can turn into a reliable shelter:
- Poncho
- Tarp
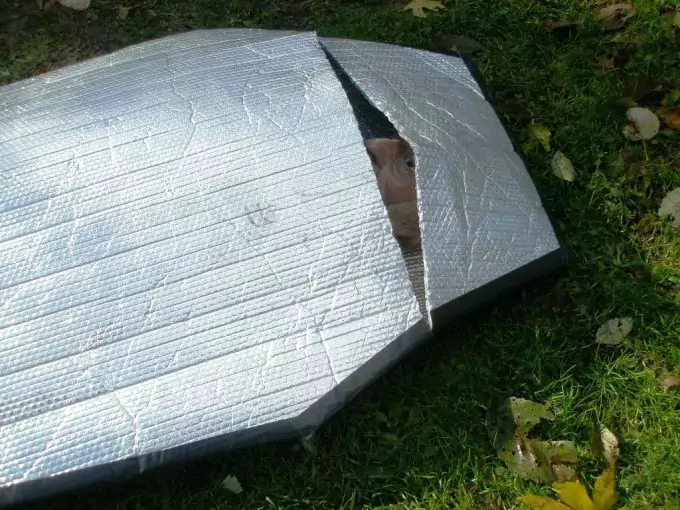
- Space blanket
- Paracord
First off, let’s start with the tarp. You can make your own with a few items like ordinary cotton bed sheets, hickory nuts (for dyeing the tarp), linseed oil, and mineral spirits. You should first dye the bed sheet using the hickory nuts. Afterward, submerge the sheet in linseed oil and mineral spirits mixture until the oil is fully absorbed. You can then test the homemade tarp and make sure it doesn’t let water through. You can see an entire series of 4 videos on Youtube on making a homemade oilcloth tarp. Here is part 1, and you can then continue watching the remaining three.
As you can see you should sew some handles on the edges of the homemade tarp, so it’s definitely worth looking up at that too. This tarp can be effectively used as a tent as well. Just use some aluminum poles/sticks to fix the tent to the ground. You can definitely use your imagination on how to turn this bed sheet into a reliable shelter in any condition. Of course, test the tarp in different ways and under extreme weather conditions like storms, strong winds, etc.

Keep in mind that you can use the same homemade tarp also as a poncho. If you follow the instructions in this video series, you can be sure to make a multi-purpose tarp-like gear.
Otherwise, if you need to know more ways of using your homemade tarp, here are our suggestions. Take cordage or a long enough paracord, and run it between two trees. Then place the tarp on top and there you have it. You can also adjust the same setting to have a lean-to shelter. Simply use a thick and tough tree branch to prop up the tarp on one end and fix the lower edges with stones or poles/sticks.
You can also use the above instructions, but add holes along the edge of your tarp, so that you can then run the cordage through the holes, once the bed sheet is safely turned into a tarp. You can adjust the above settings and tips according to your needs. And always test on safe ground before using it in the wild.
The space blanket and the poncho can be used together, in combination, to keep you warm. You can wrap the space blanket (or even an ordinary blanket) and then wrap on top of it the poncho. If you have a shelter, this can be even better, but optionally use the poncho to protect you from the rain, and the blanket to keep you warm.
Taking care of cooking
While the earth oven isn’t exactly a gear item for your backpack, but sharing shortly how to build one yourself, while in a critical situation (or in the wilderness) won’t hurt.
You need some wet sand, clay, dry straw or grass, young saplings (make sure they are bending and can’t break), and some large cloth or tarp. You can use either the soil for ground purposes or use some flat stone to build it on. For easier purposes, some people just prefer to dig a horizontal hole in the ground and build on that. For the entire building process, take a look at this instructional video on YouTube.
Otherwise, if you decide to make the oven simply in the soil, without any other material, as shown in the video above, then you can do the following. Dig a hole in the earth. Pick an earth pile to make the hole horizontal. The opening should be slightly smaller than the actual oven inside. The opening connecting the oven hole and the actual ‘tunnel’ should be no longer than 1 foot.
You can then place some burning material (dry twigs, etc) in order to start the fire. Whatever you want to cook in the oven, wrap it in aluminum foil to keep it safe from dirt and ashes. Make sure you don’t block the oven opening with whatever you’re cooking, in order to let smoke escape. This will also keep the fire burning. If you block the passage, the oxygen won’t feed the fire and it may stop burning.

Another thing you can devise is a cooking pot out of a metal (soda/beer) can. For the sake of our example, we will use a 24 oz. soda can. Use a can opener to remove the top of the can. Then, prepare a nylon paracord and thread it through the lid’s pull tab. Make sure the can’s contents are removed (drink it or just dump it). As you thread the cord, try not to remove the pull tab. It must be intact. You will have a lid for your cooking pot in this way and it won’t burn your hand if you try to remove the lid.
Next, use a cold compound weld to cover the can’s sides. Have some fire-resistant tape around the can (in several layers) so you can protect your hands and fingers. Use epoxy to seal the tape’s edges, and let it dry for a while.
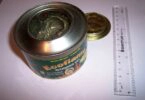
If you have a coffee can, you can also use that for the base of your cooking pot. Just make holes at two opposite sides of the can, and thread a thick metal wire through the holes. This will be the handle, to avoid burning your hands. Here you can see quickly how it should look like. It’s a quick way of turning any metal can into a cooking pot.
You can also make a multi-purpose cooking stove kit. All the items you need should be similar in size in diameter, so they can fit together. Essentially you will have a windscreen, cooking pot, stove, and also the fuel itself. The fuel should be diethylene glycol. Find one in a canister or make your own. Overall, it should burn for about two hours if you get it to be 10 cm in diameter. The reason why we offer you to use this type of fuel is that it produces more heat (890 BTU), which is much higher than what methanol does.
So, along with the cooking stove, you roll around it a windscreen and/or a cooking stand (to place the pot on top of it). The pot can be something super simple but of slightly larger diameter. It should be more than 10 cm, so you can place it around the stove and have all these items compact in your survival backpack.
All of these items shouldn’t cost more than several dollars. If you want to see how this kit looks like and how to set it up, check this All-in-One Cook kit video on YouTube.
Starting a fire
Building a shelter and having a cooking pot and oven seems like a good start, but how about starting the fire? You need some easy way of quickly turning some tinder into a healthy burning fire. This is why you need to make your own fire starters. Here’s how.

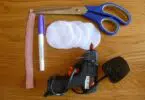
Prepare some cotton balls and petroleum jelly. Heat the jelly in a pot, on low heat. The goal is to melt the jelly. When it’s melted, move it away from the heat. Then add the cotton balls and use a spoon or fork to soak the balls well in the jelly. Make sure to store the petroleum cotton balls in a safe place, away from moisture and water. Keep them in a water-resistant metal container or Altoids. You can use the cotton balls as fire starters. To use candles, place a cotton ball on aluminum foil and ignite it.
The above method will also work if you use Vaseline instead of petroleum jelly. The method is exactly the same, but simply substitutes the jelly with Vaseline. When melted, Vaseline soaks very quickly in the cotton ball and when it cools down, it makes the cotton ball hard and a little heavy. It adds several more minutes of burning time.
Above is a YouTube video for you to see the making of Vaseline cotton balls.
Making your own clothing
You can turn your cargo vest into an all-purpose survival vest. To add more pocket and stash options to the vest, sew some durable and thick fabrics like denim. Even canvas will do just fine. Add these pockets on the inside of the vest, where you have extra space. For the lid of the pocket, add some Velcro strips. The pockets can be of different sizes and shapes, depending on what you need to put there. You can carry things like plastic sheets, aluminum foil, tarp, etc.
For the front pockets (on the outside of the vest) again use the same durable fabric, but think of these pockets as stashes for essential and important items, like matches, compass, GPS, purifying tablets, etc. If you can stuff these items on your survival vest, you’ll have a lighter and more compact backpack, which is always a plus.
A challenging, but by all means, an interesting project is to make your own lightweight sleeping bag, using down feathers for the insulation. You may want to use the outside layer of an old sleeping bag and then rip open a down blanket. Use the down from the blanket, sew the baffles on the sleeping bag, and stuff each baffle with Down feathers. Then take some time to stitch the zipper and the edges of the bag. If you want you can make also a small pack to keep the sleeping bag inside.
Above you can see more detailed instructions.
Catching your own food
There are a few items for catching your own food which you can make at home. For example, you can make a fishing rod quite easily, either on spot, or at home, and carry it in your backpack. Making it on the spot will probably mean that it will be more primitive and basic, but it will still work.

So the most basic way to have a fishing rod is to just find a sapling or a young tree (branch) that can bend enough, but still not break easily. Then find some thin cordage and tie it to the tip of the rod. On the other end of the cord, thread on a hook, and you’re ready. As we said, it’s the most basic and quick way of making a fishing rod.
A more sophisticated fishing rod (where you also add a reel) will require you to spend a little bit of time at home to prepare it. You need essentially the same as above – a flexible wood/branch, some cordage, hooks, and in addition to those, extra loops to hold the cordage along the rod, and some items for the reel. So, to make the reel, take a metal can and attach it to the handle end of the rod with some thick wire.
Add another hook at the edge of the reel so you can begin to wind the cordage. You will have to prepare some duct tape, scissors, etc. for the preparation. For visual help and more details, check this Survival fishing pole with reel video on YouTube.
We can add in this category also an emergency fishing kit. You will find it easier to carry, many times more compact, and extremely light. The idea is that you can go fishing at any time, as long as you carry this fishing kit. It holds the essentials for successful fishing in the wild. You will only have to find a stick or a branch which to use to construct your rod. So here is what you need to have in the kit.
First of all, you need to have a cord. Leave it coiled on the spool to prevent it from tangling on itself. Another thing to add is a small package of hooks and sinkers (put several of different sizes). They can be small enough and yet work just fine for your purposes. Put some baits like plastic insects and artificial flies.
Place some nylon string as well, just in case you may need it. You could also find some more powerful bait options while you’re compiling your fishing kit. Don’t forget also to put several swivels in a small plastic bag, along with several eyelets (to correspond to each swivel).
In the Emergency Fishing kit video on YouTube you can see all the items you should pack, and also see in action how to make the fishing rod, using the kit and a branch from the woods.
You can also see in action how to catch real fish again shot in the same video.
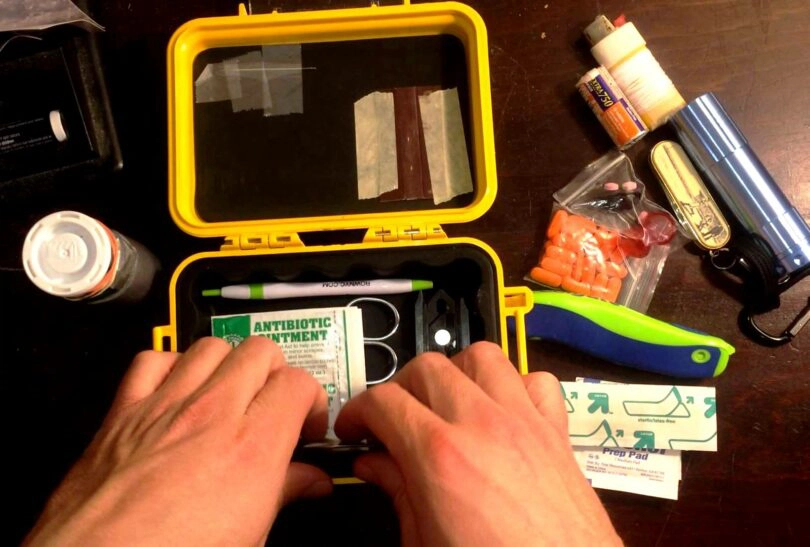
Essential items
Consider making your own survival kit as well. You will definitely need items like bandages, anti-bacterial creams, a sewing kit (or at least a needle), band-aids, painkillers, sanitary items, wet wipes and dry tissues, personal medication special for your needs, medication for stomach problems like nausea and diarrhea, water purification tablets, tweezers, etc. Take a look at part 2 of the Super Ultralight Backpacking Gear on YouTube (by IntenseAngler) for more details.
You shouldn’t forget the washing kit as well (with a toothbrush, toothpaste, hand soap, etc). For more tips on how to find food, search for water and build a shelter, see our article.
DIY water filter
Here’s a very useful tip about how to make your own homemade water filtering system. It’s very simple and small and can fit in your palm, as compared to most ready-made filtering systems.
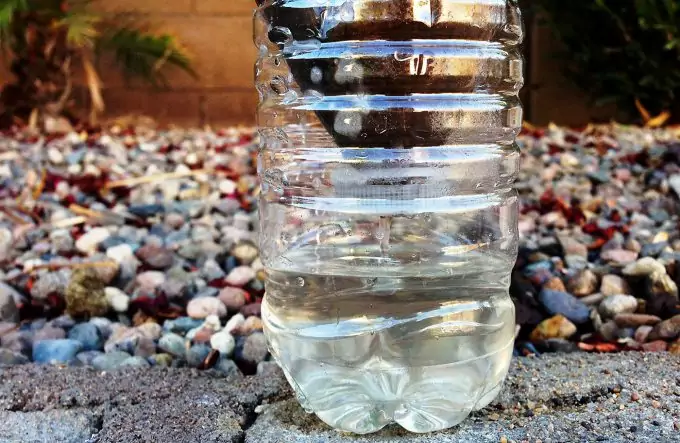
So, begin collecting the items you’ll need. Start by picking a prescription bottle and unscrewing the lid. Take one water bottle cap and drill tiny holes into it. It should look like a salt container with holes. Next, prepare a thick enough cotton ball. Finally, take the prescription bottle and make a much larger hole on the bottom of the container. It should be thick enough so that you can put your finger inside the hole. It can be even slightly wider than a finger.

As this setup is ready, take the water bottle cap and prescription container and place the cap (with tiny holes) at the bottom of the container. Then stuff the cotton ball in, and you’re basically ready. Test this setting by taking some muddy water and sipping it through the DIY filter. It will drip somewhat slowly, but it will essentially remove any sediments and dirt from the water. You can then place a purification tablet in the filtered water to neutralize any bacteria and viruses. Check our article on how to use purification tablets to make water safe and safe.
To safely store your homemade filtering system, take the original prescription bottle cap and screw it on the bottle. As for the inside of the container, make sure to have a second water bottle cap (without holes) to keep the cut hole closed. The reason why this method works is that the cotton has a very thick structure and will not let any sediments or larger particles through itself. Unlike cotton, a bandana for example has larger pores and may let through some particles and dirt. See our article for more tips on how to make a water filter kit to keep water safe to drink.
For best storage, keep the entire filtering system in a plastic bag with a zipper, to make sure no water or moisture will spoil the cotton ball. You can also carry several cotton balls. When one of them is too dirty to be trusted with continuous filtering, you can substitute it with a new and clean one. Finally, you can see the entire instructional Homemade Emergency Water Filter Kit video on YouTube.
Backpack setting
Everything you need in your survival backpack, you can make yourself. It only needs some time to do the whole setup, but you can actually be sure to have a less heavy backpack and yet have all your gear working just as ready-made gear would. You can learn more of the specifics from IntenseAngler‘s YouTube channel, but here is part 1 of his series about homemade survival gear. You can watch the other series to get the full picture of how to compile your homemade survival gear.
After all the above instructions, tips, and techniques, we hope to have given you a pretty wide scope of ideas on how to improve your survival gear. You can essentially make everything yourself, with a little bit of time and experimentation.
You can continue exploring other ideas and videos on Youtube, and follow some of the people who came up with the above tips. You are of course free to experiment yourself and try new versions of the above. And remember to first try all that in the safe conditions of your home or backyard, before venturing out in the wild. See our piece on the best survival kit to save you money and keep you safe.

When all else fails, the last resort is calling for aid. That is why manufacturing homemade radio transmitters interest me.
I read up a lot about it, but do you think it is possible to construct a working one with minimal prep while lost in the wild?
You can if you have the right skills and equipment. The article should help you nurture your kills.
I have a Gransfors forest axe which has been helping me survive for more than 10 years and it has served me very well. I also have a SOG Trident knife; I literally love it and one can carry it comfortably in the pocket. I am also planning on having a Bear Grylls parang.
Thank you for showing interest in our community.
I was born to be an extremist and I love adventure and survival conditions – that’s why I joined The Green Beret Unit in the first place. All I need is a bottle to store water and my bad ass knife (Ontario – M9). Although, having extra gear does not hurt, in fact, you should always have a backup.
We appreciate your opinion, thank you.