
Being in the wild is a very exciting experience in itself: you can be a part of nature and see what it’s like to survive on your own, with less modern comfort. For this reason, a lot of people actually prefer to enhance their camping experience by learning how to make DIY camping gear.
[the_ad_placement id=”in-text-1-type-r”]
It’s one thing to buy ready-made stuff from the Internet, and it’s a whole different feeling to make your own survival kit. Besides, learning a few tips and tricks about the things you can manufacture on your own can prove a great help if your gear gets damaged or if you forget something at home.

Image credit: thecavenderdiary.com
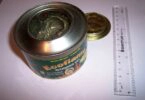
The boy scout candle lantern
Things you need:
- A no. 10 tin can or a two-pound coffee can.
- A wire coat hanger.
- A one inch nail.
- Fine copper wire – a few inches.
- A 6 inch stick.
- A candle stub.
Instructions
- Straighten the coat hanger by snipping its ends.
- Cut the wire in half.
- Take the lid off the tin can.
- Place the can on its side. The top of the can is now the front of the future lantern.
- Punch 8 holes in the can. The distance between the holes made in its bottom part should be twice the distance between the holes made in its top part.
- Bend each section of the coat hanger in the middle in order to form an “U” shape.
- Insert the ends of the wires through the holes you previously created in the can. Start from the top of the can, the ends of the wire should come out from the bottom part about half an inch.
- Bend outward the protruding ends created at step 7. They will become the legs of the lantern and will secure the wires.
- With the copper wire, tie the stick of wood to the sides of the 2 coat hanger loops. This will become the carrying handle.
- Put the nail through the center of the can’s bottom. The nail should stick up a bit. You can use some superglue to secure the nail firmly.
- Place the candle through the nail to hold it in place.
Uses
- Place the lantern on a table. You will be able to see those around you, enjoy a meal or a game of poker.
- Carry the lantern by its handle. If you need to step out of the tent at night, you will have a valuable light source so you don’t trip and fall.
- Hang the lantern on the door, inside. You can use this lantern to light your tent or the inside of your cabin. Be careful not to leave the lantern unsupervised in case of fire.
- Hang the lantern on the door, outside. Since the back of the lantern reflects the light very well, you will be able to shine a precious light for other campers who are outside.
For more ideas, see our article on how to survive without electricity, which is an interesting topic.
The Tyvek tarp tent
Things you need:
- A 9 x 12 foot piece of Tyvek house-wrap.
- Yard/Meter Stick.
- Scissors.
- Marker or pencil.
- Spring clamps.
- Bucket or tin can.
- Tyvek tape.
- Paracord.
Instructions
- Cut the Tyvek house-wrap into a rectangle with the dimensions 9 feet x 12 feet.
- Place spring clamps on the rectangle’s corners in case it’s windy outside. Disregard this step if you’re indoors.
- Mark the location of the tent loops on the sides and corners of this rectangle like this:
- Take the long edge of the rectangle and fold it in half. Make a mark on the fold that’s near the edge. Unfold back.
- Take the left corner and bring it to the mark previously created and fold the edge.
- Place another small mark on this fold. Unfold back.
- Take the right corner and bring it to the mark created in step 3.1. and fold the edge.
- Place another small mark on this fold. Unfold back.
- Repeat the procedure for the remaining 3 sides of the Tyvek rectangle.
- Mark each of the corners.
- Using the Tyvek tape, create loops to place through each of the marks previously created:
- Cut a 3 inch piece of tape and securely stick it to a tin can so you can easily get it afterwards.
- Pull out a 5 inch piece of tape from the roll, but don’t cut it.
- Place the tape with its sticky side upwards underneath the tarp at one of the marked corners.
- Press the tape slightly on the underside of the tarp.
- Pull another 3 inch piece of tape off the roll.
- Get the piece of tape created in step 4.1. and stick it to the tape created in steps 4.2. to 4.4.
- Make sure that the sticky side of the short tape is placed on the sticky side of the long tape.
- Pull another 5 inch tape from the roll and cut it.
- Fold the tape over in order for the sticky side to face down.
- Stick it to the Tyvek sheet, leaving enough tape below the sheet to make a loop.
- Do this for all the marks previously created.
- Cut a 10 inch piece of paracord.
- Insert this piece of paracord through the tape loop.
- Knot together its two ends to obtain a paracord loop.
- Repeat this procedure to make paracord loops for each tape loop.
- Crinkle the Tyvek sheet in order to give it more texture and reduce noise:
- Remove the weights from step 2.
- Wad the Tyvek sheet into a large ball, and then release it.
- Go to a different part of the sheet and make it into a ball again.
- Repeat 2-3 more times.
- Once the crinkles are created, your tent is done.
Uses
- Using it as an improvised shelter on an extended fishing trip.
- Place your backpack or other tools and luggage inside it to have more room in your tent.
- Use it as a shelter for your pet.
- Use it as a fun DIY camping project with your kids and have a sleepover in the backyard.
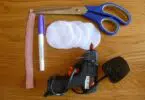
Sleeping bag
Things you need:
- Two blankets.
- Two cotton sheets.
- An inch-wide roll of Velcro Tape.
- A sewing kit.
Instructions
- Sew the tape onto the blankets: hooked surface outward on one and looped side up on the other.
- Work across the bottom edges and up the sides to about shoulder height. This will become a sort of envelope made from blankets.
- Stitch together the bottoms of two cotton sheets. Sew them up about chest height to make a sheet liner in order to prevent itching.
- Before the trip, place the sleeping bag on a waterproof ground cloth.
- Put the sheet liner inside.
- Lay a rope across the middle. Its ends should extend about a foot beyond the sides.
- Roll it up and bend it in a “U” shape over the top of a backpack and secure it with the ropes.
Uses
- A reliable sleeping bag in warmer conditions.
- A good way to keep your water from freezing during the night.
- A shelter for your pet dog.
- A decent way to carry extra supplies.
The DIY Hobo Stove
Things you need:
- A large, tall and wide can.
- A large nail.
- A knife or a can opener.
- A pair of pliers.
- A hammer.
- Matches.
- Tinder.
- Twigs.
Instructions
- Peel the labels off the can and wash it. Nothing flammable should be left on the can.
- Cut one end off the can.
- Cut a rectangular hole in the bottom side. This is the fuel door. The size should be 1/4 of the height and 1/6 of the circumference.
- Use the pliers to reduce sharp edges. This step is optional.
- Using the hammer and the nail, punch holes in the closed top of the can about 1/2 inches apart. These are the smoke vents.
- With matches and tinder, build a fire and feed it with twigs.
- Place the stove over the fire.
- Throw water droplets on top of the stove. If they steam off, your stove is ready to use.
Uses
- Frying eggs on top of the can.
- Boiling water for tea.
- Keeping a fire going even when it’s raining outside.
- Having a source of heat inside your tent or cabin.
Our tutorial on how to make your own camping stove is an important-read, so check it out soon.
The LED water purifier
Things you need:
- 4 ultraviolet LEDs.
- A small switch.
- One resistor for each LED.
- Black tape/ electrical tape.
- Some wire.
- Small plastic or glass container.
- A battery.
- Solder iron.
- Solder.
- Wire cutters/ strippers.
- Hot glue gun with hot glue.
- Scissors.
Instructions
- Using the soldering iron, solder the resistors and the anodes (the longer ends) of your LED together.
- Wrap them in electrical tape.
- Solder all the cathodes (the shorter ends) of the LED together.
- Solder the anodes together on the other side of the resistor.
- Solder a wire on each anode and wrap in electrical tape.
- Solder a small switch on the anode wire.
- Solder a bit more wire on the other end of the switch.
- Put your LED in a small clear container, leaving the switch outside.
- Bend the heads of your LED in order for them to spread light evenly.
- Make the top of your container waterproof with tape and hot glue.
- Attach a power source, such as a car battery, but don’t solder directly to the battery.
- Submerge the UV Led partially to water for about 30 seconds and it’s ready to use.
Uses
- Disrupts the DNA of micro-organisms in aquariums, preventing their reproduction.
- Used in water treatment and it doesn’t leave chemical residues in your water.
- Replacing chemical tablets used in water purification, the LED water purifier prevents bad taste, nausea, diarrhea and headaches.
Do check out our piece on how to purify water using primitive methods in order to survive to give you more ideas.
A DIY backpack
Things you need:
- Hardwood stock for the frame.
- Nylon webbing for the straps.
- Heavy cotton canvas for the cover portion.
- A can.
- Long screws.
- Glue.
- Crossmembers.
- Lacing.
- Buckles.
- Pads.
- Grommets.
- Nylon cord.
Instructions
- Make the frame members out of 0.75 inches thick hardwood strips, about 3 inches wide.
- Fit the upper and the lower crossmembers into the notched uprights.
- Glue the joints before setting the screws.
- Make the straps out of 2.5 inches wide nylon webbing.
- Sew leather or nylon straps with buckles to the webbing for adjustable straps.
- Pad the straps to make them more comfortable.
- Wrap the upper straps around the upper crossmember, and secure them with a piece of aluminum, drilled for four 0.75 inches long screws.
- Cut the back support out of heavy cotton canvas.
- Cut and hem an 8 inch oval hole in the upper centre of the panel, 3 inches below the hemmed upper edge.
- Place 7 grommets on each side.
- Wrap the canvas around the frame.
- Close it with a 72 inches long piece of nylon cord.
Uses
- Extra space to carry your tools.
- A great way to replace a lost or damaged backpack.
- A good way to carry a sick pet.
- A firm, durable pack for food or miscellaneous items.
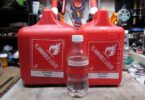
Emergency battery
Things you need
- Vinegar or lemon juice.
- Tape.
- Aluminum foil.
- Strong paper.
- Paper towel.
- A bowl.
- Copper coins.
- Bicycle light to test the battery.
Instructions
- Roll up the paper so that the coins fit in.
- Tape aluminum foil on one side.
- Make aluminum chunks of about the size of the coins, the same number as the number of coins.
- Repeat the step with paper towel pieces, in order for them to absorb the lemon/ vinegar fluid.
- Fill the paper tube with a piece of paper towel, next a coin, and next aluminum until the whole tube is filled.
- Put a coin at the end.
- Test your battery.
Uses
- Flash light battery.
- Bicycle battery.
The conclusion
That being said, it’s obvious that making your gear on your own is a challenge that can prove a satisfactory endeavor, but should you do it?
[the_ad_placement id=”in-text-2-type-r”]
Here are the advantages and disadvantages you should take into account.
Cons
You will need a lot of extra-time
DIY projects are pretty time-consuming, and even if you’re an expert in building, sowing or crafting, you may still spend a decent amount of time making things you can otherwise buy with a few clicks or a quick visit to your local camping gear shop.

Image credit: sfphblog.com
The quality isn’t always top notch
Even if you do your best and follow the instructions to the letter, you don’t have all the last minute technological support, materials and machines used for mass manufacturing. That means your products aren’t the best they can be.

For instance you can make a Tyvek tarp tent – but that won’t keep you as warm as the real deal. Even the DIY hobo stove doesn’t work as well as a camping stove with all sorts of features included.
Pros
Making your own equipment is fun and educational
Sure, you may not always get it right and it does take a lot of time, but at least you’ll know it’s something you’ve made with your own two hands. That’s why sleeping in a bag you’ve made yourself from a couple of blankets and sheets can feel far more satisfying than sleeping in a bag you’ve bought online.
Besides, if you have kids you can enjoy even more teaching them how to make their own equipment, while they also acquire fundamental notions of preparedness, responsibility and teamwork.
It’s cheap
Store made camping gear isn’t always ridiculously expensive but most of the times it does cost more than the stuff you have lying around your house, which you can employ to put together something to fit your needs, and to confidingly use outdoors.
It’s a good safety net
Even if you buy most of your gear ready-made, that doesn’t mean you can’t learn a few things prior to your camping trip.
If your flashlight batteries run own, you can easily make new ones with tools and materials you have in your backpack, or even try making a lantern.
[the_ad_placement id=”in-text-3-type-r”] These being said, consider both the pros and the cons, and decide if the do-it-yourself way is for you or not. Nonetheless, it doesn’t hurt knowing how to make a few things just in case things go south.

Helpful list indeed. I now know the to bring list i will give my daughter in the event of an overnight trip. We have already a comforable sleeping bag, we thought she would have a hard time rolling it back up into the pouch but she said it was fine and didn’t have any problems. will surely purchase other items on this list!
Well, personally, basic camping gears for me are, hatchet, plates, tarp, headlamp, stove and first aid. And you’ll be good to go!
I will certainly start making some of the things listed with my son. Thank you for the detailed instructions, it seems fun, educational and useful.
All my previous DIY experience comes from reinventing certain items, but it will be fun to make these.
Camping with as few supplies as possible is one of those experiences you never forget.
I will always remember going out to the woods in my youth and bringing along items that can’t fit in my backpack! This article reminds me of these long gone times.
Holidaymaking won’t be easy without the basics.