
DIY alcohol stoves for camping or backpacking are not hard to make, and I know this because after hiking and backpacking almost 20,000 miles in the US, I have tried just about every stove available.
Manufactured and DIY stoves are both excellent options for cooking in the backcountry. However, the DIY camp stove is a great, lightweight, inexpensive option for mountaineering, hiking, and emergencies alike.
I’ll discuss several DIY camp stoves that are a good option and also fun to make.
Table of contents

The option above is good if you have fuel readily available, and it burns relatively evenly, but cardboard and oil are not always available.
Still, if you have the materials, it is a fun little stove to make, especially for your kids.
Beer Can DIY Alcohol Stove
Creating a camp stove from a beer can is relatively simple.

- Use a beer or soda can (about 500 ml or smaller).
- Cut the top of the beer can where the edge meets the flat cover, right where the opening is. Make sure not to create a rugged or jagged current edge. This will allow you to have a working stove later on.
- Next, take a pair of scissors and cut the entire can right in the middle. The bottom part of the can should have a perfectly circular, refined edge. It should be 1-1.5 inches in height.
- Place the two beer can halves next to each other. The top edge of the bottom half should reach the second piece’s edge from top to bottom. Mark where the bottom half’s edge touches the top and cut. Ensure that you cut carefully and leave a straight edge.
- Now, you should have two shortened beer can pieces. Take the half with the open edge, which you cut at the beginning of the tutorial. This piece will have pockets for the fuel to evaporate, creating flames. Use a small pocket knife and begin denting ‘pockets’ (combustion chamber) in it.
- These dents should be vertical if you place the can piece upright. The pockets will drive up the evaporating fuel. Create tiny openings with the cuts to allow the energy to burn slowly.
- Next, take the top can piece and slide it into the bottom beer can piece. It should be easy. Push it so that the dents you made can provide openings for the fuel to burn.
- Finally, use a sharp metal pointy edge (a blunt needle) and make a slight indentation on the ‘sloppy’ side of your combustion chamber beer can.
Using Your Beer Can DIY Alcohol Stove
Once you finish your stove, it’s time to add the fuel. You can use several different fuel types in a DIY alcohol stove, which is nice if you are traveling and can’t be picky and what you use.
Fuel You can Use in Your Alcohol Stove
I like to use denatured alcohol. It burns easily and usually lasts for about 10-12 minutes, which is about all I need to boil water. It is also reasonably easy to find.
What other fuels can you use in your alcohol stove? I’ve listed a few below.
- HEET – in the yellow bottle and not the red
- Isopropyl Alcohol – creates a lot of soot
- Methanol – poisonous but can be used in a pinch
- Gel Fuel – not efficient and takes longer to burn
Time to Cook!
Fill the backpacking stove with no more than a finger height of fuel. Use a lighter to light the fuel, and it will ignite immediately. Next, place a pot on the stove and begin cooking.
You can’t adjust your flame on a DIY alcohol stove, so I primarily use them to boil water or make a quick meal.
Alcohol stoves have their place in the lightweight world of backpacking or as an emergency backup stove. However, if you are not interested in making your stove and want to look at other options, you can take a look at these reviews on the best stoves for camping.
In my early years, I used Brasslite stoves. This is a small stove maker that makes everything himself by hand. He has been making these stoves for years, and they are lightweight and well-made.
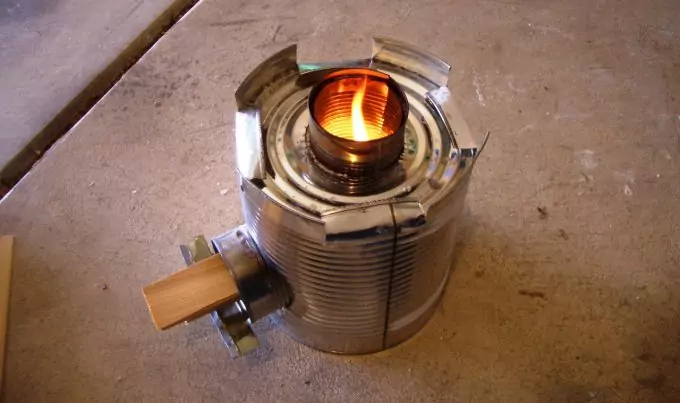
Advanced Metal Can Alcohol Stoves
This stove is more advanced, but it also provides you with a portable and compact ready-made stove.
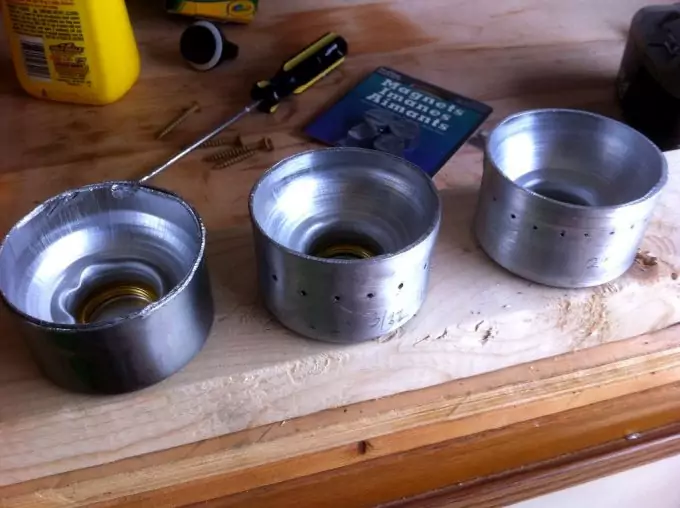
- Prepare two soda or beer cans and cut them in half. Use a sharp knife or even a razor blade to make sure that the bottoms of each can have flat, smooth edges. Additionally, use a file or sandpaper to make the edges softer. This will help you avoid injury.
- Remove the inner circular section of one of the beer can bottoms using a sharp knife.
- Find a 3M piece of fiberglass. Cut out a rectangular section of fiberglass to fit the bottom of the beer can.
- Use a grommet kit to punch a hole in the middle of the fiberglass. Then, add the grommet pieces on both sides of the fiberglass so that they essentially are the hole in its center. Lock the grommet firmly in place so it doesn’t move.
- Lay the two cans facing downwards. Place the fiberglass between them and lock it firmly in place with the second can on top.
- Prepare insulation to fit inside between the two cans. Add another layer of fiberglass underneath the first layer if you’d like. This will protect against fuel spillage.
- Prepare a third can bottom piece, just like you did initially. Make it the bottom of the entire stove.
- Use duct tape to measure the circumference of your stove. Then, mark the beginning with a pencil or felt-tip marker. Finally, remove the tape and place it next to a ruler.
- Your holes will need to be evenly spaced. If you’d like 16 holes, measure the entire circumference of the can and divide by 16. The result will be the space between each hole. Set marks for each hole right on your piece of tape.
- Attach the tape once more to the can. Now that you know where your holes will be begin puncturing the can.

Using Your Stove
Once you have finished your stove, put your fuel through the grommet hole you created earlier. Try not to spill any fuel while transferring it into the stove, or the fuel will burn and evaporate from where the spillage occurred.
If you stay in shelters along hiking trails, especially those along the Appalachian Trail and Northville Placid Trail, you will see burn marks all over the wood. This is often from spill fuel, so make sure you clean up any fuel you spill.
Use a lighter to ignite the fuel. You will produce high temperatures, so don’t move the stove while it’s burning. Instead, place a wire grid above the stove to cook or prepare a meal.
If you don’t have the time for a DIY alcohol stove, I also provide reviews on the best alcohol stoves. These are all excellent stoves that vary in price and function.
Although this is an older video, it is still a good tutorial on constructing your own alcohol stove with a time-proven design.
Aluminum Water Bottle Alcohol Stove
This is an interesting DIY camp stove that uses an entirely different container. You will also need more specialized tools for cutting.
- For this stove you will need to purchase a cheap aluminum water bottle. You can probably find one at a dollar store.
- Mark a line on the bottle where you’ll cut both its top and bottom ends.
- After cutting off both ends discard the middle. Then, place the bottom half on the table facing up. Place the bottle’s opening inside the bottom half. Fit that part as tightly in as possible – you may even have to use a hammer.
- Now that you have the set ready, take a permanent marker and mark 16 evenly spaced dots for drilling holes through the aluminum. The fuel will burn/evaporate from these holes (the combustion chambers from the first tutorial).
- The holes should be located below the seam of the two aluminum pieces. Otherwise, you will smother the fuel, and it will burn through the bottle’s neck.
- Remove any leftover marker with rubbing alcohol.
At this point, you’re finished with your stove. Some may start immediately, and others may take a while. It depends on the quality of the holes. If you’re cooking a meal, either place your pot on a grate or put it directly on the DIY camp stove.
Final Thoughts – Alcohol Stoves
DIY alcohol stoves are popular amongst hikers and survivalists because they are lightweight and relatively easy to find fuel.
However, if you like to cook, this is probably not a good choice. It isn’t easy to adjust the flame on most DIY stoves, and they won’t burn or simmer for long periods.
The DIY camp stoves have hundreds of variations, depending on your imagination. However, as long as you follow the same general concepts, you have good options for cooking meals at camp.


This is a very good read. I didn’t know you can make an improvised stove using aluminum cans. This will be a good school project for the kids too, especially in summer camp.
Thank you, Jason. It is indeed a good way to teach kids about using what you have around for creating usual things.
Oh, yes! We did this as part of our camping activities. There may be some places you can’t find wood, or the wood is wet, so knowing it is an advantage. Its easy to make and very efficient too. Our instructor demonstrated with a beer can, he even poured the remains of the beer to the ignited can. However, everyone should be careful because aluminum or tin cans can cut our fingers.
Hi Molly,
Safety should always be practiced when camping or doing DIY projects. The beer can that your instructor showed is a nice way to be creative about making fire. You can also use lighter fluid but always be careful as we do not want to inadvertently cause a fire.
Samuel
We tried the beer can stove a while back and while inventive and efficient for cooking small portions, we found it difficult to regulate heat. The metal can stove looks complicated but looks badass! Question though, we can put in coal right? Food tastes better and coal has even heat distribution. A little bulky for travel but definitely not heavy.
Yes, you can use coal, but make sure you do not use a lot of it so as not to overfire the stove.
The beer or soda can stove is genius! You can make a lot at home and just keep it when you have camping trips since it is only a small thing to keep in your camping bag or you can just bring beer and make one after drinking it and you can show it off to your camping friends.
This is a great project to try as it is not only fun but also a convenient way to have working stoves during camping trips. I have one question in mind, can the soda can stove provide enough heat to cook food or should I just opt to make bigger ones?
A soda can stove is an effective energy source for preparing fast meals or beverages, but not such a convenient stove for cooking food. You should consider making a sizeable wood burning stove.
One of the easiest camping projects is a DIY beer can stove. It is a simple stove, which is probably not effective for cooking serious meals, but certainly convenient for preparing fast meals and beverages. It is always good to try out something new.