If you never heard of survival bracelets your first question might be “how is a bracelet related to a survival situation?” Your question would be totally legit as we all know that bracelets are more of a fashion thing than a survival accessory. Still hikers, soldiers, and outdoor adventurers wear at least one on every adventure they have. Actually, one of the first things you learn when preparing for an adventure is how to make paracord bracelet. In order to clarify things, you first have to find out what a paracord bracelet is and why it is so popular.
First you need to know that paracord is actually parachute cord (or 550 cord as people call type III paracord) specially made to withstand high forces. Initially this type of cord was used for parachute lines (which is why it’s called parachute cord) only but lately soldiers and civilians learned to use it in other activities too. It is so versatile and resistant that even astronauts use it in space (they used it to secure equipment in a mission to repair the Hubble Telescope). Besides high resistance, the paracord is also quite elastic and has many uses in the world of survival -you can read more about such uses in our in-dept article on emergency uses for paracord.

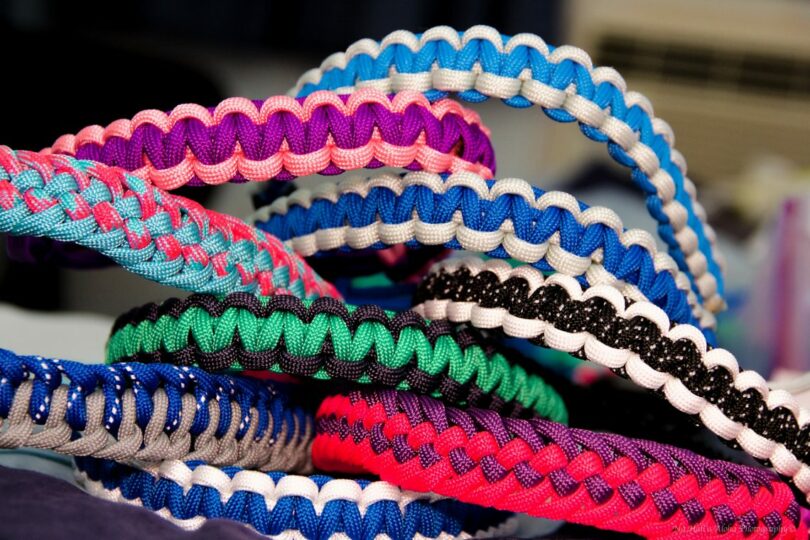
The paracord bracelet is nothing else but a bracelet made out of paracord that could save your life in an emergency situation (this is why people also call it a survival bracelet). The bracelet contains several feet of paracord woven into a bracelet that can be easily worn at your hand.
The weave is made in such ways that the paracord would easily unravel offering you fast access to a powerful piece of rope. The uses of such a bracelet are countless and we are going to discuss them a bit later. For now, let’s talk about history: how the idea came to life and who is the genius behind this amazing trickery.
Everything started (like almost any great idea) from a kitchen table in Florida where outdoor passionate people started a family business, selling bracelets that were more than a fashion statement. The idea was amazingly well received by public (both civilians and military personnel) fact that quickly transformed the small business in an industry leader in survival bracelets share. The small business is called Survival Straps and they continue to produce high quality paracord bracelets among other equipments.
Basic DIY instructions for everyone
The beauty of this survival bracelet is that if you know a few tricks and you have some paracord you can make your own bracelets. They are not expensive but you must make sure that you buy quality paracord and not some cheap knock-offs.
Also, making a paracord bracelet could be a fun DIY afternoon project to try with your family and friends. Since wearing one became a trend, you can find paracord bracelet kits on sale so you would only have to know how to weave the bracelet.

There are a few different types of patterns you can use to weave the bracelet and each one allows a certain length of rope to be introduced in the bracelet. For example, the King Cobra pattern weave is the pattern that allows you to introduce the most paracord in the bracelet (up to 25 feet), but this is not the only pattern you can learn. Of course you can create other things by weaving the paracord like belts, pet collars, pouches, and more. The versatility of this piece of rope is pretty amazing! If you are interested in other creative ideas, take a look at our extensive guide on paracord projects to use in the wilderness.
There may be many different styles you can weave the paracord but according to the way you secure them on your hand, there are only two types of survival bracelets:
- Paracord bracelet without buckle
- Paracord bracelet with buckle
As you can observe from their names, the only difference is the presence or the absence of a side release buckle which makes the bracelet easier to take off your hand. The paracord bracelet without buckle should have two different colors of rope and is usually secured with a special knot that ties both ends. In both cases you are going to need a few extra items to make the paracord bracelet that are easily found in any household. You will need:
- A candle
- A lighter or matches
- Scissors or a knife
- The paracord
- Measure tape
Option #1 – a bracelet without buckle
Now, after you gathered all the necessary items, you can start making your survival bracelet. If you are a beginner, don’t expect to be successful on the first try, these can be tricky but once you get the knots and the style of weaving you can make them forever.
As we said before, you are going to need two different colored pieces of paracord (if you want the bracelet to look good and it’s easier to make). Take the measure tape and put it around the wrist to measure the length of the bracelet. You want it to be a bit loose, but not very loose so you lose it while you’re walking. It is recommended to add one foot of paracord for every inch around your wrist and one or two feet for back-up.

After the measurements are finished you will know the length of paracord you’re going to need. Divide the total length in half and take two pieces of paracord of the same length. Of course that when put together, these pieces’ length is equal to the total length of the necessary paracord. Now you can start the actual bracelet. Here are the steps you need to follow:
- Fuse the ends of the two paracord pieces by holding them in top of the candle flame. The nylon in the rope will melt and fuse the two pieces together. Make sure that the fuse is strong enough by trying to pull them apart.
- Now you have one piece of paracord with two different colors. Take the paracord by the place you fused the two pieces together, fold it in two and straighten it up side by side. Wrap the paracord around your wrist so you know how long the bracelet is going to be and add about an extra inch and a half. Now you have the beginning of the bracelet.
- The next step is to make the first knot. For this model you are going to use what it’s called a cobra knot which is extremely simple once you get to learn it. Take one end of the rope and make a loop underneath the whole thing and then take the other end of the rope and, still going underneath everything, go through the loop. Remember to always use the same color for the same actions. For example, if your paracord is green and orange you can use green to make the loops and orange to weave the bracelet by going through the loops. Don’t change colors!
- After you make your first two knots, you need to create a loop by stretching the original knot. After the loop is made you can hold everything in place and tighten it up.
- Continue weaving until you reach the end. Make sure that what’s left behind is tight and neat.
- Once you’ve reached the end you are going to have the paracord bracelet with a loop at each end and a bit extra paracord left. You can use this to make a nice, cool clasp. There are many clasp possibilities and you can play with it, creating something unique, especially for you. If you’re not in the mood to think about this, most people use the knot to loop system. This type of paracord bracelet can be made to be adjustable so you can fit it on different types of wrists.
Because we know that an image is worth a thousand words, we found a short, useful video of how to make a paracord bracelet without buckle.
Everything is explained in simple, easy steps and as a bonus, you get to see how to make a really cool clasp out of loops.
Option #2 – a bracelet with buckle
For this type of bracelet you are going to need (extra to the standard items and materials) a side release buckle that you can find in any equipment store. If you are a beginner it is recommended to use two different colors of paracord that you fuse together just like we talked about at the paracord bracelet without buckle. The choice of colors and how many pieces you’re going to use is yours.
You also need to measure the paracord and your wrist to make sure you have enough for the entire bracelet. Keep the same rule: 1 foot of paracord for 1 inch of your wrist with one or two feet extra. It’s always better to have more than to not have enough.
- Fold the paracord in half, take the ends and slide them through one of the buckle’s halves. When you almost reach the other end, make a loop and put the ends through the loop making a knot to secure the buckle.
- Put the free ends through the other half of the buckle and measure it on your hand to make sure you get the right length for the bracelet.
- Bring up the ends that went through the second half and start making the cobra knot (use one side for the loop and the other for going through and weaving the bracelet). Do it like this until you reach the end. Don’t forget to tighten everything up.
- Cut the extra paracord and use the lighter to melt the ends thus preventing the paracord to get apart. Tuck the ends in the braiding and voila, you have your own survival bracelet!
Of course that we have a video for this type of paracord bracelet too, so you can actually see how easy it is to do.
In this tutorial video you can see step by step of making paracord bracelet with buckle.
Different types of pattern
In the previous examples we talked about how to make a paracord bracelet using a Cobra knot. This is actually one of the easiest styles to make, especially for a beginner. We also said that there are many other styles and the only difference is the style used to weave the paracord. So if you don’t feel comfortable with using the Cobra knot or you want something more advanced you can always use one of these styles:
- Snake designs: Viper, Sidewinder, King Cobra, Rattler, Copperhead, Boa, and Mamba.
- Fishtail weaving
- Corkscrew design
- Wide dragons tongue
- Ladder rack
- Center stitched
- Trilobite
- Sawtooth
There are as many designs as there are weaving styles and every once in a while, a new design may appear. We have a great article on the wide range of paracord knots (or patterns) commonly used by survivalists and outdoor adventurers and you can read about it here.
How to use a paracord bracelet in the wilderness
Well, now that we have a new, cool and pretty bracelet that we actually made, let’s see how and where we can actually use it. In the beginning of this article we talked about how paracord can be used in many different outdoor activities due to its versatility and strength. These are the exact features that are going to be useful when you are in the middle of nowhere and you need some (extra) rope.
Let’s say that you get lost in a huge wooded area and you can’t find your way out. All you have with you are the items in your backpack, very little food and the paracord bracelet at your wrist. The scenario is pretty dark and it may seem that you are destined to live with forest fruits until rescue teams find you. Well, if you have some survival skills, a pocket knife or a multi-tool and your paracord you can actually get yourself some meat on the table.
- You can make a bow and arrow to hunt small animals (if you know how to use such gear). To make the arrows you’ll need a flexible sapling, feathers and some tree shoots. Find the right wood for the stave and use an intact piece of paracord to make the bow string. You’ll also need a strand from the core of another piece of paracord to add feathers to the arrows. For a more detailed explanation, take a look at our article on how to make a bow and arrows.
- Paracord is also very useful to make traps. Using the paracord you can make a snare noose and catch your food rather than hunt it. In case you think someone or something is following you, use the bracelet to make a trip wire that will let you know when something comes close to your resting place.
- Use it to stop severe bleeding by making a tourniquet. Tie the paracord above the wounded area and stop the bleeding using a twig to tighten the tourniquet.
- When in the woods or in the outdoor it happens sometimes to slip and fall, thus breaking a leg or a hand. Well, we all know that if you look around you’ll find a few stiff branches to improvise a splint but there is nothing to tie them up with in order to fix the wound in place. Using your paracord bracelet you can get enough rope to make a pretty good splint.
- You can use it to replace any ripped shoe laces, belts or suspenders. Also it’s works pretty good to tie your backpack if you need some extra compression.
- If your tent was attacked by wild beasts (raccoon, ferrets, or others) over night and now you have a big hole in your tarp use your paracord bracelet to get the necessary amount of stitching wire by using the core.
- Improvise a tent using just a tarp and your paracord bracelet. Tie each corner of the tarp to a tree using a piece of paracord and enjoy your new home.
Of course that these are just a few examples, but a paracord bracelet can be useful in many other situations. Whenever you need to tie or stitch something, the paracord is going to be there for you. It always helps to have that extra piece of rope with you when out in the nature.

Lately, the paracord bracelet became a trend and people use it for both fashion (it really looks good) and survival. Of course that people who use it as a fashion statement have almost no idea how useful the thing around their wrist really is. Once you get outside and try a few outdoor adventures you will learn all the uses a survival bracelet can have and who knows, maybe you’ll discover some new ones.
The ingenuity and passion for outdoor activities lead to this simple yet amazingly useful invention. It has everything that an outdoorsman needs: simplicity, ease of use, strength and versatility. It’s always very easy to reach and you can’t forget it at home because you actually wear it. As you could see, it’s also very easy to make and it doesn’t require a lot of your time, especially after you make a few.


A debt of gratitude is for the enlightening methods for spicing up my basic paracord bracelets designs that I have become burnt out on making. This article gave me some new thoughts of what I can attempt next!
We are glad we could help.
Hm, interesting! I never even thought about making a paracord bracelet. I carry it in my backpack, but by wearing it as a bracelet not only will I free up space in my backpack, I will have a new fashion item!
Is there a type of paracord you recommend for a starter bracelet maker?
We recommend a bracelet with a buckle for a starter bracelet maker.
I have been a hiker for three years now and I’m not sure why I missed paracord bracelets. Now that I’ve seen this I’m thinking of incorporating a compass and a flint fire starter. I for sure will make this by myself because I want to make sure that the ropes are efficiently elastic.
DIY Paracord bracelets are easy to make. In fact, you get to incorporate your own unique designs.
I never knew that paracord bracelets are very useful in emergency situations. In the past, I have only seen them as unnecessary fashion accessories. I will now make sure that there is at least 2 paracord bracelets in my bags just in case I end up in an emergency. This knowledge just might help me when the need arises.
What do you attach to your personal paracord bracelet? Is it a good idea to attach both a compass, and lighter at the same bracelet or should I make one bracelet for each? Personally, I think that using paracord with bright colors are somewhat better because you can easily see them and they would be hard to misplace.
You can attach attach a lighter, a compass or a whistle. Bright colored paracord is good for visibility. Also, make a number of survival bracelets, at least two.
Well, then you should know that a survival Paracord bracelet is an important gear for any survivalist/outdoorsman. It has proven beyond doubt its usefulness in numerous situations in the wilderness.
We have different careers to choose, but mine landed in the military for about 3 years. It was a good experience. How we made different bracelets out of 550 parachute cord. These paracord bracelets have been with me in different mission. A paracord bracelet is quite resourceful and versatile. After leaving the service, I still find it interesting to make new styles for everyday use.
One of my dearest friends found interest on my paracord bracelet making, since she was so fascinated about the whole thing. She even asked me if it could be possible to make one for her upcoming hiking expedition. Well, I will love to take up the challenge with the help of this article.
The explanations on how to make your own paracord bracelet on this article are very good, but I am not that good with DIY. I would rather buy a ready-made model. However, I believe there are benefits to a DIY paracord bracelet, such as the ability to customize the design to your liking.
Survival gear doesn’t look good as a part of your everyday wardrobe, but maybe it should be a part of it, and it doesn’t have to look like survival gear or any type of gear either. DIY paracord bracelets are easy to make, and you can add your own designs to it, so it can go well with your outfits. Combining style and usefulness can be very good for you over time.
If there is one important gear that you should always include in your backpack, then that is a Paracord survival bracelet. And you don’t need to spend too much on it, since you an make one with the help of the provided tips.
Most Paracord bracelets you will find on today’s market are custom-made. So, it won’t be a bad idea if you try to make one yourself. It doesn’t have to be difficult. We have provided you with enough tips to get you started.
Making a paracord bracelet doesn’t have to be a difficult proposition. Of course, you need the skills, but practice makes perfect. The tips we have provided will definitely prove helpful.
Designing Paracord bracelets can be a hobby if you want to. For me, it is one of the things I like doing on my backyard. I shared the tips to motivate you into embracing the skill of making paracord bracelets.