
Hiking, trekking or simply camping you still need clean water. Without it you risk catching some disease and if you’re far from civilization, it may take a lot of time until you reach a hospital. All of this may claim your health and even life. Many hikers and campers, when dehydrated, don’t consider the importance of finding a way to purify their water.
[the_ad_placement id=”in-text-1-type-r”]
Whenever they find a water source, they immediately start drinking from it. This may be extremely dangerous. It is especially true when you’re dehydrated, since you don’t think about dying of some organism or virus, but of dehydration. Only when you’ve given your body some water, do you realize that the water was unclean.
In order to avoid all these scenarios we will give you handy methods to use when you’re out there, and for some reason you’ve run out of clean water. You may have forgotten to take along some purification system or filter, so you will have to rely only on tools and methods at hand.
Useful water purification methods in the wild
To start with, in order for these methods to work you would still need some items at hand, and we will explain all of them in detail and how to actually use them.
Your first method, which is also the easiest of all, is boiling. Water boiling is known as a decent method for purifying water. It is a very old method and is still reliable even to this day. You would need a durable water container (a metal can, or other cookware) and a gas stove. There are small portable and very light gas stoves made specifically for hikers and campers who don’t want to carry too much load.

If you don’t have a gas stove, you can of course build a fire. This may be more time-consuming and require some skills in starting the fire. Make sure you gather old and dry branches and foliage (leaves) for the base. If you have a lighter or matches, light the foliage and blow gently at the burning branches. If you don’t have matches or lighter, you will have to use some old methods for starting fire. One of them is to take a medium size branch (old and dry) and cut a notch in it.
Then place another thinner branch in the notch and start rapidly and briskly rotating the thinner branch. If you do it correctly at some point smoke will start coming from the base of the notch. Place dry foliage (or cotton balls if you have, as they catch fire extremely well and quickly) at the notch. Be careful not to ‘suffocate’ the beginning fire, as it is still fragile and weak. You need to feed it little by little. Of course, there are other methods (less painful) to build a fire and we invite you to read about them in our in-depth tutorial on how to start a fire.
Now that you’ve started the fire you can finally boil the water. Of course, without container you won’t be able to do that, so make sure that you carry some metal container in your backpack. If you don’t know what works with hiking and camping, we have a great set of reviews for the best camping cookware to own, especially if you want to go in the great outdoors more often.
You need to boil the water at least 5 to 10 minutes. Be aware that the higher you’re situation (in elevation), the longer you will need to boil the water. The reason for this is that the atmospheric pressure gets weaker and weaker as you go above sea level. This means that water starts boiling at lower temperatures than 100o Celsius, which also means that you will have to keep the boiling process longer in order to achieve the same results at sea level.
Another handy method for purifying water without any modern invention is to use soil or sand. It may sound absurdly easy, but it works. Soil is known to purify and extract any viruses or organisms from the water, leaving it clean and ready for drinking.
So this is how to do it. Get a cloth or a shirt and place it above the water container. This is where you will pour the water. As you have places the cloth, now put some soil (or sand) on the cloth, right above the container’s opening. Now start pouring the water. Make sure the water goes through the soil (or sand), in order to be filtered. If you think once wasn’t enough, you can repeat the procedure one more time. Try to keep your containers (bottles) clean, so you don’t have to worry about impurities.
Another similar method, but more time-consuming is to dig a hole in the damp ground and wait for the water to accumulate in the hole. This may take quite some time for it to happen, but is still a working and reliable method.
On top of that, you can collect rain water. It is naturally distilled and clean, so you won’t be worried about any viruses or microorganisms. Of course if you’re trekking or camping in a relatively dry climate, you should not rely on rain. Try finding other water sources.
Another useful method, which is as old as boiling water, is solar distilling. This method requires some time to build the system, and then some more time to wait for the water to collect. It is nonetheless a method you should definitely remember.
First of all you need to dig a hole. Make it deep enough so you can put your water container in it. Also, the container’s top edge must be below the edge of the hole. You will see later why.
Now put some fresh leaves and foliage at the base of the hole. Place the water container in the center of the hole. Take some plastic sheet or cover and try to spread it all over the hole, so it covers it completely.
Place some heavy stones on the four corners of the plastic sheet. This will make a mini greenhouse effect. Now that you’ve done this so far, take a small stone and place it right above the container’s opening. It shouldn’t be too heavy, but it must stretch the plastic sheet so you will have a protrusion that will accumulate water droplets. As a result the droplets will gradually fill in the container.
[the_ad_placement id=”in-text-2-type-r”]
This method requires patience but it works without question. Not only does water evaporate from the vegetation and foliage, but also, the earth always contains some moisture and water which will gather in the form of water vapor and then fall into the container. This method resembles the one where you could only dig a hole and wait for the water to accumulate, but in this method you force the water to accumulate quicker and directly in your bottle or container.
A variant of this method is to just use a large bowl (if you have such at hand), place a metal cup at the bottom of the bowl; then pour the unclean water in the bowl. Again, cover the bowl with some plastic sheet (other covers may work too, but not fabrics, as they absorb the water). Place the heavy object or rock on the sheet right above the cup, and wait for the water to evaporate and then start dripping in the cup. This method may be preferred if you have a reliable source of water and can have immediate access to water.

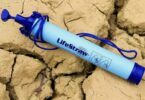
Another handy method, used by hikers and trekkers, is to expose the water to the strong sun’s rays. These machines are called UV purifiers. You simply dip it in the water bottle and wait for it to do its miracles. The principle behind this is that the UV rays kill bacteria and viruses and leaves the water clean. It may not remove other impurities, but the bigger danger is removed.
Several more very basic, yet useful water purification methods
Well, you may not have such a tool at hand when in the wild, so you will have to rely purely on the sun’s magic. Fill a plastic (or glass) bottle with water and expose it to a sunny spot. The sun must be really strong (like at the peak of the summer) for this to work. The higher the sun is on the sky, the stronger the UV rays. When you touch the water bottle it should be warm. Then you know that the water is ready to drink.
You need to know a few things about this method. It works only for a while. The fact is that UV damages the pathogens DNA and they are ‘deactivated’, thus harmless. But, the longer they are exposed to the sun, the higher the chance for them to develop some resistance against this damage and reactive anew. So, you should drink the water immediately after sun exposure. Repeat this process with new water.
A very useful trick is to get two containers – one with a higher bottom, than the other. The other should be placed lower. You can simply place the second container on a flat stone or some other object, to elevate the container slightly. Then place the dirty water in the higher container.
Take a shirt or other piece of clothing and rip some small piece of it, at its length. It should be somewhat long, but thin in width. Then place one end of the cloth into the dirty water. Move the lower container next to the one with the dirty water. Put the second end of the cloth into the empty container.

Basically, the ripped cloth will act as a transporter of the water from one container to the other. This works since the cloth soaks until all its fibers are soaked and eventually the water reaches the edge of the water container and starts going down to the empty one, thanks to gravity. Eventually, the water will end up clean, leaving all impurities, particles, organisms and microbes in the first container. All of them will reach the harder surface of the cloth and stick to it, whereas the water will keep moving along the cloth.
In case the water stopped accumulating, this means that either the cloth doesn’t reach deep enough into the water, or that the cloth is too clogged up. You can clean it up, or you can use another cloth from the same piece of clothing you used initially.
Here is yet another tried and working method for cleaning and purifying water. You can use urine or salt water for this method. And don’t worry – you don’t have to drink it. In fact, you’ll boil it. Here is how it works.
Take two metal containers. Place the urine or salt water in container No 1. Container No 2 should be empty (and hopefully clean). Then container No 1 should be placed slightly above (in elevation) the second container. Place lids on both containers. Make holes to the side of the containers and place a metal tube connecting the two holes. They have to be made right near the openings of the containers, since the vapor will collect to the top parts of the containers.
As container No 1 is placed slightly above the second container, the evaporating water will immediately slide into the second one. You will basically have distilled water as a result, leaving all impurities, salt and other elements in the first container. Of course, you have to place it above fire or heat source for this method to work.
Another very primitive method for gathering water is to take a plastic bag and cover a tree branch with it. You need to make sure that the plastic bag envelops the branch easily and yet tightly. Close the plastic bag’s opening with a rope or thick thread so that the water will remain in the bag. As trees contain a lot of water and moisture, this method will create somewhat a greenhouse effect.
Of course, you will have to wait quite some time to have some meaningful amount of water, but even a few sips can be life-saving. So, consider this method when there’s absolutely no other water source around you.
[the_ad_placement id=”in-text-3-type-r”]
One good method of filtering the water is close to the method of using soil or sand. This one is further developed into a system itself. So, take a durable plastic bag. Thin and fragile ones won’t work. Place on the bottom charcoal. On top of them place a layer of soil/sand, then a layer of small rock, then again another layer of soil/sand. You need to vary the layers.
Then on top of all this, pour the unclean water. All the sand, rocks and charcoals’ layers will filter it. Make a small hole on the very bottom of the plastic bag so the clean water can come out through it. If you don’t have a plastic bag, as funny as it may sound, using a condom will actually be quite handy, as it can stretch to quite a size and withhold. Nonetheless, be careful when placing some sharper rocks as they may puncture the condom and all your setting will have been in vain.

So, make sure to place another container (clean) beneath this system, in order to collect the filtered water.
Of course, we need to point out that some very easy methods like using iodine tincture or potassium permanganate work also. The only problem is that you have to pack them beforehand. Otherwise, if you filter the water using the above primitive methods, you may still want to add some iodine tincture to make sure that the water is absolutely safe for drinking. These chemicals are usually available as tablets that have to be dissolved in water – you can more learn from our article on water purification tablets.
You can also use a few drops of chlorine bleach. You need a certain concentration of sodium hypochlorite – 5.25 per water bottle. Don’t drink it immediately. Wait at least 1 hour. This is applicable for almost all chemical methods of treating the water. The minimum amount of time to wait is 30 minutes (when using iodine). After all you’re using chemical solutions to purify your water and it certainly kills bacteria, which means it can be damaging for humans too, even in such small amounts.
If you use potassium permanganate there are certain signs you should be aware of. Follow the instructions of the package, but remember – after 30 minutes since you drop the crystals the water should turn pink. If so, it’s ready to drink. If the water is dark pink, the concentration is higher than would be considered safe, so better put some more water to dilute it. If it’s red, don’t drink it.
As long as you follow the above advice you should be safe. We still would advise you to either practice at home or in your backyard these methods, or carry some chemical solutions to stay on the safe side. The safest and most preferred method remains the boiling. It’s easy to set and relatively quick (10 minutes of rolling boiling water). Of course, the less humid and moist the area, and the less water sources around you, the harder it would be for you to find and purify water. So, plan ahead your trekking/hiking area and consider the risks.
Boiling is the best! Except it consumes fuel, makes the water hot, and you can’t move while boiling the water because you have to watch the fire lest it spreads. At least, it is safer that way.
Hi Judith,
Boiling is an option but there are other cost effective methods of filtering water like solar condensation and improvised water filters. You CAN move around while waiting for the water to boil but you would have to use common cooking areas or areas that have already been used as cooking area. This lessens the impact and you are sure that the surroundings are cleared of possible fuel.
Regards,
Samuel
I would also stick to boiling. But cool to know about this other primitive methods, especially if I get into a situation where my options have run out. Still, if I am going camping or hiking, I would probably get those handheld UV water purifiers and bring extra batteries. I’ve heard that they work as fast as 90 seconds versus those iodine tablets that takes around four hours to kill some harmful micro-organisms like giardia.
Learning the various water purification methods is completely necessary when you are going into the woods. You never know when you will need them to survive the wild.