Paracord bracelets are a trending fashion accessory among outdoor enthusiasts and preppers alike and although they do come with different patterns and overall design, some will try to find another way to bring their paracords along with their other every day carry or EDC gears. A few enterprising individuals have come up with lanyards, anklets, necklaces and whatnot but among these new incarnations of the paracord bracelet is the paracord keychain.
[the_ad_placement id=”in-text-1-type-r”]Keychains, or key fobs in other countries, are handy when it comes to locating your keys or looping similar mementos in. They can be attached to a bag at the start of the zipper or it can be attached to your carabineer and then attached to your belt loop. Keychains have a variety of other uses other than holding keys and this applies to paracord keychains.

There are possibly a thousand and one paracord projects out there that you can make and given the strength of the paracord, the purpose and size of these projects is also quite expansive.
Some examples of projects you can make using parachute cords are:
- Rifle Slings
- Harness
- Pouch
- Wallet
- Belts
- Koozies
- Snares
- Lanyard

Image credit: guidepatterns.com
The list can of course continue, and if you want to see more and instructions for each project, please take a look at our paracord projects article.
But, out of the multitude of projects, today we will stick with keychains. Paracord bracelets involve basic loops and knots and you can sometimes squeeze in an added feature or two. This goes the same for keychains, you can have monkey balls, hidden compartments, and you can even shape your keychain into a grenade or a cross.
Keychains assemble!
Crafting your own paracord keychain is quite easy and will take a small amount of time to make one. The great value of learning how to make a paracord keychain is that you can mass produce them to give to friends or sell them online or even supply a specialized shop with them. There are several varieties and here are the instructions to make some of them.
[the_ad_placement id=”in-text-2-type-r”]In making any paracord project, always remember that for every inch of the finished product you want to make, you will need the same length in feet of parachute cord. For example, you would want a 12-inch paracord lanyard, and then you would need 12 feet of parachute cord to cover the entire length. This can still be adjusted depending on the type of weave that you would want to use for your project. The more complex, the longer cord it needs.
Simple paracord keychain using the cobra weave
The very basic of all paracord keychains uses a standard cobra weave.
That is easy to untangle and can easily hold up to 12 feet of parachute cord.
Materials needed
- Scissors
- Ruler
- Lighter
- Key Ring
- A length of Paracord, any thickness
Instructions
- Take your parachute cord and insert one end into the key ring and then pull it through until the midpoint of the paracord is on the key ring.
- Using the ruler, measure about 6 inches from the key ring and make a mark. This mark will be the starting point for your cobra weave.
- Starts making your cobra weave by looping one end, usually the right, under the main shaft and under the other cord; loop the left cord over the top of the main shaft and through the loop created by the right cord. Make sure to pull the cords tightly before moving to the next set.
- Repeat this step until you close in on the key ring.
- Leave a little space between the key ring and the loops.
- Cut the excess parachute cords, as close to the loop as possible.
- Burn off the ends using the lighter until the strands have melted together.
Video:
https://www.youtube.com/watch?v=bTumuvv4tAs
Simple cobra weave keychain using two different colors
This is a stylish version of the first keychain that was discussed.

Image credit: instructables.com
The cobra weave is also called the Solomon Bar.
Materials needed
- Scissors
- Ruler
- Lighter
- Key Ring
- Carabineer
- 2 pieces of equal length of Paracord, should be two distinct colors, any thickness
Instructions
- Take your parachute cords and using the lighter, fuse them together on one end.
- Make a Lark’s Head knot on the smaller carabineer loop using the melted joint as the middle point.
- Take the loose ends and loop them around the key ring. You can measure the desired length using your ruler at this point.
- Once you’ve taken the measurements, start making your cobra weave by looping the right cord under the main shaft and under the left cord. Loop the left loop over the main shaft and through the loop created by the right cord.
- It is important, at this point, to remember that whatever color is on top of your weave should be the same all throughout. Doing otherwise will result in another weave that you will learn later.
- Pull on the cords tightly to make sure that the keychain weave is compact and will not unravel easily.
- Repeat step 4 until you close in on the carabineer, leaving a little space in between.
- Cut the excess parachute cords, as close to the loop as possible.
- Burn off the ends using the lighter until the strands have melted together.
Video:
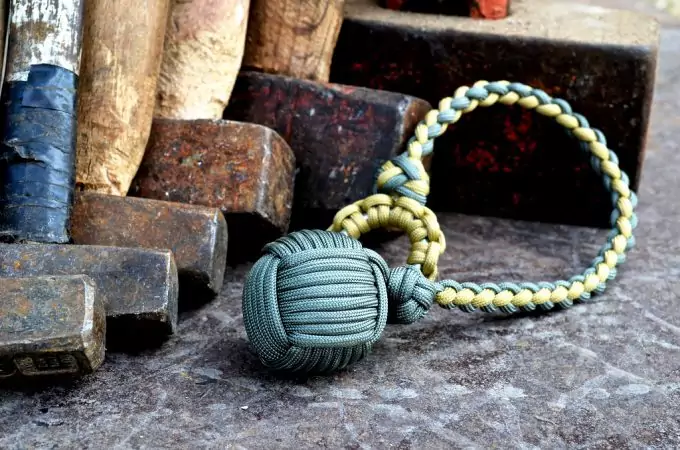
Monkey fist paracord keychain
This keychain can also serve as a self-defense tool since it can act like a mace when needed. No need to put it spikes though.

Materials needed
- Scissors
- Ruler
- Lighter
- Key Ring or Carabineer
- Super glue
- A small ball bearing or a good sized marble
- A length of paracord, it can be of two distinct colors, any thickness
Instructions
- Take your ball bearing or marbles and super glue one end of the parachute cord on the marble or ball bearing. It doesn’t have to stick that well as long as it can stick long enough to help you start building your knots.
- Place the ball or marble between your index and middle finger and take the paracord and loop it around your index and middle fingers five times going towards your fingertips. Once the cord is halfway on its fifth loop, extend it a bit around your middle finger then push the ball bearing towards the middle of the two loops that you just made.
- Using your middle finger as the base point, loop the cord around the ball again, this time passing through the gap created by the ball bearing, effectively wrapping the first set of loops you made earlier.
- Remove your fingers from the loops and then loop the cord around the space where your fingers were earlier, completing five loops. You should have three non-intersecting loops.
- Locate the first loop in the first set of loops that you made and tighten them. Repeat this for the remaining two sides. You should have a tightly woven ball or monkey fist after these steps.
- With the remaining cord, you should be able to make any knot or weave that you want; you can add another color by joining it near where the original cord comes out of the ball and weave away.
- For this example, the other end is closed by looping the cord towards the end and then wrapping the remainder going towards the monkey fist.
- You can also close this project out by attaching a carabineer or a key ring at the other end, or a key ring with a carabineer works fine too.
- Cut any excess cord and burn off the ends using the lighter until the strands have melted together.
Video:
King cobra weave paracord keychain
The King Cobra is a thicker version of the Cobra Weave keychain.

But the added girth also means added length to your parachute cord which can come in handy during emergencies.
Materials needed
- Scissors
- Ruler
- Lighter
- Key Ring or Carabineer
- A length of Paracord, it can be of two distinct colors, any thickness
Instructions
- Find the middle of the cord and mark it with a rubber band or you can go ahead and insert the key ring. Create a Lark’s Head around the key ring and measure how long you want your keychain would be.
- After you have the measured your desired length, start making your cobra weave as discussed earlier.
- Once you’re close to the key ring, you can opt to close out the first set of cobras by tying a simple knot or you can add just go ahead and continue. This time, create a cobra weave over the first set of cobra weave that you just made, going the other direction.
- Make sure to pull the cords every now and then to ensure that the whole keychain is tight.
- Close out the King Cobra keychain by cutting off the excess rope at the end of external cobra weave and burn off any loose strands using the lighter.
Video:
Paracord keychain multitool pouch
This variety of keychain is very useful especially if you have limited space to put in your multitool.

Image credit: instructables.com
Materials needed
- Scissors
- Ruler
- Lighter
- Key Ring or Carabineer
- Multi-tool
- Fid, or parachute cord weaving needle
- A length of Paracord, it can be of two distinct colors, any thickness
Instructions
- Take your paracord and make your standard cobra weave, using the key ring or carabineer as the mid or anchor point. The cobra weave will act as the main structure of the pouch.
- To check if you have the correct length of cobra weave, take your multitool and wrap the cobra weave around it, once you are able to enclose the multitool around it, then you have the right length of cobra weave. Make sure that you allow a little excess weave that will serve as the opening.
- With your multitool still wrapped around the cobra weave, weave through the outer loops of the cobra weave using a fid. Use a standard in and out pattern for each side. There should be two loose ends after you finish your cobra weave and you should be able to use both for their respective sides.
- Once you are done weaving the ends in and out of the sides, pull on the weave to tighten them accordingly.
- Cut any excess cord and burn off the ends using the lighter until the strands have melted together.
Video:
DNA paracord keychain
Another stylish variety of the parachute cord, this is easy to unravel as well.

Image credit: instructables.com
Materials needed
- Scissors
- Ruler
- Lighter
- Key Ring or Carabineer
- A length of Paracord, it can be of two distinct colors, any thickness
Instructions
- To start making the DNA keychain, put the paracord through the key ring or carabineer and find the middle point.
- Once you have the middle point, measure the desired length of your keychain and mark the place with a rubber band or string.
- The first step in making the DNA weave is similar to a cobra weave. The difference starts on the next weave where instead of maintaining the same side or color throughout the weave, you alternate the colors or sides by bringing the cord underneath to the top and vice versa.
- Repeat the process until you get to about half an inch near the key ring or carabineer.
- Close out the keychain by cutting off any excess rope at the end of and burn off any loose strands using the lighter.
Video:
Grenade shaped paracord keychain
A thicker and shapelier version of the King Cobra and the Cobra weaves, other variants of the grenade paracord keychain includes a hand sanitizer in the middle, earning the moniker, Germ Grenade among enthusiasts.

Image credit: outdoorwarrior.com
Materials needed
- Scissors
- Lighter
- Key Ring
- A length of Paracord, it can be of two distinct colors, any thickness
Instructions
- Start off the grenade keychain by locating the middle point and then tying a standard diamond knot.
- Measure your desired length of keychain and then create your first cobra weave. Repeat the cobra weave until you reach the diamond knot at the end.
- Once you’re done with the first cobra weave, do another one over the first, like how you would do it for a King Cobra weave. After you’ve finished the second layer, turn it over and do a third cobra weave and a fourth.
- Like all other keychains, snip off any excess parachute cord and burn any loose strands until they melt.
Video:
Paracord keychain with a hidden compartment
Probably one of the coolest paracord keychain projects out there.

This includes a secret compartment where you can stash pen knives, small pens, even cash.
Materials needed
- Scissors
- Lighter
- Pencil
- Key Ring or carabineer
- Three equal lengths of Paracord, it can be of three distinct colors, any thickness
Instructions
- Take two strands of your paracord and intersect them in the middle to form a cross. From this point on C1 will refer to the horizontal cord, C2 will refer to the vertical cord and C3 will refer to the third cord that you will use in a bit.
- Form an S shape using C1. It needs to go over C2 then under and then over again.
- Weave top portion of C2 should go over C1’s top loop then under the bottom loop of the S you made with C1.
- Using the other end of C2, weave it over C1’s bottom loop and then under the top loop of the S shape.
- Pull the cords to tighten the knot but keep it a little loose for the next step.
- Take C3 and insert it into the S shape created by C1, going under both the top and bottom and over the middle section. Pull C3 until you reach the middle point.
- Pull C1 and C2 again to tighten the first knot.
- Spread out all strands like six-legged starfish. At this point, the right end of C1 will be C1R, and so on. The left end of C1 will then be referred to as C1L and so on.
- Take C3R and cross it down and over C1R, then take C1R and cross it over C2R, repeat the process until all strands have crossed down and over the own adjacent to it.
- Pull all cords to tighten the knot. This knot is called the closed crown knot.
- To make the secret compartment, complete four to five of the crown knots and then insert a pencil in the middle of the knots, make sure that the pencil sits on top of the very first knot.
- Continue weaving the crown knots around the pencil until you have reached the desired length.
- Close off the crown knots using a diamond knot. Grab any of the strands and put it under and through the next loop in the series. Pull it and repeat the process for all the remaining strands.
- Pull the strands to tighten the knot just enough to keep them all together before removing the pencil.
- You can opt to retain the excess length of parachute cord to serve as a design feature or you can cut it clean one each after the diamond knots and then burn off the strands until they melt.
Video:
As you can see, paracord keychains can take many forms and weaves can be interchanged and even mixed together to come up with a unique design. However, in order to make all these projects, you will need to know the basic knots and how to work from there to the more advanced ones. We have a great piece on paracord knots that you should check out if you want to learn more.
[the_ad_placement id=”in-text-3-type-r”]Like many survival tools, paracord keychains need proper maintenance to make them last and any defect seen should be scrutinized to determine if the keychain should still be used in emergency situations or not.


A paracord has always been a part of my BoB, I’ve used it as a rope, and even while fishing and holding my tent. In my opinion, it is a must have survival tool.
Hi Corey,
Thank you for sharing your experience with paracord keychains.
It really is a must for any bug out bag as it can be useful in tight spots.
Samuel
Here are more cute paracord projects!!! I can’t believe it. Maybe I should use one as my car keychain. But seriously though, I don’t need to use my paracord in the city to know how useful it will be when the need arises (as I have seen how handy it is when we’re out backpacking). For now, I guess I’m just enjoying the colors and how they improve the visibility of my stuff.
Paracords are a beauty and the most resourceful and versatile survival gears.
Paracords are crazy useful. You don’t need to be out in the woods to appreciate it because you can be right in the middle of the city and still be at the mercy of a paracord. I have dark brown ones and I weaved them that one time I forgot to wear a belt!
The paracord is the best gear and the one that you should always have with you.
I don’t want to lose my keys again. This informative tutorial works just right for me. It has presented me a systematic process on making various designs for diverse color combinations. Paracord keychain making is a perfect survival tool to hold small yet important belongings while on your way to an adventure. Greatly functional and stylish.
Paracord Keychains are made functional without dropping off the style. These things can be crafted and designed according to one’s taste. For a decent man like me, I want to have something that is classy. Luckily, video tutorials are available; all I have to do is to pick different color combinations. Not just that, in Paracord keychain making, I created something according to my desired length.
Basically, a Paracord keychain is more than a simple tool. Apart from keeping your keys together, you can always use the Paracord when the need arises. And the keychain is one of the simplest projects you can engage during your free time.
A Paracord keychain provides you easy access to all your keys. Most importantly, the key chain packs enough Paracord for use during a survival situation. So, you should learn how to make one.