Making a bug catcher can be a nice and easy way of collecting interesting small bugs (but not the dangerous ones, like wasps, bees, etc) and can be very educational for children. Bug catchers made using simple household items can take as little as 20-30 minutes and can be reused over and over again. We advise you not to injure or kill any of the insects you collect. When you are ready with inspecting and looking at them, release them back in the nature, as close to the area you found them as possible.
[the_ad_placement id=”in-text-1-type-r”]It’s also a good way to teach your children to respect the animal and insect kingdom by learning more about the insects they catch and then letting them go free back into nature.
On top of that, you can also catch insects in case you’re in a survival situation and you probably got bitten by ticks. You can catch them without letting them escape. You can also catch other such small insects for inspecting and even giving them to a laboratory for testing for various diseases.
A bug catcher is also useful in a survival situation if you know which insects are edible. For this, please take a look at our tutorial on edible insects, it’s extremely detailed and useful.
Make your own bug catcher using a glass jar
Here is a very simple and easy to follow tutorial on making a bug catcher with a glass jar. Prepare the glass jar, and pick one which is spacious enough but not too deep (puck one which is shallow). Prepare the metal lid, fitting the jar, two straws with bending part, hammer and thick nail.
Take the lid and, using the thick nail and hammer, make two holes right next to each other through the lid. Be careful not to get injured. Use the hammer to flatten the lid on the inside right where the holes are (as metal parts will be sticking after punching the holes). Take the two straws and cut them at 2/3 along the length. Keep the bending half intact as you will need it for the bug catcher.
Thread the straws through the two lid holes, securing them along the middle. Use duct tape to secure them firmly in place. No need to be careful with this. The idea is to keep them in place without letting air in through the holes. Also tape a bit of soft tissue or cloth around the straw’s end, which will be inside the jar.
You are basically ready. Screw the lid and find an interesting bug (let’s say a small spider or an ant). You should then approach the bug catcher’s one straw and suck through the other (to create vacuum and suck the bug in). Unscrew the lid and then let the bug go, when you’re finished inspecting it.
For more details and visual guide, you can watch the YouTube video by the Eden project.
Instructions on making a survival bug catcher
This method should be applied if you are possibly hiking, camping or surviving after a natural disaster. Bugs and insects can be incredibly bothersome and even can transmit diseases, so you will need to find a way to attract them somehow and get rid of them. This is especially true for mosquitoes, flies and even wasps.
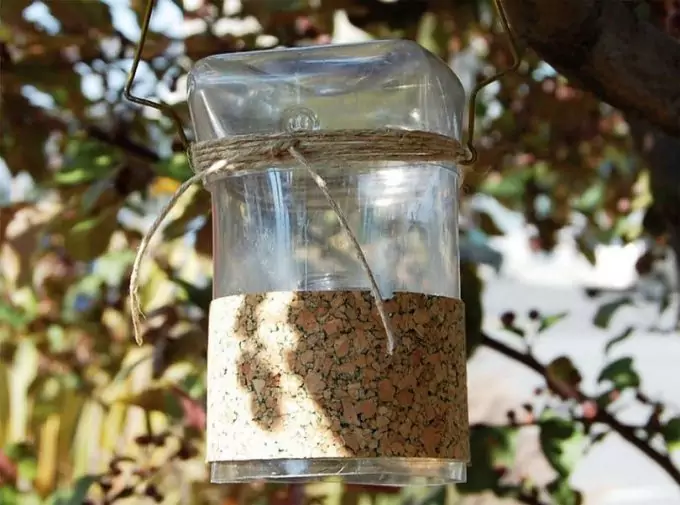
So, to begin with prepare a plastic bottle, preferably at least 1.5-2 liters. Take scissors and cut the rounded top off the bottle, right where the curvature of the top begins and attaches to the bottle’s neck. Then this piece you cut, place it inside the remaining bottle, but turned upside down, so that the bottle’s neck points downwards. Take some duct tape and seal the bottle where the two edges of the two pieces meet. If you don’t do that, some insects may be able to escape.

Now here comes the part which will catch the bugs. You need to put some bug bait in a bit of water. For example, mosquitoes may like the smell of brown sugar, whereas smaller house flies would prefer the smell of rotting fruits or cane sugar. It depends on what bugs you need to attract and catch.
[the_ad_placement id=”in-text-2-type-r”]For this work, you need to be sure that the bait is fully covered (mixed/diluted) in the water you put at the bottom. Bugs must not have any harder surface on which to stand and potentially escape.
To finish this bug catcher you can drill holes on either side of the bottle and hoist it on the porch or somewhere inside your house and let it hang there. Inspect the bait regularly and refill the bottle whenever it has evaporated. Depending on how much you put initially you may have to refill it every several days for up to two weeks.
If you’re particularly interested in catching mosquitoes for example, you can also add yeast to the brown sugar. Yeast tends to produce carbon dioxide, and it’s known to attract mosquitoes. If you want to enhance this project you can also use black duct tape, since mosquitoes are also attracted to dark colors, particularly black.
Wasps and hornets catcher
If you need to catch wasps and other stinging insects, you can use a slightly different solution in the bug catcher. Prepare cooking oil, sugary drink/water or any similar sweet (with sugar) soda drink. Don’t use artificial sweeteners as they have no effect (no sugar content) on the wasps. Mix these ingredients and you will see that it specifically attracts wasps and hornets. Place the bug catcher at a safe distance away from the entrance of your house or anywhere close to where people/visitors/guests may spend time on your porch, terrace, etc.

Image credit: gardeningknowhow.com
As wasps and hornets are seemingly smarter and heavier, they may quickly fall in the water solution and drown. But if you don’t want to take any chances, you may make your bug catcher with a less wide neck. You can tape some cloth and make it as wide enough so wasps and hornets can get inside, but won’t be able to get outside as quickly, thus eventually dying.
Cockroach catcher
Another unpleasant insect you may want to catch is the cockroach. It is also drawn to sweet watery sources. This means the initial solution you made for attracting mosquitoes will work also on roaches. Since roaches can survive for about a month without eating anything, but just a few days without water, they will be specifically drawn to watery sources. This is why you will often see them in the bathroom or under the kitchen sink. This is where you can place the bug catcher.

Also, since roaches are great climbers, you don’t want them to go back through the hole after falling in the bug catcher trap. To prevent them from escaping, grease the inside of the bug catcher.
Fruit flies bug catcher
Here is how to trap those small annoying fruit flies. Take a plastic or glass jar (or a small bowl) and prepare a plastic wrap. Using a toothpick, punch s few tiny holes through the plastic wrap and stretch it over the edge of the jar/bowl.
[the_ad_placement id=”in-text-3-type-r”]As for the liquid inside – mix some sugar, maple syrup, jam or honey with something fermented like wine or vinegar (beer will also work). Add to this a bit of oil (optional). Of course, dilute this in water. Now cover this mixture with the plastic wrap and watch how with time you will attract those tiny fruit flies. They will often try to escape and will land on the inside part of the plastic wrap.
We don’t recommend you killing them, so you can safely release them as they are still alive, in nature, safely away from your house. One last note, if you don’t want to kill any of them, don’t put oil. Oil is the ingredient which makes sure the insect can’t move anymore and they will perish in time.

Image credit: wholenewmom.com
Also, you can build a bug net catcher, but you must be more precise and be right on the spot where you located the bug. You can use any thin net-like tissue or cloth and attach it to the rim of a tennis racket or badminton bat. This may work well is slightly larger insects like wasps, hornets and even spiders. Be careful though how you handle them as you try to remove the net bug catcher, as a wasp for example, may get pretty angry and even attack you.
Lastly, if you don’t want to kill any of these insects, or as little as possible, don’t add the oil. As we mentioned it gets stuck onto the insects’ wings and entire body, thus making it too heavy and virtually impossible for the insect to be able to fly away (something like quicksand is to people and other heavier animals).
You can optionally put less water inside, so that the insect, when it falls in the trap, won’t be fully submerged under the water and risk drowning. If you’re more into the humane approach, experiment and see which methods kill fewer insects, then safely release them away from your house.


One of my most loved things to do growing up was to catch bugs! Yes, I was certainly not a girly young lady! At the point when my child was more youthful, he used to love getting bugs as well. Obviously, I urged him to set them free after they’d been in the jug or holder for a brief time frame, so we didn’t wake up to a container of dead bugs the following day. We used to utilize a clear jar with a couple of gaps in the covers to hold our bugs, yet I thought it would be fun make thought to brighten a bug catcher container with the children.
we’ve got big creepy spiders at home and they are not that easy to catch or get rid of. Maybe one of these bug catchers will help. Which do you think would be effective for my spider hunting?
Also, do not keep containers that may become breeding grounds for these pests (especially dengue-causing mosquitoes). Question, how often do we need to change/dispose of the trap? Do you have advice on proper disposal? I heard there are pests that multiply through their blood or whatever (like lice).
You should dispose of it as often as possible, depending on your catch.