
As times become more challenging, people around the country have begun to lead more simple, efficient lives. But, if there’s one universal idea survivalists and preppers can unite under, it’s the desire to stretch our dollar further.
One trendy item that has flooded the market is the paracord bracelet.
Sold initially as a survival accessory for around $5 or $10, they have now become a sensational style piece, with some “designer” brands selling for several hundred dollars (no, I’m not kidding).

The truth is, these bracelets don’t cost that much to make. With a bit of time and practice, you can create a paracord bracelet, making everything from leashes to rifle straps to knife holsters.
A bracelet made of paracord is one of the most straightforward projects you can work on. If you want to learn, take a look at our tutorial on making a paracord bracelet.
Table of contents
What is Paracord?
Paracord material is easy to find. Essentially, it is a rope of thin nylon strands, as fine as human hair, woven together repeatedly. The rope is bound in a woven nylon casing, creating the cord you’re used to seeing.

Paracord was once known as parachute cord. It was used by the US military for paratroopers. The material was strong enough to withstand the enormous pressure of opening a parachute and cheap enough to manufacture on a large scale during war times.
The material has gained enormous popularity among civilians for its usefulness and versatility, particularly by survivalists. In addition, paracord’s strength and affordability make it perfect for bulk purchasing. It is often sold by the spool or by the foot, making it more economical than purchasing small, individual knick-knacks.
Paracord comes in several thicknesses and strengths, each supporting a different amount of weight. The most common is paracord 550, rated to support up to 550 pounds. Other types of paracord can support up to 750 lbs, but 550 should be more than strong enough for whatever you need.

Paracord is highly affordable, with bulk prices of approximately $50 for 1000 feet. This is more than enough for a hobbyist or a prepper. Shop around online, or call your local farm supply store to see what rates are like in your area.

How to Braid Paracord: Styles and Techniques
There are several different ways to braid paracord like any other craft or skill. There is never one correct way to do it. The style you use will depend on preference, the amount of time, patience, and skill you have, as well as your use for the braid. Below are a few of the basic braids to get you started.

The Seesaw Knot
This is one of the fastest and most accessible types of paracord “braids,” though it is essentially just a series of knots. I think this one looks best with two different colors since you’ll be knotting together two double strands of paracord to make your braid.
The steps for this braid are straightforward, and the video tutorial below is helpful.
- Depending on what you’ll be using the braid for, start your project off by securing one set of your paracord ends off in some fashion (for a buckled bracelet, you would do this by creating slipknots to run through the female end of your buckle).
- Make sure you find the center of your two equal lengths of paracord to create a slipknot. You’ll have four strands (two of each color) lying side by side.
- Then, it’s simple: grab two cords at a time from one side, and wrap them around the two cords on the other side to form a basic knot or hitch.
- Grab the two cords from that side, and create a trap around the other side. Continue in this fashion until you have the length you need.
- Once you’re done, again, depending on the project you’re using it for, secure the ends with a couple of knots and cut the excess off.
- Many people then take a lighter or match the ends, which melts the nylon together to prevent fraying.
The Fishtail Braid Paracord Technique
This is another technique that produces a nice-looking pattern. It’s similar to the fishtail braid pattern used by people that braid hair.
- To start this pattern, you’ll need three lengths of cord. Basically, two lengths of cable stay immobile while a longer one is woven through them.
- If you’re making a bracelet, start by measuring and attaching your two lengths of unmoving cord to your buckles and the third longer length of cable only at the starting end. You will weave with the third, longer length of rope.
- Take your long cord (which should be sitting on top of your other two) and weave it over and under the left line.
- Then, weave it up through the middle of the two. Next, weave it over, then under the cord on the right, and back up through the middle.
- Repeat the pattern, weaving the long line, again, over and under the left cord, through the middle, and then over and under the right thread.
- Continue in this fashion until you have your desired length. When you’ve reached the end, take the long, loose cord, and secure it by weaving it through the braids.
- Then, weave it up through the loop created by the last braid. Pull it tight, then trim the excess and melt the end.
Cobra Weave Paracord Technique
This is one of the most popular paracord braiding techniques right now. The knot is made with a single long strand of paracord, pulled halfway through the buckle loop with the loose ends woven into the circle in the middle.
- To get started, find the center of your length of cord. If you’re making a bracelet, pull the ends through one end of your buckle, giving yourself plenty of sizes to work your knots.
- When making your first knot, take the loose end on the right side, and run it under the loop in the middle. Then, take the open slot on the left side, and run it over the circle.
- Next, pull your loose ends taught, forming a knot over the loop in the middle.
- Now, do the reverse. Run the loose end on the left side under the loop and the open end on the right over it, tying another knot.
- Continue in this fashion, making sure to alternate your knots (otherwise, your work will begin to twist).
Trilobite/Ladder Weave Technique
This is an intricate-looking weave, but it’s not that difficult in practice. This weave produces a wide, flat band, making bracelets, straps, and gun slings comfortable.
If you plan to use this pattern for a paracord bracelet, it will be helpful to have a way to secure your buckles so that you can focus on keeping your strands in order and at the proper tension for a tight, uniform braid.
- Once you’re ready to begin, get an extended length of paracord (12 feet if you want to make a bracelet). Begin by finding the center of the strand.
- Next, pull the folded center of the cord through one of your buckles. Then, drag the ends through that loop to form a cow hitch.
- Next, pull the ends of the paracord through the other half of your buckle, pulling one back out to each side.
- Continue by pulling the ends back through the other end of the belt buckle and up through its counterpart again, keeping one end on each side of your work. You’ll end up with six strands of paracord joining your fasteners.
- This weave works with six strands in the middle, two groups. Start by taking the loose end on the right and weaving it under the right two strands, over the second two, and under the left two.
- Then, take the open slot on the left and twist it over the left two strands, under the middle two and right. Are you starting to see a pattern here? Pull your loose ends taught, and push the weave up before beginning your next series. Be sure to alternate your over and underway as you progress.
- After your last series of knots, finish your weave by simply pulling the ends through the loop created in the pattern’s center. You may have to use tweezers or hemostats to get the lots through.
- Pull to tighten, then trim away your excess and melt the ends. You’re done!
Honestly, it can be easier to learn by watching than by reading. So, if this all seems daunting and complicated to you, try watching one of the many YouTube videos above. Plenty of creative and talented folks have put together some great tutorials for visual learners. Once you see these paracord braids in action, you’ll realize just how simple they are.
We also have a guide for the most used knots, especially for creating a wide range of projects. So, if you want to learn more, take a look at the paracord knots article.
Putting Paracord Braiding to Good Use
There is no limit to what you can make using the basic braids described above. However, since this is a survival website, of course, we’ll focus on survival items. Below are a few fun, simple projects to get you started.
Rifle Sling
This is a straightforward project that can save you some serious dough (have you ever seen the price of a rifle sling? Ouch!). There are a few things go consider before you get started.
- First, decide what kind of paracord braid you want to use. Since guns are heavy, you’ll want to consider how comfortable the braid will be laying across your shoulder, carrying some weight.
- I’d recommend the trilobite weave, as it has an excellent flat shape and can hold a ton of paracord, just based on its design.
- With that in mind, you’ll want to have at least 75 feet of cord on hand to do this project.
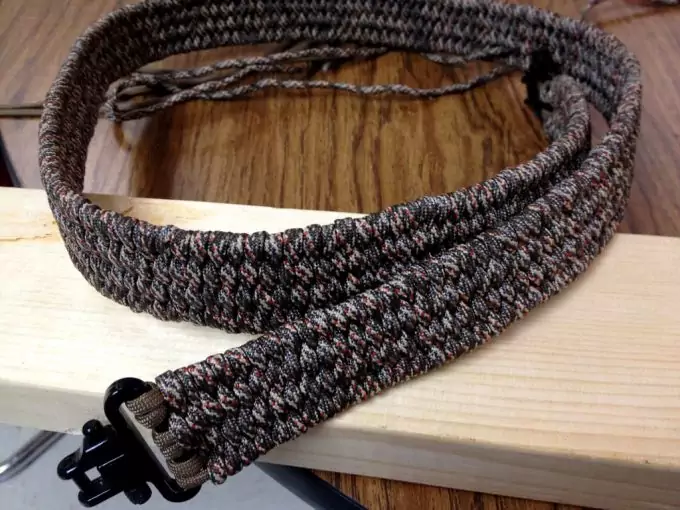
- Begin by removing the sling hardware from your gun. If you plan to use the trilobite weave, it’ll be beneficial to mount the hardware to a piece of wood as you work.
- Remember that this sling will not be adjustable, so measure how long you want it to be, then mount your hardware that distance apart. Other than that, it’s as simple as working your paracord through the hardware!
For another idea, look at our Paracord survival belt tutorial.
Dog Collar
There is nothing more frustrating than breaking a dog collar in the middle of a walk. Paracord is incredibly strong, so as long as your knots are tight, it’s not going to break under the pressure of an excited dog.

Making a collar is almost exactly like making a bracelet. Remember that if your dog pulls against it, you want to make sure the band is wide enough to distribute the weight evenly.
A cobra or trilobite weave may be your best bet.
Get some sturdy buckles (metal if you can find them), measure your dog’s neck (adding about a half inch for comfort), and start braiding!
Self-defense Key Fob
This good idea incorporates paracord braiding, a steel ball, and a monkey fist knot!
- First, attach it to something big and sturdy, like a carabiner, so you can put all the weight you want into it.
- Next, make what’s called a monkey fist knot around a steel ball (or something equally heavy and intimidating-a pool ball would undoubtedly make for a formidable weapon!).
- Form the monkey fist (check out our tutorial on how to make a monkey fist out of paracord) around the ball, securing the ends at the base when you’re done.
- After the ball is done, start braiding. Use a flexible and robust technique, like a fishtail or seesaw braid. Then tie your ends off around your carabineer, singe the tips, and voila! You have a stylish and intimidating self-defense tool!
These are just a few projects to get you started, but there are plenty of other ways to put your paracord braids to use. The next time you break a strap on a backpack or outgrow a belt, you don’t have to go to the store to buy a new one. Instead, order yourself a spool of paracord, and make something that will not only last but will serve a dual purpose should you ever need it.
If you’re interested in learning more, please look at our paracord projects article.
Final Thoughts: Paracord Braiding and Prepping
Paracord has seen a rise in popularity, and with good reason. The cord is inexpensive and durable, and can be used for several different projects.
This skill is not just a fun project for the DIYer in all of us – it should play an important role in everyone’s prepping skill repertoire.
Challenge yourself even further. Can you turn flimsy vines into a sturdy rope with a fishtail braid? Can you make a sling to put your food sack in with scraps of fabric and a cobra weave? The ability to create a thick, sturdy material out of something small and flimsy can be an invaluable skill, especially for wilderness survival.


I remember one time when I had to use the paracord as a belt; it definitely saved the day. I used a rope cutter, to keep the integrity of the paracord and keep it intact; another method you can consider is heating a knife over a fire then cut the paracord to keep it from stringing.
Those are great skills you have there, thanks for sharing.
My wife and I have had a hard time adjusting to married life as she has no hobby other than watching TV, while my own include several odd ones. To make things better, we both started paracord braiding as a way to bond but ended up enjoying it that we have been making them on the side and sharing them with our friends.
Hi Ahmad!
It’s great that you and your wife found paracord braiding as a common interest. They are a great material to work with and the design possibilities are endless.
I hope you continue braiding and wish you more success.
Samuel
I say, the more complicated the braid, the more pleasing it looks. However, are some braiding styles easier to undo than the others? I imagine if some emergency might occur and you’d need to undo your paracord fast, maybe it would be more practical to use the simplest braid?
You should always settle for simple paracord braiding techniques, this way, it will be easier for you to undo your paracord in case of an emergency.
What are the numbers that are shown in the paracords? Like 750 or 550.Is there a brand that you prefer or does all paracords have the same strength and length, etc. I’m thinking of getting a pack for my emergency kit since I can see that I can do a lot of things with this material and it may just help me survive when the need comes.
I never knew that paracord bracelets can be used this way. I always see people wearing them as fashion accessories. I am looking to try this braiding, and look to sell them not only for bracelets but also share the knowledge of using them during emergencies.
You cannot be able to do Paracord projects if you do not know Paracord braiding. There are various Paracord knots that you must know in order to be able to complete Paracord projects. Learn how to braid as many knots as possible.
The figures that are used to define Paracords are the minimal breaking strength. Paracords are classified based on their breaking strength. You can best use parachute cords if you have basic knowledge of paracord braiding.