
With recent spikes and increases in oil and gas prices, consumers are researching wood stoves. This is a smart move, as you’ll not only save money, but you’ll conserve resources and reduce the need for harder-to-find fuels.
Also, consider that if you are ever in a doomsday scenario, the ability to locate fossil fuels and generate electricity will be difficult. Having the skills to build a wood stove will be necessary.
Table of contents
Wood Stove Savings
As monthly utility bills continue to increase, and our world becomes less stable, learning to build wood stoves is a smart move.
These homemade stoves are easy to make and also energy-efficient and sustainable.
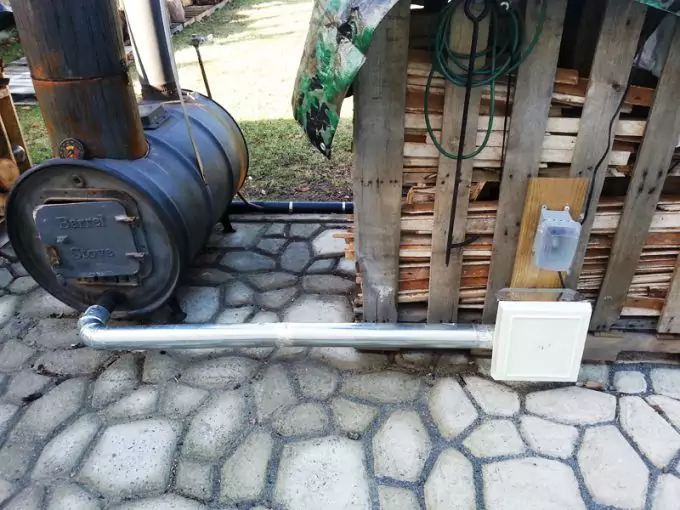
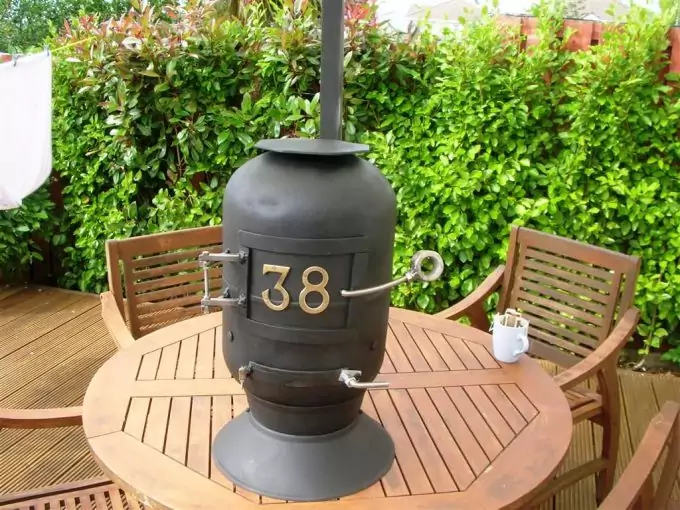
Wood stoves can be built out of scraps, including gas bottles, water tanks, electric water heaters, steel barrels, steel plates, paint cans, etc. Go check out that junk pile back in the woods. There are probably several stoves worth of parts. Those items could be the solution to lowering your electric bill.
See also: Hot Ash Stove Review: Burn wood safely
Building a Wood Stove
Initial Structure
- Use Google SketchUp to design your stove. It is free and easy to use.
- We recommend using a 4mm thick sheet of mild steel with 1200 mm by 625 mm dimensions.
- Begin by making the front, sides, and back of your stove, creating a cube.
- Fold the sides to make corners. Don’t try to weld four metal sheets together. This will take too long.
- Before fitting the stove’s bottom using bolts, seam weld its top and provide a baffle inside the furnace to improve your burn.
- Begin working on the legs with additional sheets of steel. Create tiny angled legs. If you run out of steel, you can use an old chair’s legs.
Grinding or Cutting Your Wood Stove
- Next, you’ll need to cut or grind your stove. Start grinding a groove on its inside, and then cut the strip from the metal sheet.
- When you finish your box, it will be 500 x 200 x 250 millimeters (LWH). Use an angle grinder to bend the stove at the corners.
- First, use a 2-millimeter fine cutting disk to cut a groove. Then use a normal, approximately 4-mm thick cutting disk to create a wide slot.
- Cut about three-fourths of the steel’s thickness to create a good fold. Then, mark the door’s opening at the curbed top.
- Use a thin grinder and a jigsaw to cut into the stove’s corners.
Welding/Folding Your Wood-Burning Stove
- When constructing the main box, run a bead of weld right below its inside corners. Don’t worry about making it too neat.
- Weld the front inside and out, and then grind it smooth. This part will be visible, and it will look nice.
- Cut a piece of metal for the baffle that will fit from the front to the back of the body. Leave a tiny space in its front, about 30mm, so that hot air can be forced around. This will keep the secondary heat consistent.
- Cut out the top and start welding it in place, starting from its exterior portion.
- Take your time when rounding the corners off so that you don’t catch yourself on them.
- Next, create a 600 x 300 (L x W) top, about 50 mm more oversized. Cut a hole through the stove’s top, drilling a few spots around the circle with your jigsaw. Keep this piece for the damper in the flue.
- Weld small tabs inside and underneath your stove so that the base is fixed.
- Drill and tap the tabs so that they allow countersunk Allen-keyed bolts if you have them. This base should sit flush with your stove’s bottom.
Creating the Door, Hinges, and Air Vents
- Cut a few more metal sheets (10 mm bigger all around to create a good seal) to build your door.
- To seal the door, use a rope and glue. Cut small tabs using a flat bar to start the hinges. Drill the flat bar so that they can accept a 6 mm round bar.
- Use a six-millimeter threaded rod on both hinges before lining them up for welding. Then, remove them before fully welding your round bar into the bars at the bottom. The door can lift off the hinges while leaving the stove’s pin on the box.
- Next, mark the shape for your vent and drill out its shape’s corners. Cut corners using your jigsaw.
- Use a hammer to make a little teasing and a file for the tickle. Fit a thin vent over it to rotate and then reveal the holes.
- Use a wire handle so it won’t get too hot. Fit the vent at the top just above the stove’s door, allowing for secondary combustion.
- Place the flat bar on its front and drill both pieces to align the holes—Weld the small brackets so that they can slide on.
Making the Flue and Legs
- Get a 4-inch thick steel pipe. It does not have to be too thick because much of the heat is absorbed in the stove’s body.
- Cut 1000 mm and 500 mm to create a tab mechanism to join them with a pin. This only needs to be 1.5 meters above the stove’s top. This is about two meters from the ground.
- Fit the flue damper in the stove’s shorter section through the piece cut from the stove’s top.
- Weld two bolts, passing through the holes located on the sides. Weld the bolts on, making sure they are inside the flue.
- Then, weld on a small lever to operate the damper from the outside of the stove.
- Use a 24-inch steel ruler to create a collar, then fit the flue into it. Roll it to make a circle, weld, and place it around the hole on top. That you can weld in place around the spot, you can find on top.
- Use the legs of an old piece of furniture like a chair to create your stove legs.
Painting and Finishing the Stove
- Spray your wood-burning stove with heat-resistant paint that can last for a few years.
- File the rough edges as well as the lumpy welds. Sand the stove surface with emery paper for a smooth finish before spraying paint.
- Some burning is needed after spraying to cure the color to last longer. Light a gentle fire on the stove for a couple of hours.
- Finally, create a basic grate with a thick wire mesh.
Learning Efficient Wood-burning Tips
- Remember that a clean wood stove is a warm wood stove, so always keep it clean. Remove the soot from the furnace to improve efficiency.
- Various types of wood provide different heat levels. Hardwoods can give off more heat than softwoods, although softwoods are cheaper. Softwoods can be good alternatives for firewood during the start and the end of the winter when the temperature is not as cold. They can also give off a cleaner burn without turning your house into a sauna.
- Consider a place to put your woodstove. Unless you’re making a new chimney, you’ll have to find your current chimney’s location. Remember, it is unwise to have over seven feet of stove pipe connecting to a chimney due to excessive creosote accumulation.
- Place the wood stove about 36 inches away from combustible materials, including furniture, walls, and doors. Increase your stove’s clearance by using a heat shield of 28-gauge metal. This shield should be mounted off the ground providing an inch of air circulation between the wall and the stove.
- If you want to heat your property with a wood stove, you can position it near the middle of your home or where you spend most of your waking hours.
This is just one overview of how to build a wood stove. There are many other types of wood stoves. I’ve listed some other good resources below.
- https://www.instructables.com/Woodburning-Stove-from-sheet-steel/
- https://morningchores.com/how-to-build-a-barrel-wood-stove/
If you need more tips on how to make a wood stove, check out the video below.
YouTube tutorials:


I made a brick-lined wood stove and I found it to be useful in cooking my favorite dishes. Hmmm.. I think I have an old gas tank lying around, do you think it’s safe to torch it? It’s been empty for decades.
We strongly suggest to get it checked first.
Sounds like an amazing project to start. I have the necessary skills and wood to start right away. I reckon it will become useful in the winter months too. Nothing is worst than running out of fuel in the middle of no where, with no fire to keep me warm.
This is beyond reasonable doubt, one of the best survival DIY projects.
I love the smell of burning wood, and believe me nothing can replace the good old stove as a source of heat.
Meals cooked on fire taste better too, at least for me.
Is in house stove still la functional solution? I am dreaming of a fireplace like they had in old Europe.
Thank you James for sharing your opinion with us.
Do you know that you can make a stove with wood? Yes, you can make a wooden stove with scraps of metal, gas bottles, steel plates, water tank, electric water heater, and steel barrel. There are many benefits of cooking with a wooden stove as it helps to save money that would have been used in buying fuel and gas. Building a wooden stove does not require rocket science, you can make yours now with the help of this guide.
Most people tend to complicate the whole process by thinking too hard. DIY wood stoves require minimal tools, and some may not even require you to use welding. This guide has all the necessary info and images that you need to come up with a wood burning stove. Try making one of your own.
Building a woodstove is easier than what I had previously thought. I guess I can now make use of the metal barrel at my backyard and I’ll get to work this weekend so that I can show my children how one can enjoy cooking food using wood stoves.
This is a very good DIY project to start. Metal sheets are highly versatile and you can mold it to many different shapes and sizes depending on how big you want your wood stove to be. This article even has the step-by-step process on how to build one.
A wood burner is fun to have in the house since it provides warmth for your house during cold nights. A lot of money can be saved by making your own burner and this articles provides every detail that you will need.
A wood stove is one of the most resourceful cooking gear. Instead of spending on commercial brands, you can make your own heavy duty model. It is not as complicated as you would imagine.
To build a resourceful wood stove, you first need to decide on the capacity. This is so since they differ significantly. You will definitely need a bigger wood stove for home use as compared to backpacking.
Most people assume that gas canisters are cheaper than using electric cookers, but they are both costly. You should settle for a wood stove if living in your own home. Wood is not only free, but also easy to find in the woods. You will rarely spend on wood not unless you are obtaining it from a private land. Also wood stove burns efficiently as to an open fire.