
Very often people are fascinated by how something works. Other people also have an itch to make things their own way, and make them with their own two hands. One of these things is a homemade electric generator. Many engineers find it extremely appealing to begin constructing something, almost feeling like scientists discovering something new. Well, apparently someone already discovered the electric generator, but that doesn’t mean it’s not interesting, more economical and more appealing to make one yourself.
In this article we will guide you through the steps of making an electric generator with the necessary items and material. If you are a professional engineer you won’t find any problem executing these instructions. In case you haven’t done anything like that before, consulting a professional engineer or electrician is highly advisable.
How to make your own electric generator
Before we start, you need to know that you can make a generator from different things like bicycle, hand drill machine or even use a water wheel (if you live in a house with a water wheel). Let’s begin with a very simple hand crank generator.
Hand-drill electrical generator
You’ll need a hand drill, kitchen utensils or similar, thread, aluminum foil, sticky tape, phone and its charger, and a wooden plate.
Take the charger and cut with scissors the charging end (if it’s a smart phone, cut the USB end). Remove the plastic insulator so you see the four thin cables – red, white, green and black. Remove their plastic coating as well. Do this thing on the USB cut end, and on the other end. Prepare the small inner cables of different colors.
Next, take the hand drill and tighten the head entirely, it shouldn’t be loose at all. You should also remove the protective cap at the bottom of the handle, where you will have to attach the charger’s cables later.
Next, take the thread and begin rolling it around the drill, around the head and handle. The idea is to tie it securely around the wooden plate. You can substitute the thread with a duct tape if you want. That could possibly make the setting even more secure.
For the next step you could use a mixer beater to plug into the hand drill. It should also stay stable and in no way remain loose. If you suspect it may fall, then substitute it with another similar item.
Then take the aluminum foil and shape two pieces of it into long stripes. Each piece can be 15-20 inches long. Flatten then well and plug each end into the corresponding electrical end of the hand drill itself. Make sure they make a good connection with the drill. Roll the sticking ends so they resemble more cylindrical shapes. Flatten then to the wooden board and secure them with the thread/duct tape. Take the cut charger piece and prepare the red and black ends of the cables and attach each to the corresponding aluminum foil ends.
Take a wooden kitchen spoon wide enough to thread it through the mixer beater, but so it can remain there steadily. This will be the hand crank. Begin rotating the hand crank. You will need a lot of patience and strength to keep doing this until your phone battery gets fully loaded. If you need the phone just to make a call, you may have to hand crank a little less.
With this same setting you can recharge batteries, light bulbs, led bulbs and other electrical devices.
Here is an amazing instructional YouTube video, which can be of help if you want to design the above generator.
Bicycle-powered generator
If you have a bicycle you can use it, otherwise, find some old refurbished bike. You don’t even have to pay for it; simply look for some salvaged bikes and materials to construct the generator. It is important to know that for this to work, your bike should be at least in some good state. If it’s not you may only need some penetrating oil to give life to the chain and clean the rust away from the bike if there’s any here and there.

The next thing you’ll need is a simple treadmill. They have exactly what you need – a DC motor. Also, you need to know that the motor much produce higher voltage than the intended device for charging needs. A simple example – if you want to charge a battery set of 12 volts DC, your motor must produce at least 13-14 volts. An average treadmill can produce much more – about 90 volts. This means that you don’t even have to paddle so fast in order to charge your intended gadget.
Next, prepare a simple frame stand, on which you will position the back wheel of the bike. You can assemble one yourself, keeping in mind that the back wheel must be slightly elevated and not touch the ground. The frame needs to have two wooden boards to keep the wheel elevated, so they have to be vertically fixed. The base can be another wooden board.
Once you did that, it’s time to prepare the back wheel. Take it off the bike and remove the outer tire. It should be flattened and look like a rotating belt. Attach the belt tire to the motor and stretch it between the wheel and the motor. You can now reattach the bike’s wheel back on.
To keep the wheel steady you can use additional extended pegs so they hang better the wheel. As much as it should be free to rotate, it must not fall or break.
Also, it’s best to attach the DC motor to a wooden board, ideally to one to which you already had attached the entire bike. This will be a much steadier setting.
And finally, use a charge controller and attach it to the batteries, gadget, phone, etc, so that it can be an overload buffer. This is in case you charge a bit more and a charge controller will protect the device/battery. Keeping an eye on the voltage is also a good idea, and if you prefer it that way you can simply attach a volt meter to the bike to be constantly aware of how much voltage you produce.
This is roughly what your bicycle generator should look like, in this YouTube video.
Wind-powered generator
Let’s begin by collecting the items you’ll need like couplers (all PVC of ¾ inches in diameter). You should get 5 couplers with 90 degrees elbows, and 3 T-shaped couplers. The rest should be one very long pipe (PVC again) of 10-inch length, four 3.5 inches, two – 8 inches and two of 3 inches.
Start by taking one 90-degree shaped coupler and connect it to one 3.5 inches, then place a T-shaped coupler. Keep building by adding another 3.5 inches pipe and finish with a 90-degree coupler. Repeat this and build a similar copy to the first with the elements you have left. Take the remaining two 3.5 inches pipes and connect them with a T-shaped coupler.
This in itself should be the connector between the first two items we made. Take the two 8 inches long pipes and connect the remaining openings of the entire setting. This will be your base and you should now have an opening (from the T-shaped element) right in the middle of the base.
Take the last long piece (of 10 inches length) and attach the last 90-degree coupler to it. This will be the windmill itself. Attach it into the opening of the base. This is where you’ll add a fin for the windmill to actually work.
Take out the sticking part and drill a hole about an inch from the base. Then take a small motor with a cable long enough to be threaded through the pipe and draw it out of the hole you just made. A note – the motor should be slightly smaller than the coupler’s diameter, so that you can lay it safely inside the coupler.
If it’s slightly loose, you can stabilize the motor with a duct tape. Place the blade/fin into the motor right before you put the motor into the pipe. Then push the motor inside the coupler and make sure it’s as stable as possible.
Attach the sticking cable ends to an electrical gadget, radio, mobile phone, or use a charge controller to attach to batteries or other such chargeable items.
You can see how to make your very own wind turbines in this detailed tutorial we have here..
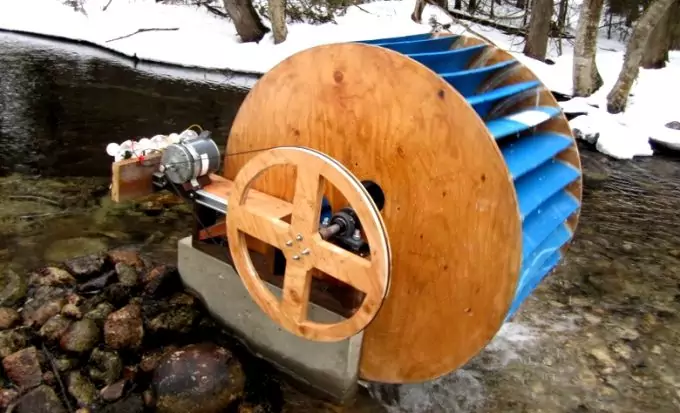
Hydroelectric generator
This is another very popular way to generate free electricity and energy. It may require slightly more time to set up the construction, including more care and attention to details, but it’s nonetheless an engaging task.
The generator itself should be made of two parts – one is called a stator, and the other the rotor. The stator (as the name implies) is static and doesn’t move. It has 4 wire coils which collect the generated energy/electricity. The rotor is a movable element and rotates. It has 4 magnets which are supposed to induce energy/electricity and transfer it to the coils in the stator.
- Making the stator – each opposite pairs of wire coils must be coiled so that the electricity flows counter-clockwise. The other two opposite pairs should have the electricity flow clockwise. All 4 coils must be positioned of equal space from each other. Also, for each coil circle, make sure to coil at least 200 coils. Make them big enough so they generate and transmit as much energy as possible.
- Making the rotor – this is a simpler disk to make. Simply take 4 magnet disks (as small as flat watch batteries) and place two magnets with the north pole upwards, diagonal on the disk. The remaining two magnets must have their south poles upwards. Again, position them diagonally on the disk. The space between each magnet must be equal for all four pieces.
Finally, make two holes right in the middle of both disks, so you can attach them later. Next we have to move to the turbine. Find a cork so you can attach plastic spoons, which will act like the wings of the turbine. Try to position them so they are evenly spaced. Use glue to keep the attached spoons firmly in place (or they may fly away if the turbine rotates too rapidly).
As you take the rotor and the stator, attach them closely to one another and thread them through a wooden stick. Then take the cork (which is by now an effective turbine) and prepare also a medium large plastic bucket. Drill holes in it too, exactly where you plan on threading the wooden stick, and where the turbine will be positioned inside. As you have the holes, thread the stick, so that the rotor and stator setting remains outside (this is important) right next to the bucket, and the turbine is positioned inside the bucket.
The turbine should be placed so that if you look at one of the top spoons it will face upward, towards you. Imagine that you let water run on top of the turbine. Each spoon will be filled with water, until it begins moving thanks to the water’s weight, exactly like an old-fashioned watermill.
Glue the stator to the bucket, so that it remains stationary. The rotor on the other hand, must rotate, so leave it free. Virtually you’re ready. Take the wires from the stator and attach them to whatever gadget or device you need to charge. You can watch this YouTube project for more insight. It shows a slightly different setting, but the essence is the same.
There are loads of other methods of creating electrical generators, made with accessible material and items,and you can see one extremely well-detailed in this article we have here.


I love the idea about using bicycles and I have seen that being applied to several people that I know. It gives them quite an exercise and they feel more accomplished after an hours “ride.”
Yap, it’s nice to know that you’re not just peddling for fun and muscle tone :)
Another DIY electricity generator that is cool to add to this list which you can easily google is how to “How to Make a Fruit Battery. You will just need fruit, wire, nails and wire to be able to produce enough electricity that can charge a mobile phone or light bulb. However, personally since I am not confident about my skills in making a safe and effective electric generator, I would just probably stock up on flashlights, an emergency radio, and those chargers that can be powered by hand cranking or solar.
DIY electric generators are very effective as backup power, especially when going into the woods. Apart from knowing how to make one, you need to stock up effectively.
This is a great article David, thanks. I’ve personally only ever constructed a hand-cranked generator and in all honestly it doesn’t output a huge amount of power, in fact, little more than enough to power a small table lamp or radio. After reading this, I think I may try my hand at upgrading the hand-crank to bicycle. Some great tips!
Hello! Thanks for showing interest in our community. It is always advisable to know how to make a portable electric generator, you never know when you will need it. Try the bicycle powered one, it’s quite interesting.
You can learn how to provide your home with an alternative energy using the information provided in the tutorials. Even if you are not an engineer, you can learn how to construct homemade electric generators with the guidance of an experienced engineer. You need some basic materials like hand drill machine, bicycle, and water wheel for this project.
The bicycle generator looks like a fun project to construct. I plan on making one for my children so that they could get the chance to work out before they can watch TV or before they can play gadgets. It might also be a fun experience for them knowing that their hard work will pay off.
DIY bicycle generator is a great project. Converting your old bike into a bicycle generator is great for the environment, beneficial for your health, and protects your peace of mind.
Most people shy away from projects, such as homemade electric generator because of lack of knowledge. However, the information provided in this post will be more than enough to help you come up with your very own electric generator. By the way, you do not have to be an engineer to achieve this, you just need the knowledge and basic interpretation.
I live near a river and I can’t wait to try and make a hydroelectric generator. I will start on making the design right now. Do you think I can hook up a power bank to the generator and store the energy produced?
The hand drill is a fun project to do. I remember doing it as a project for school. Even though the charging time is slow (approximately 2-3 hours) you can never neglect the importance of alternative power sources especially when it comes down to emergencies.
If you get a chance to produce hydroelectric power, you should go for it. There are many advantages, including: renewable energy source, guaranteed energy & price stability, and hydroelectricity contributes to the storage of drinking water.
I for one was fascinated by the hand drill DIY electric generator the first time I tried out the project. It is quite simple really, as you can see through the guidelines.