With electricity so readily available, it’s easy to take it for granted. During the day, you might not miss the lights or lamps in your home but, when it’s pitch black outside, you’re bound to do some serious fumbling and stumbling. Apart from lights, other things also depend on power like radios and recharging anything from mobile phones to music devices and anything with batteries.
[the_ad_placement id=”in-text-1-type-r”]
In fact, you can charge rechargeable batteries and use them in various appliances including a flashlight if you have a source or power. Fortunately, you can create your own solution by building a DIY hydroelectric generator.
Now, while it might sound complicated, making it yourself is easier than you realize, and you don’t need any experience or special skills. If you like, you could always practice at home and test your work regularly.
How hydropower works
Before you begin work on your homemade hydroelectric generator, you should learn how hydropower works. This will help you gain a better understanding of how the device itself should work and why each element is so important.

Hydropower, as the name suggests, is electricity obtained by harnessing the power of flowing water. When the water flows from a higher point to a lower point, it comes into contact with the turbine which is connected to a shaft that leads up to the generator. The energy from the flowing water is converted into mechanical energy and the generator then converts this energy into electricity which can be used to power a multitude of items.
In many cases, the water is pumped back up during low electricity demand times (like at night) and, when electricity usage increases again, the water is re-released and reused to generate more power. This is the perfect demonstration of renewable energy.
Advantages of hydropower
If you are planning to make your own hydroelectric generator, then you might already be aware of some of the advantages. It’s important to remember that large scale and small scale hydropower generators offer some of the same benefits but to a different extent of course. Some of the main benefits include:
- Clean energy and no pollution which is great for the environment
- The water can also be used for irrigation and other purposes
- If you don’t need any electricity, you can shut your generator down and turn it back on when the need arises.
- If you have your own compact hydropower generator, you can move it if need be.
Disadvantages of hydropower
When you make a hydroelectric generator yourself, you should also be prepared for some potential problems. While the advantages are pretty great, every source of power has its own drawbacks. Some of these include:
- If the area is flooded, you could end up without power and your generator might get damaged or even lost.
- If there is no rain for a significant period of time, water levels and rivers can become dangerously low. So much so that harnessing hydro may not be possible. Remember that the water flow needs to be significant and strong enough to get that turbine spinning.
- You may need to monitor the water for considerable amounts of debris. If left unchecked, they could cause damage to the exterior and interior of your generator.
- With all of the above-mentioned points in mind, it might be a good idea to invest in more than one generator just in case you have any trouble or need to perform maintenance.
Common misconceptions
Making a hydroelectric generator at home might take some time so, with this in mind, it’s important to do it right.

This means conducting enough research and making sure that you’ve got all the facts in order. It can be difficult to distinguish the truth from the myths but here are some important misconceptions to be careful of:
- Closed-loop systems are not nearly as effective as many might claim it to be. These designs involve a pump and a kind of relay system. The pump gets the water to the turbine which then spins and generates power. Some of this power is used to keep the pump going, and so the cycle continues.
- Home downpipe systems are also a popular idea for some but, if you know just an ounce about hydropower, you will know that this won’t prove effective. If you place hydroelectric generators on the downpipes of your home, you might get some benefit from heavy downpours but the water is not nearly dense enough to provide you with sufficient power.
- Municipal water usage has also been considered as a solution. In other words, some homeowners thought of using their tap water (which has good pressure to generate electricity) but this poses several issues. Not only is it bad for the environment (wasting water) but it will never generate enough electricity to justify this waste. In other words, the amount of power created will be worth a fraction of the cost of the water.
How to make it yourself
Building your own hydroelectric generator will take some time but, with these easy to follow instructions, you will be able to enjoy green energy sooner than you think! Once you’ve built your first one, you can then build additional generators for even more power. You can even learn what types of alternative energy sources are available for the home – check out our article on this.

Many of these principals can also be adapted on a larger scale to create an even bigger generator if you need enough power to support several people or households in the event of an emergency or disaster.
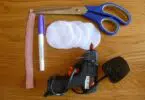
Tools needed
- An electric drill with a ¼” drill bit
- A pair of scissors
- Electrical tape
- A ruler
- 10cm (or 3.5 inch) nail/awl
- Glue gun with three glue sticks
- White glue
- A utility knife
- A pencil sharpener
- A permanent marker
- A small amount of sandpaper or similar abrasive
- A magnetic compass
- Wire cutters
- A pair of gloves
- A pair of safety glasses
Materials needed
- Templates printed on paper
- One 4L plastic jug/bottle. The kind used for windscreen washer fluid or vinegar.
- 10 plastic spoons
- 1 large (3.5 – 5cm) cork
- Approximately 100m of 24 gage enameled magnet wire
- Heavyweight corrugated cardboard or foamcore (approximately 22cm x 30cm)
- 6mm (1/4 inch), 20cm long wooden dowel
- 4 ceramic magnets (at least 18mm in size)
- 6cm long, ¼” inner diameter clear vinyl tubing
- 4 brass paper fasteners
Disk preparation
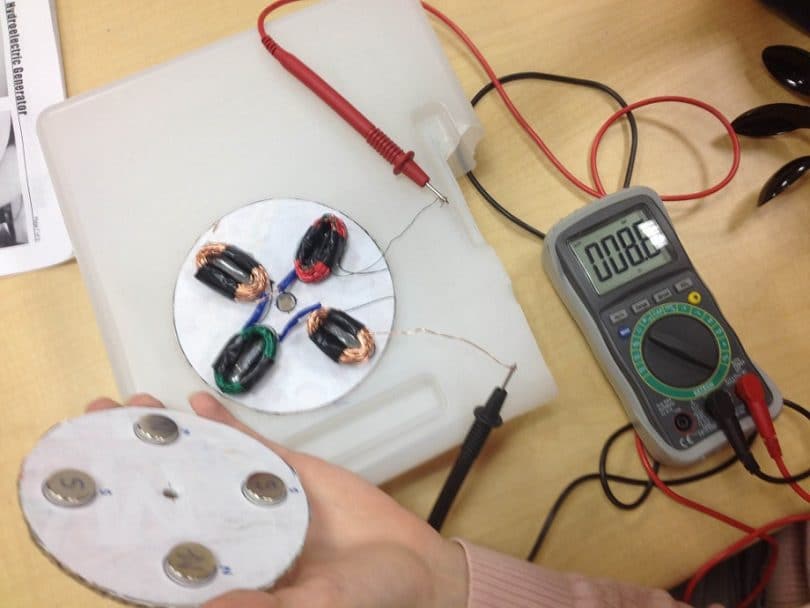
This generator consists of two main parts – the rotor and the stator.

The stator is the section that, as the name suggests, remains stationary. It has wire coils that collect the electricity.
[the_ad_placement id=”in-text-2-type-r”]
The rotor section moves and, with the help of the strong magnets, induces electric current into the coils.
- Start by using the white glue to stick the template to the cardboard. Make sure that you only use a thin layer of glue and apply it evenly.
- Once the glue is dry, use the utility knife to cut out the rotor and stator disks.
- Trim the edges very carefully and, to protect your work surface, make sure that you place a piece of wood or a cutting board underneath the cardboard.
- Use a sharp nail or awl to puncture the centre of the rotor disk.
- Use the utility knife to puncture the centre of the stator disk and make a larger hole (approximately 1cm).
Building the stator
- Cut a 3cm x 16cm piece of cardboard, fold it in half, and secure it with electrical tape. This will serve as a jig to make coil winding that much easier.
- Cut 8 short strips (approximately 4cm) of electrical tape and set them aside.
- Wind your first coil onto the jig and leave a lead of approximately 10cm. Form a tight coil with 200 turns or wraps.
- Remove the coil carefully from the jig and use two of the strips of electrical tape to secure it in place.
- Use a small piece of sandpaper or something similar to remove the enamel layer from the ends of each lead. Expose approximately 1cm of each end of the wire and make sure that the wire is totally stripped.
- Use the steps above to make three more coils
- Place the coils loosely on the disk and make sure that the windings alternate between clockwise and counter-clockwise.
- The coils also need to be arranged and connected to allow electrons to flow properly.
- Once they are arranged properly, connect the coils to one another by twisting the corresponding stripped ends together. Once connected, cover with electrical tape.
- A multi-meter will be great for measuring electrical resistance (ohms) at this point. You are looking for a reading of approximately 10 ohms (or less). If it’s any higher, you will need to recheck your connections until you find the problem.
- When you are completely satisfied with all of your connections, attach them to the stator disk with glue. Glue one coil at a time by lifting it up and applying a large amount of glue to the template beneath that coil. Once the coil is glued in place, and the glue is solid, you can move on to the next coil.
Building the rotor
- Use the magnetic compass to determine the polarity of your four magnets. Use the marker to indicate the North Pole on two of the magnets and the South Pole on the other two.
- Heat up your glue gun and prepare to attach the magnets to the rotor disk. You need to make sure that the polarity alternates from magnet to magnet.
- Place a small amount of hot glue (about 1cm) to the location for the first magnet. Press the magnet with a washer in the glue before allowing it to solidify. Once hardened, you can move on to the next magnet.
- Repeat this process for the other three magnets and don’t forget about the polarity!
Building the shaft
- Cut the dowel down to a length of 20cm.
- Use a pencil sharpener to create a point on either end of the wooden dowel. You don’t need to make it very sharp. A blunt point will more than suffice.
Making the turbine
- Drill a 6mm (¼ inch) hole through the very centre of the large cork. Alternatively, you can use a cork borer to make this hole.
- Make 8 equally spaced markings around the wide end of the cork.
- Place the cork (wide side down) on a cutting board. Use your utility knife to cut shallow slits where you made the markings on the cork. These slits are for the spoons to be inserted.
- Use a pair of wire cutters to trim the handles of the spoons down to a length of approximately 1cm.
- Warm up the glue gun and get your glue sticks ready. You might need anything from one to two glue sticks for this part of the job.
- Insert your first spoon into one of the slits on the cork and press it in. Do this with each spoon, one by one, until they are all in place. Make sure that they are evenly spaced, facing the same direction and at the same angle.
- Once satisfied with the positioning of each spoon, it’s time to apply some hot glue to each one. This will hold them in place so that your turbine can function without falling apart. So, make sure that you take the time to perform this step accurately!
Completing the housing
- Prepare your plastic container by removing any labels.
- Use your pair of scissors or your utility knife to cut a piece of the bottom off of the container.
- Use your ruler to determine the centre of the side of the container and mark it using your permanent marker. Do the same on the other side too.
- Drill a hole (6mm or ¼”) through the plastic on each side of the container (where the markings are located).
- Place the stator, with the coils already attached, on the side of the container. Ensure that the hole in the centre is directly over the hole in the container.
- Press the nail or awl through each of the stator disk slits. This will mark the locations of each slit on the plastic container.
- Use your utility knife to make four small slits on the side of the container where you left the marks.
- Use brass fold-over tabs to mount the stator disk and keep it secured to the side of the plastic container. Don’t forget to bend the tabs to hold everything in place.
Completing the assembly
- Use your pair of scissors to cut the vinyl tubing into two small pieces (approximately 1cm).
- Slide the shaft inside the plastic container (through the hole in the stator).
- Inside the container, slide one of the pieces of vinyl tubing onto the shaft.
- Place the turbine inside the container and make sure that the spoons all face the neck of the bottle.
- Press the shaft through the cork of the turbine and gently work the cork and tubing down the shaft.
- 4cm of the shaft should come out the other end.
- Adjust the turbine’s position so that the spoons and the neck of the container line up properly.
- The position of the tubing will need to be adjusted, so that reaches but does not enter the interior of the container.
- Now slide the second piece of tubing over the end of the shaft. These pieces of tubing will help keep each element of the turbine in the right position as it spins. To test this, give your turbine a spin and make sure there are no snags. No part of the turbine should snag or touch any part of the container. If necessary, make adjustments accordingly and continue to test until your turbine spins smoothly without any problems. Even the slightest snag can cause significant trouble so, rather than ignoring a potential problem, take a moment to fix it now before you continue.
- Place the rotor disk on the shaft. Ensure that it is properly positioned so that the magnets are 2 – 3mm from the coils. Give the shaft a spin to make sure that the magnets do not touch the coils.
- Give your rotor disk a spin to make sure that there are no problems in this area. Do this by turning the shaft slowly and watch carefully for any wobbles. Make any necessary adjustments to the angle of the disk on the shaft.
- Once you achieve a wobble-free spin, secure it in position by using hot glue to the area where the shaft passes through the disks.
Test time
Testing occurs throughout the building process, but it is also important to conduct some final testing as well. The amount of electricity that this turbine can produce will depend on the speed at which the water flows.

The faster it flows, the harder it strikes the spoons, the faster the turbine spins and the more power is generated.
- Place the plastic container’s neck under one of your household faucets to get the rotor spinning.
- Connect the turbine to your multi-meter and set the dial to measure the volts of alternating current. This will offer some insight into the capabilities of your homemade generator.
- Remember that you are only using your faucet to test the device! When you put it to work, you should install it where water flows freely from a high to a low. You may need to help direct the water flow to suit your needs (like a funnel) but this is relatively easy to achieve.
Different types of hydropower
Hydropower is used to generate electricity, and there are several main categories. These include:
- Conventional systems, which refer to the kinds of hydroelectric dams we are most familiar with.
- Run-of-the-river systems make the most of the kinetic energy of flowing rivers or streams. They do so without the aid of a reservoir and, in some cases, without dams too.
- Small hydroelectric projects do not make use of artificial reservoirs, and they are 10megawatts or less,
- Micro hydroelectric projects supply individual homes, villages, or industries with anything from a few kilowatts to a few hundred kilowatts of power.
- Conduit projects make use of water that has already been diverted for use in another location. Since the groundwork has already been done, why not make the most of it, right?
- Pumped-storage hydroelectric projects store the water pumped uphill and stored in reservoirs during low electricity demand periods. When the demand is high again, the water will be released again to generate more power.
Thanks to these ideas and technology that has improved over the years, hydroelectric generators made at home are also becoming increasingly popular.

Building a hydroelectric generator by yourself can be a fun and rewarding task. It is important to understand the function of each element of the design.
[the_ad_placement id=”in-text-3-type-r”]
By gaining a full and complete understanding, you will be better equipped to handle possible problems and maintenance issues. For example, if you notice that a certain aspect of the electricity generation does not seem to be running smoothly, you will know where to look.
It’s much like any other form of mechanics and, by building it yourself, you will gain the unique insight of its inner workings. Remember that these generators are great for emergency and disaster situations as well as everyday life. There’s no reason not to test out some designs and have fun experimenting!
For article reviews of the top portable generators available, read our piece on the topic.


Hydroelectric energy works best if it’s combined with another form of renewable energy. For my house, I placed a small generator in my fish pond that turns when water gets pumped upwards, it makes the pond self-sufficient and provides auxiliary power to the house as well. I use it in conjunction with my solar panels that also serve as roof shelter for my poultry.
That’s a fantastic idea Kevin! Thank you for sharing it with us!
I have also been researching about this. However, I won’t ever have access to rivers or streams, so I am still searching for guides on how to convert gray water or water that runs through household drains, such as water from your washing machine, showers, sink, and dishwasher and even rain water into hydropower.
Well, it is not an easy project as one would imagine, but with the right guidelines such as the ones in this article, you will be able to come up with your own hydroelectric generator.