
If you are often and regularly thinking through your SHTF and off grid plans then you can’t miss on planning on what to do in case you need an alternative source of electrical energy. If you would like to have all or most of your appliances working even though the main power source you have been using in normal circumstances is not functional any more or you just want to save some money on your bills, you can first start with picking a perfect way of getting electrical energy.
[the_ad_placement id=”in-text-1-type-r”]
Some of the most popular installations for getting electricity are solar panels and wind turbines. We have figured out more than one reason why wind turbines would make a perfect choice. The best is yet to come as we are helping you make your own DIY wind turbines in comfort of your own home. Follow up with our instructions in order to get started with making your own homemade wind turbines.
Wind speed
In order to be able to determine what type and size of wind turbine you need, you would first need to determine the average wind speed in the place where you live. To do that you will just need to do a research on the wind speed and other factors in the town you live. Every country has several different areas where the weather is completely different or slightly different from one area to another.
To make sure you are on the right track, it is better to check the wind speed specifically for the place you live in rather than checking the average speed for the entire country. To be sure you are able to collect electricity with your wind turbines, you need to at least have an average wind speed of 12 to 16 kilometers per hour.
That means that your wind turbines will be cost-effective and collect energy more efficiently. The ideal wind speed would be somewhere in between 20 and 32 kilometers per hour where you would be able to really take advantage of wind turbines and get the most out of its purpose.

You can easily measure the speed of the wind by using anemometer, a handy device often used for measuring the speed of the wind. You can easily purchase it online or ask someone you know to lend you one. You can also find several websites where there is a live tracking of wind speed across the globe. However, our advice is to measure the wind speed by yourself and find out the average speed from the first hand.
Rules and laws
Before you start purchasing parts and tools you need to make your own DIY wind turbine(s), it would be for the best to first have an overview of all the building rules and laws in your state/city/neighborhood. It is pretty easy if you live on a countryside where your property and house are settled miles away from your first neighbor, but if you live in a thick neighborhood when noise can become a big problem, you first need to consult with your neighbors and also check with local authorities whether or not you are allowed to even set a wind turbine in your backyard.
Space
You would also need to determine whether there is enough space for the turbine to be properly working. If there are lots of houses and trees around, even though turbines don’t require much free space on the ground, it won’t be able to collect the amount of energy you need if there are other objects and trees blocking the impact of the wind.

You would need to build it above the line of the height of other objects and trees, but then again you would need to check if you are allowed to set up objects of that height in your backyard – there is always a problem if your neighbors and regulations in your city/town/state don’t agree with it.
Wind turbine blades
If you have checked everything as mentioned in previous steps, you can now start planning your wind turbine design. We are starting off with wind turbine blades. Usually there are three blades attached to the wind turbine and all three have to be properly made and set in order for the turbine to be able to harvest energy from the wind. The reason all wind turbines usually have only three and not paired number of blades is because having three blades reduces noise the turbine is making. With two or four blades set on the turbine, the turbine is more likely to make louder noise.
When it comes to blades you most definitely need in order to make yourself a wind turbine, you need to determine whether you want to make your own blades or have them purchased. Either way, it is important that your blades are properly constructed and fully functional. If you would like to make this project completely DIY and have your own blades made, you can use our following instructions and make your blades out of PVC pipes.

Step 1: Determine how big you want your turbine to be and then choose the length for designing blades proportionally to the height of the turbine you are constructing. Choose the appropriate pipe size by following: if you are planning on having 50 cm long blades, you would need to pick a pipe with diameter of 10 cm. Adjust the proportions for smaller or larger blades.
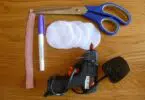
Step 2: First thing you need to do once you have chosen the size you need is to cut your pipe in four, making quarters. It is pretty hard to equally cut the pipe without measuring and measuring round objects is not the easiest thing in the world. Instead of a ruler, you can use paper.
If you want to do the measuring properly , you will need to take a paper sheet and wrap it around the pipe, you will then wrap tiny bits of paper down, revealing the pipe surface and draw the line. It is easier to measure smaller parts of round surface so you will be revealing the pipe until you draw the line so you are dividing it in half.
Step 3: Simply cut the pipe in half with a saw.
Step 4: Now that you have your pipe cut in half, draw a life on both parts of the pipe, dividing it in half again. It should be easier now and you will just need a pencil and a ruler.
Step 5: There is only one thing to do: shape the quarters you have. You will do that by following these instructions:
You need a part that is meant to be the attachment so you would actually be able to attach those blades to the base of your wind turbine. You will need to cut out a rectangle from the base of a quarter and its dimensions should be about 5 centimeters. Next cut from the bottom point to the tip of the quarter, cutting diagonally.
There you have it! You have four blades, but we recommend using three.
Generator
To get your wind turbine working, you will need to use and purchase a generator. Generally observed, generators usually use direct current and this is the type of the current (DC) that can’t make your home appliances working. In order to be able to transfer DC into the alternate current, that is AC, you will need to use the inverter. If you don’t want to buy an inverter as well, you can use an alternate current motor instead of a generator.
However, if you decide to use a DC generator regardless, you need to make sure you are buying the right one. For starters, you need at least 12 volts of constant current. You will also need to take care and buy a generator that has lower rotation, so instead of buying the one with thousands of rpm, it is better to have the one with a couple of hundred revolutions per minute. Higher current and voltage in a generator is a better option than having high rotation speed.

Besides from a low rotation and high voltage and current generator and a current inverter, you will also need to have a charge controller and a deep-cycle battery bank. You need this in between the inverter and generator. Charge controller and the deep-cycle battery will protect the generator and inverter from electricity spikes and help save and collect energy when the wind speed goes low.
Connecting parts: wind turbine head
You’ve checked if you are allowed to build up a wind turbine on your property, you have made or bought the wind turbine blades and you have solved the problem with the generator you need. Now you can start with assembling the wind turbine parts. First off we are going to help you assemble the wind turbine head.
[the_ad_placement id=”in-text-2-type-r”]
Step 1: First you will need to make a hub or have on premade. You need a hub to be able to connect the blades with the generator you’ve chosen. If you want to make your own hub rather than have it bought, you can just go ahead and have the metal parts bolted. One side of the hub should be made to be suitable for slipping the shaft of the generator you have and the other side of the hub should be suitable for the blades. Have it done properly so you would be able to attach the blades.
Step 2: Next you need to get on some drilling. You will need to drill a hole into the shaft of the wind turbine head. You will need to have a hole drilled somewhere in between the quarter, measuring from the end of the shaft. The hole should be wide enough so that it could have the wires put through it when setting up the generator.

Step 3: Once you are done with drilling, you can now attach the generator to the head shaft. To make sure no harm can be done by external factors such as weather, you can secure the generator with PVC material and have it wrapped around it to protect it and prevent it from being broken. It is also recommended to add a wooden piece under the generator.
Step 4: Now it is time to attach the wind vane. If you haven’t made it yet, you can use a metal piece and easily make it in the matter of several minutes. Use the metal sheet to make the vane and have it measured to be third of the length you have for the head shaft. That would make this two pieces proportional in oppose to one another. You can attach the vane by cutting a groove through the half of the wooden piece.
Step 5: To support the head and secure the weight it can carry, you will add an iron floor flange. The flange should be about 2.5 cm.
Step 6: It is natural for the wind to change directions and that can happen several times a day. To prevent the wind turbine from turning loosen, you can add a pipe nipple that will give the additional support the wind turbine needs.
Step 7: Next and the last for the head shaft, the hub with the blades you’ve already attached should be attached to the generator shaft. What you will need to take care of is to have the balance checked. The vane part should be even with the generator shaft part and if this is not the case, you will need to add some weight to the vane. If everything is done properly, you can continue with assembling other parts of the wind turbine.
Wind turbine base
Obviously, you need to build the base and the way you build it will certainly reflect on the functionality of your DIY wind turbine. The main catch with the wind turbine base is that this part exists to make sure the wind turbine is well secured and that it won’t be blown away or broken if the wind speed is higher and the wind consequently stronger. See more of how to make your own homemade wind generator by reading our article on this topic.
You can have the base made for purposes of moving the turbine, making it portable so you can move it easily from one place to another or you can have the base made for permanently installing the wind turbine in one place. Whatever the case is, you need to make sure that the base is strong enough to support the wind turbine body.

Image credit: gabreport.com
If you are using the concrete, measure carefully and set the pipe in the middle of the base to be secured while the concrete is slowly drying. You don’t want your turbine crooked, so be careful and set it straight.
In case you prefer having portable base, you can make your base by using plywood. You will also need a pipe to support the tower base. You can choose the length of the pipe yourself and make the turbine as tall as you like. Whether you are making a portable or a permanent base, you need a PVC pipe at the base of your wind turbine construction. You will assembly everything you have previously made with this pipe and have the rest of the parts attached.
Add stakes to the plywood base in order to support the wind turbine.
Setting up the wind turbine
It’s time to set your wind turbine and have it ready to use it. You will need to assemble all the parts you have left waiting to be set. You have some mounting and wiring to do in order to make your DIY turbine fully functional, so follow the next steps to finish your construction.
Step 1: You should first connect the charge controller to the battery you have in order to prevent power spiking. This should be done before attaching the battery to the wind turbine.
Step 2: Next you will need an insulated wire so you could attach it to the charge controller. So, this wire is supposed to lead the power transferring it through the generator, across the charge controller and into the battery. The wires should have two lengths and you can use the ones you can find in any electricity cord, of course once you remove the plugs as you don’t need those. Even though you have two wire lengths, the two wires should be insulated together.
Step 3: You should now go ahead and set the wire through the shaft and the base. Put the wire through the pipe and set it through the top and across the tower shaft. You can use the fish tape to help you thread it efficiently.
Step 4: You will now attach the shaft to the base and add it additional support if needed by using wires. You can do so by using guy wires.
Step 5: Next is attaching the head of the wind turbine to the tower shaft. Put the wires across the assembly and have them connected to the generator. It is advised to remove the blades form the hub if you are installing the wind turbine on the permanent base tower. You can them assemble all parts then put the blades back.
Step 6: You should have another end of the wire left, so you need to connect it to the generator and finish your construction. You can now set the power to be directed to the battery by using your charge controller configuration.
If you’ve been following all the instructions and have everything done and checked if properly set and installed, you should now have a fully functional handmade wind turbine. Remember that you can always purchase or have premade all the parts you need, such as hub and blades, but it does feel good to be self sufficient and have it all made by yourself.
It also wouldn’t hurt to give your wind turbine a professional look and have it sprayed or painted so the assembly would look fabricated and sleek instead of DIY patched. Remember to use DC generator with inverter instead of an alternate current generator and think about setting 3 blades instead of having four – your wind turbine will vibrate less and make less noise.
[the_ad_placement id=”in-text-3-type-r”]
Make sure that your wind turbine is set on the open and that there are no trees and other objects blocking the path for the wind to reach the wind turbine. If this is not the case, you won’t be able to harvest the power you need for powering all the appliances you need to use in your home. This is especially important if you are planning to permanently mount your wind turbine.
If you are planning on making more DIY turbines, you can by following the same instructions as by far. That will of course provide you with more energy that you can save and use efficiently, making your electricity usage extremely cost-effective. You would only need to make sure that you have larger space for all the turbines to be set – make sure that all the wind turbines have enough space in between. You can also try making your own DIY electric generator by following the instructions on the article on this topic.
Once you have everything figured out, you can use your alternative energy source and have your backup plan worked out in case a power out occurs and you end up living in a SHTF scenario where there is no mainstream electrical distribution enabled. You will be glad you’ve tried making your own handmade wind turbine even if you are only trying to save some money on your bills.
See our article on alternative sources of energy for your home, it’s a must-read for all.


pretty useful guide for us naive with these things. where did you purchase majority of the materials?
Subject that always intrigued me.
Would you recommend using a treadmill motor or building an entire thing from scratch?
I plan on dabbling in making a wind turbine myself for my lake cabin, I figure it could replace the power generator I use currently.
Very interesting information!
I find that using an item such as this one requires research, but is generally doable. DIY stuff is always neat, and it is great to read an article with concise and precise information.
Wind turbines are the best alternative electrical energy source.