Building a snow cave that is safe requires skill and practice. If the Shit Hits the Fan (SHTF), and you live in a cold environment, this may become a very valuable skill.
In a worst-case scenario – nuclear winter, asteroid strike, or anything that sends vast amounts of particles into our atmosphere, this would be must-have knowledge.
Consider igloos. These are shelters that have evolved because of the environment in which humans live. They adapted their homes to their frigid environments.
Most snow skills can be learned over time, but working with an expert or taking a course is recommended. If you don’t have that kind of time, this article provides a good overview of building a snow cave and also provides some survival alternatives.
Table of contents
- Requirements for a Good Snow Cave
- What are the Right Conditions for Your Snow Cave
- What Tools Do I Need to Build a Snow Cave?
- Overview of Steps Needed to Build a Snow Cave
- Finishing Your Snow Cave
- Disadvantages of Snow Caves
- Survival Alternatives to a Snow Cave
- Final Thoughts
- Additional Resources
- Related Posts
Requirements for a Good Snow Cave
There are a few basic requirements to consider when building the actual snow cave itself. I’ll go over these in more detail below but in brief…
- Deep Snow
- Thick Roof and Walls
- Dome Shaped Roof
- Entrance below interior sleeping area
- Air holes
What are the Right Conditions for Your Snow Cave
Conditions don’t have to be perfect for a snow cave, but below-freezing temperatures and snow are not the only things to consider.
Avalanche/Dead Fall Risks
Avalanche risks should be avoided. Look for areas that have had potential rock falls or old avalanches. Make sure you don’t set up under a snow cornice that might fall or collapse on you.
Also, make sure you don’t dig a cave under dead hanging limbs (widow makers) or dead trees. These are especially at risk in blizzard or storm winds, and you don’t want one crushing you or your cave.
Snow Direction
Build your snow cave out of the wind, or at least where the wind is blowing away from the cave. You don’t want your entrance to be buried in feet of snow when you wake up.
Camping out of the wind will also keep you warmer, although digging the proper entrance and interior will help also (discussed below).
Snow Cave Location
Look for a snowdrift at least 5 feet deep or where the wind has blown snow up against a hill or slope. You can build your own pile of snow, but make sure you pack it down as you build the pile.
Type of Snow
Light powdery snow is not ideal and hard to work with when building a snow cave. You can use this snow, but you will need to pack it down as you build and then wait hours for it to harden.
What Tools Do I Need to Build a Snow Cave?
There are four things you will definitely need to build a snow cave.
- Avalanche shovel – for digging out the cave.
- Light – to see inside the cave when working.
- Clothing Layers – becuase you are probably going to sweat and don’t want to become hypothermic.
- Second person – to haul away all the snow you will need to shovel.

Overview of Steps Needed to Build a Snow Cave
Prepping Snow for Your Snow Cave
When building your snow cave, set a steady pace. You don’t want to overheat, sweat, and then get chilled in below-freezing temperatures. This can cause hypothermia.
How long is it going to take you to build a snow cave? This is a good and command question. If you are alone, plan on a minimum of four hours for a proper cave.
Not only will you need to dig out the cave and construct it, but you will also have to stop to move all of the snow as you go.
If there is not a snowdrift, you will need to build a pile of snow that is at least 5 feet high.
In the case of a pile, pack the snow down firmly as you build your snow pile. If the snow is light and powdery, you will want to stop and pack it down multiple times as you make the mound.
Once the snow pile is built, wait for a minimum of 2 hours for cold temperatures to harden the snow. You don’t want it to collapse on you. If the snow is light and powdery, you will want to wait as long as possible, even up to 24 hours.
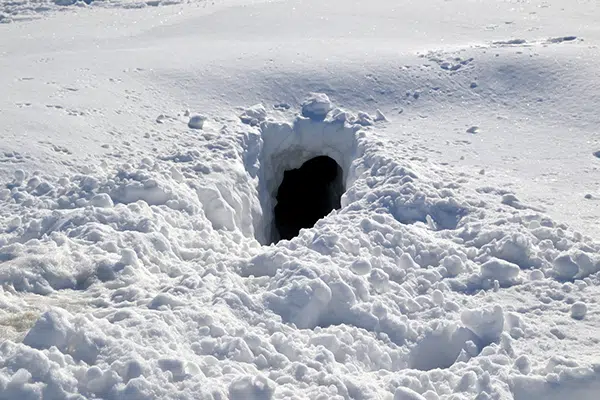
Digging Out Your Snow Cave
If you are building your cave in a snow pile, stick a branch or hiking poles 18 inches into the top of the snow pile. You can stop digging when you reach these. If you dig any further, you may risk your cave collapsing or creating thin walls that won’t provide insulation.
Start angling your entrance tunnel up if you are building at the bottom of a slope. If you start on a flat surface, dig down several feet and begin angling your tunnel up.
An entrance tunnel should be 3-5 feet long and provide at least 1-2 feet on each side of your body as you crawl through it.
Remember to only keep the snow cave as big as you need it to be to fit and store your gear. The smaller the cave, the warmer it will be due to body heat. You don’t want unnecessary space to heat up in the cave.
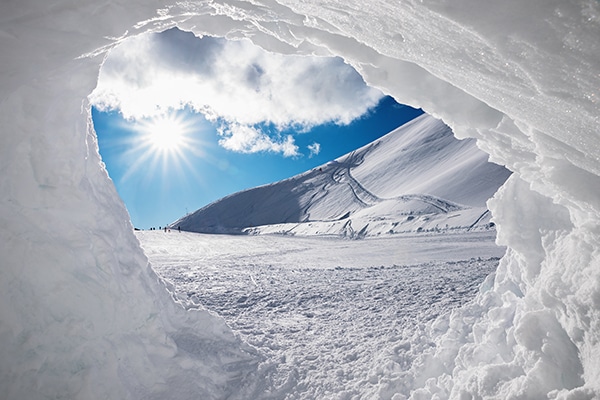
As you hollow out the cave, focus on preparing the ceiling first to keep the shelter from collapsing. Mold the ceiling into a dome shape so water runs down it and not onto you. After this, you can work on the walls and floor.
Hollow out the center of the cave, keeping the ceiling 12-18 inches thick and the sides of the cave at least 20-26 inches wide. This will help prevent collapse and protect you from the elements.
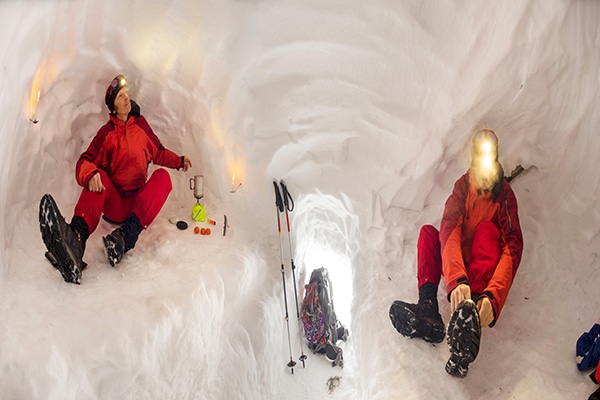
Dig a trench in the middle of your cave, and keep the entrance below the level where you sleep. Sleeping up on snow benches that you smooth out around the trench will keep you warmer. Cold air settles, and you will be protected from the cold wind blowing into the cave.
Preparing the Snow Cave Interior
As mentioned already, smooth out the top of the snow cave in a dome shape to as snow melts; the water will run down the sides. You can also dig grooves down the sides of the cave to funnel down the water, so it does not drip on you.
Staying dry is critical in sub-zero temperatures, and can be the difference between life and death. You want both you and your gear to stay dry.
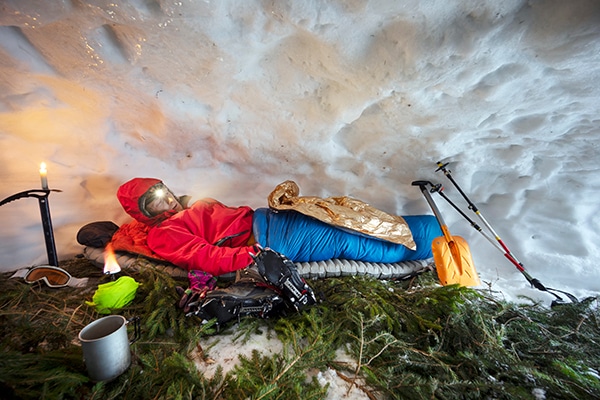
Spread out tree branches and duff for insulation on the floor or benches in your snow cave. This will help protect you from the cold floor temperatures and keep you warmer.
Use your hiking poles or branches to dig small holes, at a 45-degree angle, in the top of your snow cave on both sides. This will allow carbon monoxide to get out and let in some fresh air.
Remember that your snow cave interior may ice over, so make sure you keep the holes cleared. You may also need to periodically check the exterior of the holes if it is snowing and make sure they are kept clear.
Finishing Your Snow Cave
If you are building a snow cave for emergencies, make sure you can be found. Leave brightly colored gear outside the cave or conspicuous branches and debris.
Leaving these objects around your cave also marks its location, so you don’t walk across the shelter and have it collapse or lose the opening if leaving the cave. It is tough to tell all of the mounds apart in deep snow.
Once your snow cave is finished, make sure you keep a shovel near yourself. This will help you dig out if the snow cave does collapse. Also, it would help if you kept a long stick or pole straight up and as close to your head as possible. This will poke a hole through snow if it collapses and potentially leaves an air pocket.
After your snow cave is finished and you are settled in, place snow in front of the entrance to block the wind.
Remember to keep your gear away from the walls of the snow cave, so it does not get wet from melting water.
One thing you can also do is use a small candle to add some warmth to a snow cave, but not enough to melt the snow cave.
Disadvantages of Snow Caves
Although a snow cave is a very good shelter for protection from wind and temperatures in the right situation, it is not always the best choice.
- Snow caves can takes hours to build, and in an extreme situation you probably won’t have hours.
- A lot of energy is required to make a good snow cave.
- Collapse due to suffocation is a risk if you don’t have experience building snow caves.
- It is hard to construct a snow cave without the right tools, like a shovel.
- Temperatures need to be below freezing consistently to avoid the risk of collapse.
Survival Alternatives to a Snow Cave
- Quinzee – is a simple hold dug into a pile of snow. It won’t provide as much protection, but it will at least get you out of the wind.
- Trench or tarp shelters with boughs or tarps can be built more easily and much faster if you are in a dangerous situation. An easy way is to dig a trench and put your tarp over the top of the trench.
- A Tree Well Shelter can be built fast in high snow. Use the open space at the bottom of what is usually a large spruce, hemlock or pine tree. Clear it out, place boughs over the top, and you have a fast solution.
Final Thoughts
Snow caves require experience, skill, and time. They are good if used for base camps or if you expect to be in one for several days or more. They are used by backcountry rangers, travelers, etc.
Due to the time and energy, it takes to build a snow cave, they are not the best solution in an emergency situation. In an emergency consider a faster shelter – tree well, tarp, Quinzee, etc.
Additional Resources