
There is a lot of debate around colloidal silver and its uses. Traditional institutions claim it has no positive attributes, but alternative medicine users swear by its supposed benefits.
If you decide you want to use colloidal silver and save money and make it yourself, this article provides an overview and additional resources.
Table of contents
What is Colloidal Silver?
Colloidal silver consists of tiny particles of silver suspended in a liquid solution and can be found in various strengths depending on the amount of silver it contains. It was once a widespread remedy for everything from common colds to cancer.
For years colloidal silver fell out of favor and is still frowned upon by many doctors and medical institutions.
Recently there has been a resurgence in the use of colloidal silver, especially as an antibiotic, dietary supplement, and for preventing bacteria, viruses, and fungal infections.

Suggested Benefits
Advocates for alternative medicines claim the benefits from using colloidal silver.
- Antibacterial treatment
- Antiviral treatment
- Antifungal treatment
- Boosting the immune system
- Improve wound healing
- Treat skin disorders
Suggested Risks
Scientific studies for risks and benefits are limited, but most doctors and traditional institutions do not consider colloidal silver safe.
- Argyria – a build up of silver in your body that permanently turns your skin a grey, blue color.
- Ingested silver can cause toxicity or death
- Headaches, fatigue, seizures
- Interacts with other drugs to reduce effectiveness
Always consult your doctor before using colloidal silver.
DIY Colloidal Silver in Summary
This DIY guide provides a general overview that uses silver wire, a battery source, and liquid to create colloidal silver. The silver wires will rest on a container of water.
When electricity runs between the silver pieces, silver particles will shed and become suspended in the water.
Additional Resources
Colloidal silver is widespread, and knowing how to make it is common among survivalists. I’ve listed additional resources below.
| Title | Price | |
|---|---|---|
 | Colloidal Silver Making A-Z: The DIY Illustrated Guіdе tо making Cоllоіdаl Sіlvеr at Hоmе | Check Price |
 | Colloidal Silver: The Natural Antibiotic | Check Price |
 | DIY COLLOIDAL SILVER: The ultimate DIY guide | Check Price |
 | Everything You Need To Know About Colloidal Silver | Check Price |
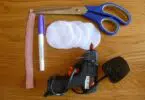
Materials
There are not very many basic materials needed to produce colloidal silver.
- Battery
- Distilled water
- Silver Wire
- Diodes
- Containers (2)
- Alligator clips
Source of Power and Silver
- Create a power source out of 3-4, 9-volt batteries. If you’re planning to use a small amount of colloidal silver, you may choose less expensive batteries. Use lithium batteries for a longer period of use.
- You will need lead wires to connect the batteries to the silver wire. Alligator clips will make the connections easier.
- Purchase the purest silver wire you can locate. Don’t use sterling or plated silver.

Some people don’t trust the silver wire they purchase and will instead use silver bullion.
Current Regulator Diode
Diodes will allow you to regulate and control the current that runs between the silver wire or bullion.

Distilled water doesn’t possess a high level of conductivity, but silver does. As silver begins shedding from the wire, the water will conduct it. As the current increases, you will find more significant pieces of silver in the water.
You don’t want larger particles of silver because large silver particles are ineffective at ridding the body of bacteria and pathogens. You may also be at higher risk of Argyria.
A regulator diode will address this concern.
Diodes will keep the current from increasing beyond a certain point. Choose a diode that can keep the current at only around one milliampere.
Distilled Water
Distilled water is the cleanest source of water with very few particulates or impurities. You can purchase it at convenience or grocery stores.
If you don’t trust ready-made distilled water, you can also learn how to make distilled water.
Containers
For this improvised colloidal silver machine, you will need one or two containers. One container will hold distilled water, and it should be made of glass or plastic.

Glass is safer to use for this experiment. Find a container used explicitly for creating colloidal silver. Don’t use a container that could be contaminated from other uses.
Tips to Remember
- Store your CS away from light in an amber-colored container.
- It should be easy to find an affordable DIY colloidal silver container in-store or online.
DIY Colloidal Silver Process
- Connect your batteries in a series by attaching the positive terminal of one battery to another battery’s negative terminal. You should have a positive terminal located on the left and a negative terminal on the right.
- Connect a set of alligator clips to the terminals. At the end of your clip for the negative terminal, connect your diode. Then, attach another alligator clip on the other side of this diode.

Connect the two pieces of silver to your leads. Then, put them in the water, ensuring you let them rest on the bottom and side of your colloidal silver container. However, do not allow them to touch. This will cause a short circuit.
Don’t let anything else enter your distilled water, including the alligator clips.
Starting Your Experiment
Pay attention to the water and see what happens during your first DIY colloidal silver experiment. Usually, it will take a couple of hours before the silver particles start saturating the water. But, of course, this all depends on the volume of water you put in your container.
First, you will notice that the water turns a slightly yellowish color.
After a few hours, you’ll have a good understanding of how long your colloidal solution takes to finish.
Next time, you can set the alarm.
When you’re done with the first batch, pour your solution into one of the amber-colored containers you set aside earlier.

Using your Colloidal Silver Solution
Voila! Your experiment is done.
To use your homemade colloidal silver, opt for the sublingual approach. Some people try to ingest it, but we don’t find it necessary since 90% of the silver will be flushed out of your body.
Swish the silver around in your mouth for about 10 minutes. This is a safe and effective method, and you won’t have to worry about silver deposits in your body. It can also be applied to wounds as a disinfectant.
Additional Materials and Tips
It may be helpful to monitor the density of your colloidal silver solution using a small handheld laser. They can be easily found in most supply shops. After about 30 minutes, you should be able to see your colloidal silver solution’s progress.

Use a wooden spoon to stir your solution occasionally.
Additionally, you may need a wooden board to hold the wires on top of your glass jar. Don’t use metal, as it will shortcut your circuit.
Use any small cutting board in your home, but make sure that it has two drilled holes in the middle at least one inch apart. Put an end of the alligator clip on the end of every silver wire to keep it from falling into the water.
The other end of the wire is pushed through the hole in the wood before going into the water. So, the wooden board is on top of the jar while holding the wires in place.
Important: only use distilled water for this project! To learn about ways to purify your water, check out this article on water purification.
Impurities found in normal water can bind to silver, putting you at risk for Argyria. Argyria is a condition where the skin becomes blueish-grey. It is irreversible and should be avoided.

Safety Tips
- Do not put any other chemicals or ingredients, other than silver into this project, including salt.
- Do not put anything at all in the water.
- Tap water may be used to create colloidal silver for external purposes, but not for ingestion. This includes house cleaning and disinfecting.
- Don’t refrigerate colloidal silver.
Please take note that colloidal silver may also kill friendly bacteria, so you may want to take supplements, such as lactobacillus acidophilus or yogurt to replace them.
This article only references homemade colloidal silver and is not intended to serve as medical advice. Consult your doctor before consuming colloidal silver.
Final Thoughts on How to Make Colloidal Silver
Colloidal silver is not difficult to make, but you should consult your doctor before ingesting or applying colloidal silver.
There are also numerous, more extensive resources on colloidal silver, so take the time to research.
| Title | Price | |
|---|---|---|
| Colloidal Silver Making A-Z: The DIY Illustrated Guіdе tо making Cоllоіdаl Sіlvеr at Hоmе | Check Price |
| Colloidal Silver: The Natural Antibiotic | Check Price |
| DIY COLLOIDAL SILVER: The ultimate DIY guide | Check Price |
| Everything You Need To Know About Colloidal Silver | Check Price |


So you mentioned it being used in medicine, but how?
The 5orce, colloidal medicine was used in treating yeast infection before as well as asthma and several forms of allergies. There have been success stories with regards to treatment using colloidal silver but these were not properly documented.
Andrew
Very interesting! It is always useful to see how something is being made. My aunt swears by colloidal silver and uses it to treat all kings of infections. It works and is a good product.
We are glad we could help, Joseph!
Mentioning a current-limiter is a good idea, but it’s extremely odd not to specify any values at all. You can’t simply ask for a “current-limiting diode” install it, and expect it to work. You need to know the current range you are trying to achieve.
I use a regulated power supply, set to 30 volts and 10 milliamps, which achieves my desired results. I also use a multi-meter to monitor the actual current flow, as the power supply only shows the maximum current limit.
We will consider your contributions in our next posting, thank you.
Hi! Great post! I was told when using a 9V battery to only leave the rods in there for about 1-2 minutes, take the rods out, add a pinch of salt, then transfer it into an opaque glass jar. Have I been doing this incorrectly? Thank you!
How long you leave the rods in is up to you. You want enough silver ions produced to make the water somewhat cloudy. Saline is used in the process to help conduct electricity since water is a poor conductor.