Seven days backcountry is no joke, and my recent backpacking trip on the Benton Mackaye Trail (BMT) put my lighter weight gear to the test!
My goal was to hike 94 miles southbound from the northern terminus of the Great Smokey National Park down to Fontana Dam, where I left the park’s boundary.
The trip was filled with gorgeous scenery, wild ass pigs, black bears I only glimpsed, and almost no other people.
Table of Contents
Logistics
The trip started at Baxter Creek Trailhead (35.751144,-83.109451), where I was dropped off to start the climb up Mt. Sterling.
There is plenty of parking at this trailhead, and you could probably leave your car here with no issues.
I ended the hike at Fontana Dam Shelter, just north of Fontana Dam (35.452614,-83.804596).
Campsites
The Great Smokey National Park requires you to reserve campsites on the BMT @ https://www.nps.gov/grsm/planyourvisit/permitsandreservations.htm. I wanted to average around 15 miles/day.
Below is the itinerary.
- Mt. Sterling
- Enloe Creek
- Newton Bald
- Jerry Flats (Stayed at Mill Creek)
- Chambers Creek (Stayed at Pilkey Campsite)
- Fontana Dam (Fontana “Hilton”)
- Home
Maps & Apps
I used both electronic apps and carried backup maps.
- Guthooks – This was my primary means of logistics. It is an interactive App that has numerous trails you can pay to download. It provides shelters, campsites, water sources, town information, etc.
- Gaia Gps – I always download a Gaia Trail map. It offers more detail than Guthooks within a larger radius. I also build my own tracks and download tracks with Gaia.
- NPS Map – You can download a pdf map for free.
- Trails Illustrated Maps – You can purchase these.
Terrain & Climate
The terrain was moderate to difficult, with a few easy sections thrown in sporadically, so the trail could slap me around a little.
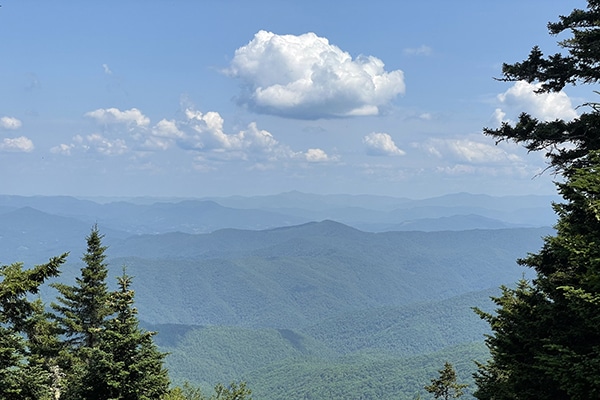
Views included an awesome view from Mt. Sterling and a few glimpses of Fontana Lake, but that was about it. It was summer, so the foliage was thick.
There were quite a few “kick your ass” climbs in the beautiful second and third growth forest. It really was beautiful – almost tropical with Monarchs, birds, wildflowers, fungi galore, etc.
Stream crossings were not lacking, and I had torrential rains almost every afternoon, but there were plenty of bridges.
BMT – Day 1


Miles – 6.2
The climb up from Baxter Creek trailhead wound through quiet old hardwood forests as it made its way up 6.2 miles to the summit of Sterling Mountain. The climb of 4,126 feet over six miles kept my heart pumping, but it wasn’t too bad.
Water for the summit campsite is about a quarter of a mile before camp, on the north side. The water is about 700 feet off-trail so make sure you get it before getting to camp if heading south unless you want to add a half-mile to your trip.
BMT – Day 2


Miles – 14.9
The hike over to Laurel Creek Shelter was nice, as was the shelter! I wish I had stayed there for the night. If I had started at Baxter earlier the day before I would have gone to Laurel Creek. Definitely better campsites.
I hiked down about 2,300 feet to Beecher Gap Trailhead before a 1,800 foot climb up to Hyatt Ridge. From there it was pretty much downhill to Enloe Creek Campsite.
I got dumped on by some pretty intense thunderstorms over the course of the afternoon so I wasn’t too happy about setting up camp in the low-lying dirt at Enloe.
I did at least manage to set up under a healthy tree with lots of leaves. This helped block some of the intense rain overnight.
BMT – Day 3


Miles – 14.5
There was nowhere to go to the bathroom @ Enloe Creek, and I had to climb straight up a mile before finding a good spot – rough!
After making my way about 2,500 feet down to Smokemont campground I stopped for a lunch break at the benches outside the historic Baptist Church. Tourists on horseback turned to stare at me as they made their way past. Bad hair day.
I then began my 2,700-foot climb up to Mingus Creek Trail junction before making my way down to Newton Bald Campsite. Clearly “Bald” is defined differently in the park as there was no “Bald” mountain that I saw.
I was tucked amongst the trees in a notch.
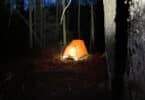
Thankfully, I chose to camp at the top of the knob back on the edge of the trees. About an hour after setting up camp I was visited by the Tasmanian Devil!
I lay in my tent watching as a GINORMOUS wild pig raced into camp and tore up the ground where I had just laid out my clothes to dry from that day’s thunderstorms. It actually ripped up the ground where my clothes had been laid out.
Good thing I was weaponless Porkchop.
BMT – Day 4


Miles 16.1
Today was a day of stream crossings and of course rain. I hiked downhill 2,500 feet over 7.5 miles before a steep little 1,800-foot climb that brought me to the junction of Noland Divide Trail. There was plenty of water. Water is no issue on this trail.
The final 5.5 miles took me down towards Jerry Flats Campsite, my destination for the night. Along the way, and just prior to Jerry Flats, I passed several campsites closed due to “Aggressive Bear Activity.”
I’m not sure if this meant the bears were stubborn campsite visitors or if they had eaten a poor unsuspecting hiker, so I decided to pass on by Jerry Flats that was only 2.5 miles past the last closed campsite.
Bad bears and the excessive horse manure at Jerry Flats pushed me on towards Mill Creek which had PICNIC TABLES. Alleilujiah!
Home for the night, next to a burbling brook and hopefully fewer bears, although the picnic tables did make me pause.
BMT – Day 5


Miles – 21.4
Thankfully, no black bears visited Mill Creek, but I did see one go charging down the mountain as I made my way down to Bearpen Branch – also closed for Bad Bears I believe. What do you expect with a name that has Bear in it.
The highlight of today was reaching Lake Shore Tunnel and Trail. From this point on there were no big climbs, just a little roller coaster.
There was also the Zombie Tunnel. I swear I heard scratching as I raced through the LONG abandoned tunnel!
Chamber Creek was my destination for the night, but it was disgusting! The Party Pontoon was pulling up just as I was leaving the trash dump. It is sad how people treat our National Parks at times.
Moving on to Pilkey Campsite, I arrived just as the heavens opened up. I stood under a Spruce tree taking a shower as I waited for the thunderstorm to pass. It finally stopped raining at 6 AM the next morning. Ugh…
After setting up in the rain – again, I was resting about an hour later and watched under the edge of my tent as two very large black hairy legs passed through the campsite.
Apparently, the bears were migrating south since their campsites were closed further North.
BMT – Day 6


Miles – 19.8
Well, it was time to wrap this baby up, so I headed for the Fontana Shelter – affectionately known as the Fontana Hilton by hikers.
The BMT was going to take one last swing though.
My feet had been wet for 5 days and for some unknown reason they decided to swell around mid-morning. I felt the hot spots and stopped to examine the blisters that had developed on both feet behind the ankles – on both sides of each foot. Damn…
There was no amount of tape or band-aids that was going to hold in that spot in wet shoes, so the death march began.
By noon I could barely walk and was popping pain pills like candy. I carry them for emergencies and have never used them and now I was chewing them like gum!
By the time I reached the final shelter, I could barely hobble and had massive sores on my feet. Crazy! Thank goodness there were relatively few hills.
It is over a week later and I still can’t exercise. I just purchased backup sandals for all future hikes.
BMT – Day 7
No Miles
I was picked up mid-morning, whining and limping. My shoes would not go on my feet so we stopped for flip flops at the dollar store and of course a very large pain-numbing cheeseburger.
Equipment
Below is a list of equipment I use for my fast, light hikes. Don’t hesitate to shoot me a note with any questions. I only cover the major pieces of gear.
Shelter (Tarptent)
I use shelters made by ZPacks. They are pricey but light and last forever! The ZPacks gear is also made by hand in a shop here in the US. I like that I’m buying gear made in the US.
I have used all of the shelters below over the years, and they only produce high-quality shelters.
The shelter I used on the BMT was a single-person Hexamid Tarp tent from ZPacks. I purchased this 14.3-ounce shelter in 2013 and it is still holding up like a champ. It is pricey but I figure after eight years I’ve gotten my money’s worth. It still looks almost new.
If you want something with more room, check out the 19 ounce Duplex from ZPacks. It is a damn palace for one person at barely over a pound!
Finally, if you want a smaller footprint, but you are tall take a look at the 15.4-ounce single-person Altaplex by Zpacks.
Backpack
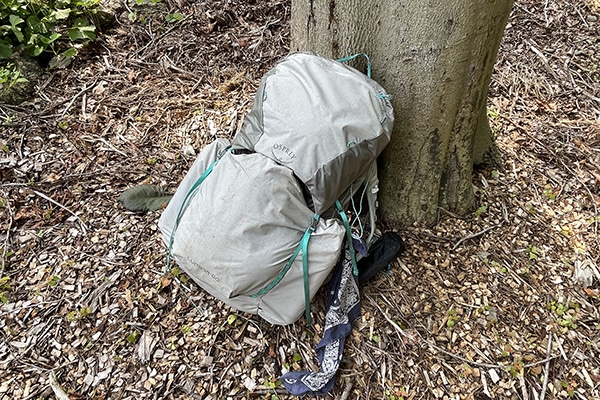
I used the Lumina 60 Backpack by Osprey on this hike. At two pounds this was an incredibly comfortable backpack that carried my 25 – 30 pounds easily.
Osprey also uses silnylon in the Lumina 60’s construction, so it was very water-resistant. Good thing since it was dunked and washed daily on this trip.
I trust NO backpack though, so I always line my backpack with a compactor bag. I’ve not used pack covers in years. They are just a pain in the ass.
The Osprey pack was a test for me. I’ve always wanted to try it out. My personal favorite line of backpacks for fast hiking is a line made by ULA Equipment out of Utah – another U.S. shop.
ULA has found the right balance between weight and durability.
Sleep System
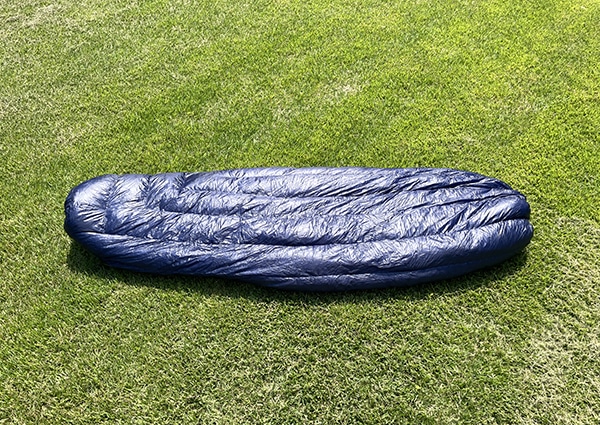
I’m a tosser and a thrasher! I mean I really move around when I sleep – it’s probably why bears just pass on through my campsites.
Because of this, I use a quilt if it’s above freezing. On this trip, I used the Enlightened Equipment 20 Degree Revelation. It attaches to the sleeping pad if it gets cold, and it is much more comfortable than a sleeping bag in warmer weather.
My sleeping pad of choice is the Thermarest Neoair XLite. The one I’m still using was purchased in 2013. It’s pricey, but again, 8 years – just saying. The pad is inflatable and almost 2 inches thick. Forget about those bumps and lumps!
Miscellaneous
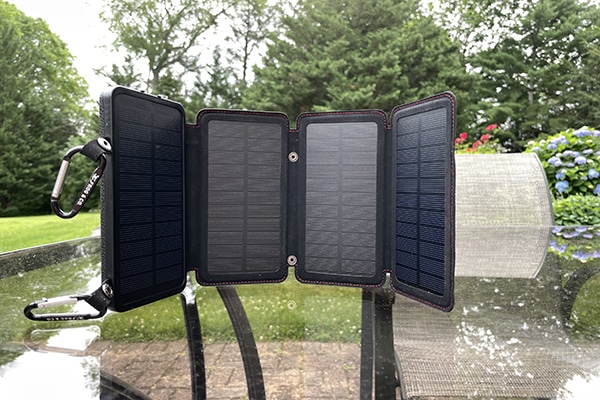
One last thing to mention is my QuadraPro by Survival Frog. It is a 4-panel solar charger. I used it for my phone, headlamp, InReach, etc.
Check out the review on this solar charger. There was not a lot of sun, but after the fourth day when I lost juice (even on airplane mode), I was still able to run from spot of sun to spot of sun and sip just enough juice to keep my phone going.
I needed the phone for the last day’s extraction.
Final Thoughts
The Benton Mackaye Trail (BMT) was a truly remote experience. There were no people and I felt like I was secluded in the backcountry.
There were a few spots where I encountered civilization, but mostly I was on my own. This is definitely a trip I would recommend.
Don’t hesitate to shoot me a note with any questions.