Camping and hiking goes hand-in-hand with dehydrated food. This is simply because dehydrated food is so light and low in weight and takes very little space that it’s so much worth taking such food than anything else. It still keeps its nutritional value and properties and is as healthy as the original version.
[the_ad_placement id=”in-text-1-type-r”]You can dry almost any type of food, from meat to fruits and vegetables.

And as long as you have a food dehydrator or a well-ventilated and hot room, you can try the following recipes.
Hamburger rocks
Drying any type of meat doesn’t require anything more special than drying fruits or vegetables. As your meat is finally dried you can store it preferably in a plastic bag with a tight zipper and away from moisture. This can last for up to 2 years. Other people claim it can last even longer than that. Still, if you want to be sure of the quality of your dehydrated meat, you should buy a professional dehydrator. We reviewed some of the best products on the market and you can read more about features and prices here.
This is how to prepare it: first of all, prepare the meat (on average, 5 pounds will end up being a quart of dried meat), wash it and then fry it in a skillet. Fry it until it’s nicely brown. Carefully remove the grease, and then wait it to drain further. You can also use a high temperature colander to further rinse the grease under water. Thus, even more fat will be washed away. Clean or wipe the skillet so it is ready to be used again.
https://youtu.be/a74Pi1p-9LA
Begin frying the meat again. Do not use any fat for this process. Ideally the meat will be chopped into pieces so that as you fry it you can roll them over and over again, thus preventing them from sticking to the skillet or getting over burnt.
They need to be brown all over, but not black, so be careful with this second frying. This step is done so that we can make sure that the water content in the meat evaporates. You will know when this is done, thanks to the steam that comes up from the meat. If there’s no longer steam coming off, then you’re ready. Be careful though, as steam comes off the food when it’s over burning and turning black.
Finally, spread all the pieces of meat on an oven pan and place it inside the oven. Turn the heat to about 200 degrees F (above 70 degrees C). Ideally, leave the oven door slightly opened so that the moisture can escape easily. Doing this oven ‘cooking’ will remove all the remaining moisture from the meat. This last step can be achieved also if you have a home dehydrator, but it will take slightly more time. Using the oven method, you need about 2 hours of drying.
This entire method can well be applied to many meat sources, like poultry, lamb, beef, turkey, etc.
As you finished with the above process, store the meat in plastic bags, preferably using an oxygen absorber to vacuum the bag. Store in a dry place or cupboard.
Fish jerky
This one can be done pretty easily. Prepare the fish of your choice and cut it in strips. Marinate it so that it has some flavor to it when done dehydrating. Ideally, keep it marinated at least 4 hours, ultimately – 8 hours. Then place each piece in cookie forms so that each piece has as much surface exposed as possible.
Make sure no fish parts are touching. Place them in the oven and set it to about 150-170 degrees F. It’s best to keep the door open for the moisture to escape. If your oven has some ventilation you can use it, but remember that the moisture needs to escape somehow.
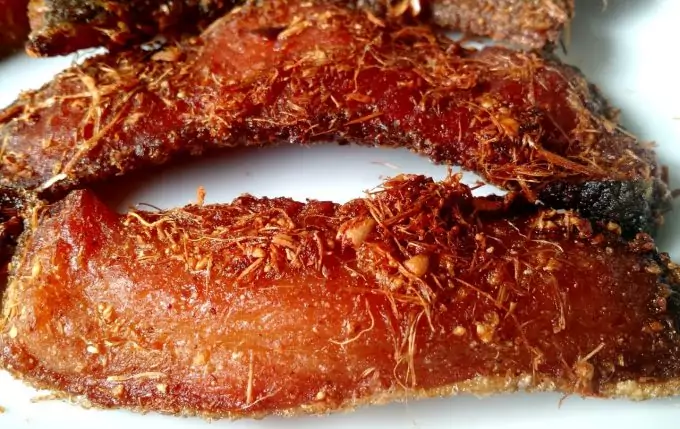
This whole process should take about 12 hours. Check regularly in the meantime how the process goes and if the fish is drying well enough. Check also for moisture and if it sticks to the meat surface or the walls of the oven. Anyway, if you keep the door open, there is little chance that moisture will accumulate anywhere inside the oven, but you can’t be too careful.
If you have a dehydrator, you can skip the oven part and directly put the fish in the dehydrator. It will take a little less time, but the process is identical.
Dehydrating vegetables
Dehydrating is a process, which isn’t different for different vegetable products. It’s basically the same, with small exceptions. For vegetables, it’s safe to try a DIY food dehydrator (electric or solar). If you want to know how to make one, take a look at our tutorial on how to dehydrate food.
Basically, you cut the vegetable to small pieces. Rinse them well before you set them to dry. When you spread them on the trays (either in a dehydrator or other method you use) make sure they are evenly spread and they don’t touch each other. Give enough space for the water to evaporate. Some people like to steam the vegetables for a few minutes just to bring out that nice strong color, so when they dry they will keep this fresh look.
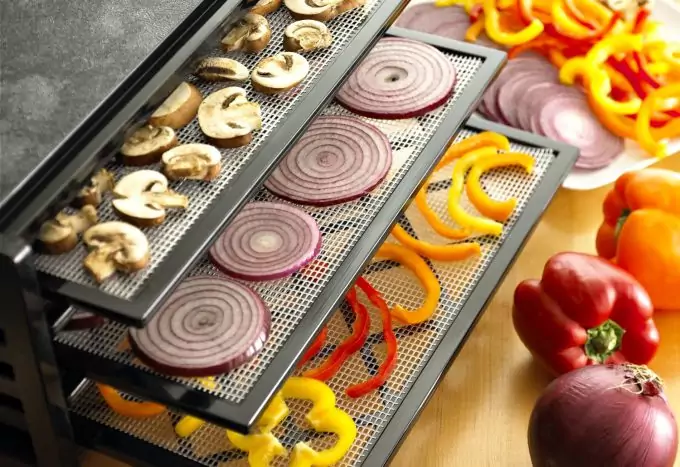
Some other vegetables like corn, broccoli, beans, etc are better off steamed beforehand since they rehydrate quickly and preserve their natural taste. Otherwise, corn and beans when dried raw will remain hard and raw even if you soak them for a while. They need a bit of cooking.
Dried tomatoes
Wash the tomatoes and let them soak for 30 minutes in a bowl of water so that the nitrites and pesticides can safely wash away. Cut the tomatoes and remove the green part where the stem was attached to the tomato. Cut the rest to small even pieces – rolls or cubes, all works fine. Leave the seeds, as they are nutritionally valuable. Basically, don’t remove anything else, even the natural juices can remain, as their vitamins and mineral will stick to the hard parts of the pieces.
[the_ad_placement id=”in-text-2-type-r”]Lay them evenly spread on trays and either use your home dehydrator, or use an oven, and keep the temperature steady at about 135 degrees F. It will take up to 8 hours for your tomatoes to be fully dried. Tomatoes, when dry, aren’t crunchy and hard like most dried food, but are more leathery and gummy in texture.
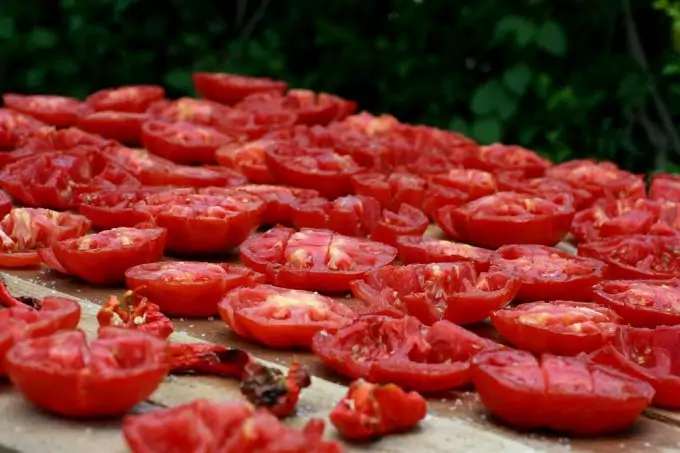
Also, during the process it is advisable that you stir them now and then to quicken the process. Also, since tomatoes let lots of juice and water when cut they may stick to the trays. To avoid that, use non-stick trays. Of course, they may still stick here and there, so when you spot such a piece, unstick it and stir it carefully.
Cherry tomatoes can be dried almost the same way, but since they don’t let that much juice when cut you may not have to necessarily use a non-stick tray. Normal one will work as well. Ideally, place the pieces with the skin facing the tray, so that the cut parts are facing up.
You can dehydrate peppers almost the same way. Cut the peppers and remove all the inside dangling flesh and seeds. The pieces should be of even size. Spread in a tray with the skin facing down. They also require about 135-145 degrees F of warmth and it takes up to 8 hours for the process to be complete.
Dehydrated celery
First, wash the celery and preferably let them soak in water for 30 minutes – this washes away nitrites and pesticides. Then rinse the celery and cut in very small rolls. You can also use a food processor so it looks almost like a thinly sliced salad in the end. You should have a nice celery mesh if you use the chopping blade of your food processor. This is much better than having to chop the celery heads by hand, since it will take a lot of time until you chop it to small enough cubes.
Spread the pieces evenly on trays and set them in the dehydrator. Usually one average tray size will be used for an entire celery head. So, measure that before you go cutting the celery. Set the temperature between 125 and 135 degrees F (52-57 degrees C). It will take slightly longer than the other vegetables to be fully dried (as celery is almost entirely water) – about 12 hours.
Finally you can also make powder out of what you dried. Use the coffee grinder (or simply your blender) and within seconds you will have a nice green vegetable powder, which you can add to soups and other meals. Basically, one tablespoon of fresh celery weighs half a teaspoon of dried celery.
Dehydrating fruits
Dehydrating or drying fruits is practiced since time immemorial and there are lots of techniques. We have a great article on methods to dry fruits that can teach you a bit more. But, for now let’s start with apples, as they are easy. Take as many apples as you plan to dehydrate. Wash them well, or leave them in a bowl full of water to soak a little, to remove any chemicals (they are water-soluble). Wait about 30 minutes and take them out. Use an apple peeler if you have, or do it by hand, but you need to peel the apples.
When you’re done peeling, cut the apples in tiny rolls and remove the core of the apples including the seeds. Cut each roll in half so that you end up having half-moon shapes. Take the pieces and put them in a bowl of water with Fruit Fresh solution. Follow the instructions on the product to get the best results. The apples will soak and remain fresh as you let them in the solution. Best not to leave them in for more than 40 minutes.
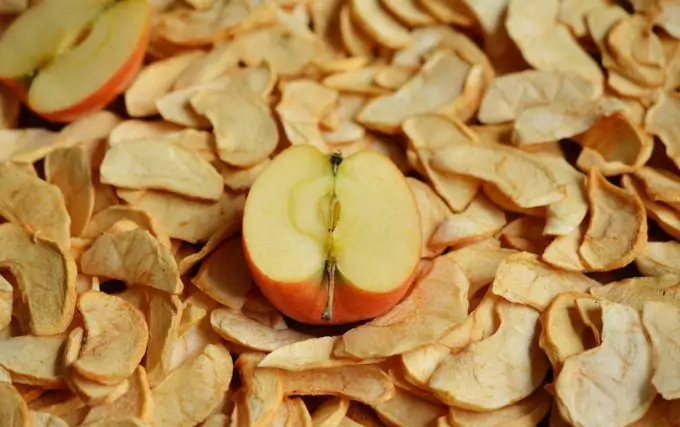
Remove the apple pieces and you’re ready to place them in the dehydrator. The ideal temperature would be around 135 degrees F. At this temperature you’re dehydrated apples will be ready within 8 hours. If you don’t have a dehydrator, the oven will be just as useful in this case. Again, leave the door open a bit to let the moisture escape.
The recipe is almost the same with bananas. Cut the bananas in rolls and you’re ready to set them to dry. No need for soaking or washing beforehand, as you remove the peal anyway. Bananas may require from 6 to 10 hours of dehydration, again at 135 degrees F.
If you don’t want to dehydrate your fruits at such high temperatures, so as to preserve some of the more fragile vitamins, you could set a lower temperature, like 115 degrees but then you’ll have to wait slight longer – up to 12 hours. This applies both for the apples and bananas. It may also be true for other softer fruits.
Dehydrating pineapples
This one may be a bit tricky as it involves preparing the pineapples before you set them to dry. Cutting and peeling the pineapples takes the most time.
Prepare about 20 pineapples (best if they are on sale for a low price). This will give you on average 9 trays (depending on how large or small your dehydrator or oven is). Remove the green heads of the pineapples. Then start slicing the sides but make sure not to cut too deep and remove too much of the flesh. There are pineapple cutters but it often cuts deep and removes a lot of the flesh. Better off wear some kitchen gloves, as pineapples are slippery when you’re cutting them.
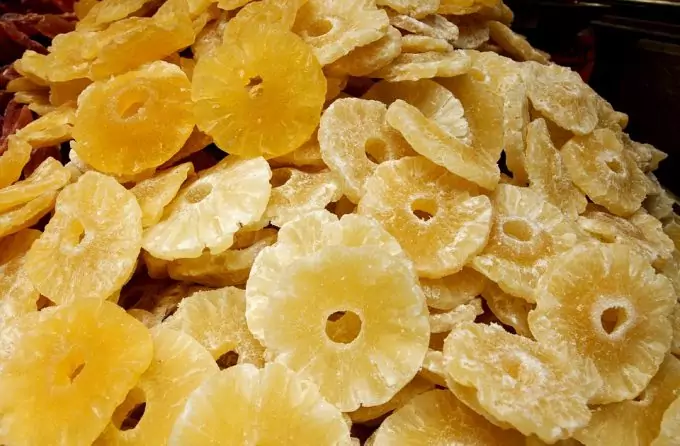
When you’re done with the outside layer, cut the pineapples through the middle to the length so you end up having 4 quarters of each pineapple. Then you need to remove the thicker inner core of the fruit. It’s edible and nutritionally beneficial but unless you’re juicing, you may want to remove it. So cut it out and then you’ll finally be left with the sweetest and juiciest pineapple flesh. Start cutting slices off each quarter, similar to the way you cut the apples and bananas – you need to have thin slices, about 1/8 inch.
When that is also done you’re ready to lay them in the trays. There is a lot of water content in this fruit and it will take up to 14 hours to have them ready. The temperature is again around 135 degrees F.
Dehydrating blueberries
This recipe is also easy and doesn’t take much time to prepare. There are two ways to dehydrate blueberries. First, you can just wash them and place them on the trays to dry, or (and the better option) you can set them to blanch for a little while.
Here is how. Start boiling some water and as it starts simmering, put the blueberries in. Let them stay there very shortly, no more than half a minute. You only need to shock them. This is called blanching. This will make them smoother and less crunchier, and will even give them a raisin texture. Otherwise, they will remain hard and chewy.
So, after 30 seconds, move them quickly in icy cold water. Next, set them in a sieve and let them drain as much as possible. Basically that’s all. Then you lay them evenly on the dehydrator trays. Since they are small fruits, the time required can be around 6 to 8 hours, on 135 degrees F.
Dehydrated mango
Mangos are very sweet and even dried they keep their sugary content. Commercial dried mango unfortunately has unpleasant additives like sulfur dioxide and added sugar. It avoid that, you can very easily make your own dried mango.
When cutting the fruit you better use kitchen gloves to prevent it from slipping. The flesh is very juicy and slippery and this may cause you to cut your fingers.
[the_ad_placement id=”in-text-3-type-r”]Start by peeling the mango. Then cut it at its length in strips. Aside from the mango, prepare a simple natural solution by using honey and lemon. This will substitute the sulfur and added sugar most manufacturers use.
So, squeeze a whole lemon in a small bowl and add honey to it. Stir until you have a homogenous mixture. Dip each mango strip in this solution as you prepare them for the dehydrator.
As this is done, arrange them on a non-stick paper and lay them on the dehydrator’s trays. Optionally use the oven.
Set the temperature around 135 degrees. It may take around 12 hours at most for the mangos to be dully dehydrated. We advise you to check them every hour after the 8th hour mark. They may be ready within less than 10 hours. It all depends on the water content in the fruit.
Dehydrating ginger
Yet another easy and tasty recipe. You have a few options about cutting the ginger to pieces – either you grate it or you chop it in rolls/slices. Either way will work.
So first of all, peel the ginger roots you have prepared and pick your choice – grate or cut them to slices. The only single problem with cutting in disc shapes is that you have to cut them very thin and this may be a bit tricky, since ginger tends to be slippery. This may be a bit of a danger to your fingers, unless you use special kitchen gloves to protect your hands and stop them from slipping in your grasp.
As you chopped/grates the ginger, the pieces are ready to be spread on a non-stick paper and laid on the trays. Ginger dries very quickly so you need to be around it to observe for changes in their structure. It’s a good idea to turn them around every 30 minutes. You may be surprised to know that within 2 hours they may be ready, either chopped in discs or grates, so as you set them on, don’t leave for too long and check for changes.
To be ready within two hours, you need to set your dehydrator to 95 degrees F. Slightly higher temperatures will leave you much faster with dehydrated ginger.
As a bonus, if you want to have ginger powder, use your coffee grinder or blender, or even better spice grinder. Since ginger has very hard fibers it may take some time to grind them to powder, but it’s worth it. You can use for soups, meals and even teas.
Dehydrated garlic and onion
Here is another spicy recipe. For the garlic you need 1-2 heads of garlic. Peel all the cloves of each head, and start chopping/cutting the garlic. You can also simply mash with the back of a spoon or you could use some other similar method, but you need to end up having very small pieces of garlic.
When you’re done with that, place them in a tray and put in the oven. Set the temperature at 150-200 degrees F. It can take about 2 hours to have them perfectly dry and ready to use. You can grind them in a food processor or coffee grinder to end up having garlic powder. This is a much better option than using commercial garlic powder as it contains other preservatives and suspicious additives.
This recipe is about 1-2 heads, but if you want to stock much larger amounts of garlic powder, simply repeat the recipe for all the garlic heads you have.
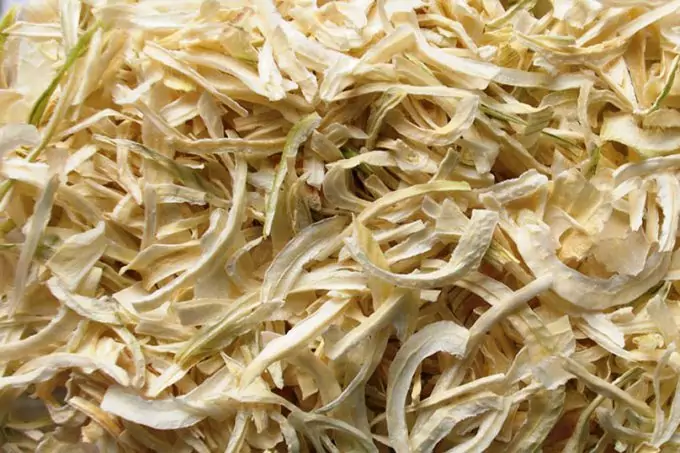
About the onions – for starters, take one onion head. Cut it in small slivers, they should be less than a quarter inch. Again you can use some peeler to make sure you end up having thin like paper garlic discs. The oven/dehydrator should be preheated to (again) 150-200 degrees F. Spread the rolls/discs on a baking paper (and if you want you can use a non-stick paper) and wait an hour or two for the process to complete.
To have powder, again use an electric or spice grinder. If you need a larger amount, repeat the recipe with the amount of onions you have at hand.
Dried stevia leaves
This is an easy recipe and you can end up having a sweetener for your tea or other cooking recipes. Use the stevia leaves for the dehydration process. Place them in the sun, ideally use a solar dehydrator since the temperatures don’t rise that high when dehydrating at home, and it’s much more natural. If you let the leaves in the solar dehydrator, it can take no more than 12 hours for your stevia to be ready. You can then grind it with the back of a spoon or even between your fingers to have a nice powder. Sprinkle in salads, teas, morning muesli, etc.

Image credit: stevina.vn
The above recipes may vary depending on your food sources, water content etc. and yet, they can be applied to many other vegetables, fruits and spices. You can experiment further with what food you have at home and document the results, so you can repeat the recipe or improve the steps. Enjoying your own homemade dried food while camping is priceless.


I have been looking for alternative cooking methods and these recipes seems like a very good place to start. Food is very important in camping and I think I just found the perfect method to get that covered.
I enjoy eating dehydrated fruits, especially mango – even at home. But they are more expensive compared to the fresh ones because their water content was removed so they weigh less. However, because they don’t have water, they are sweeter and the sugar sits on my teeth. I think dehydrated foods are good for climbers or hikers, but if you are trying to survive, I like the fresh ones better – they are the best choice for me. :)
Dehydrated foods is mostly for emergency purposes. I still find the value of having freshly cooked food while out camping.
I tried dehydrated mangoes once and they are so good.